Showing posts with label woods. Show all posts

Sunday, November 10, 2019

“But If You Do Get Lost”, Outdoors USA: 1967©


The cover of Outdoors USA: 1967

 
An excerpt from “But If You Do Get Lost”, Outdoors USA: 1967, by Kenneth M. Cole, page 89.

  
Authors Note – to read part one of this series “How Not To Get Lost”, Outdoors USA: 1967, by Charles Elliott, click HERE

How Not To Get Lost” and “But If You Do Get Lost” are my two favorite articles in Outdoors USA: 1967; which is a fantastic book full of great articles!  However, as I wrote in part one, it is a hard book to find.  So, I thought I would show case both of these articles and include a link to a PDF copy to the entire book.  This week’s installment is about the article “But If You Do Get Lost”, by Kenneth M. Cole.  The author, of “But If You Do Get Lost”, in 1967; was the Director of the Schiff Volunteer Training program at the National Training Center for the Boy Scouts of America and he packed this article full of valuable survival tips, like the ones below.

 
An excerpt from “But If You Do Get Lost”, Outdoors USA: 1967, by Kenneth M. Cole, page 89 to 90.

And then there is…

 
An excerpt from “But If You Do Get Lost”, Outdoors USA: 1967, by Kenneth M. Cole, page 91.

And…

 
An excerpt from “But If You Do Get Lost”, Outdoors USA: 1967, by Kenneth M. Cole, page 91.

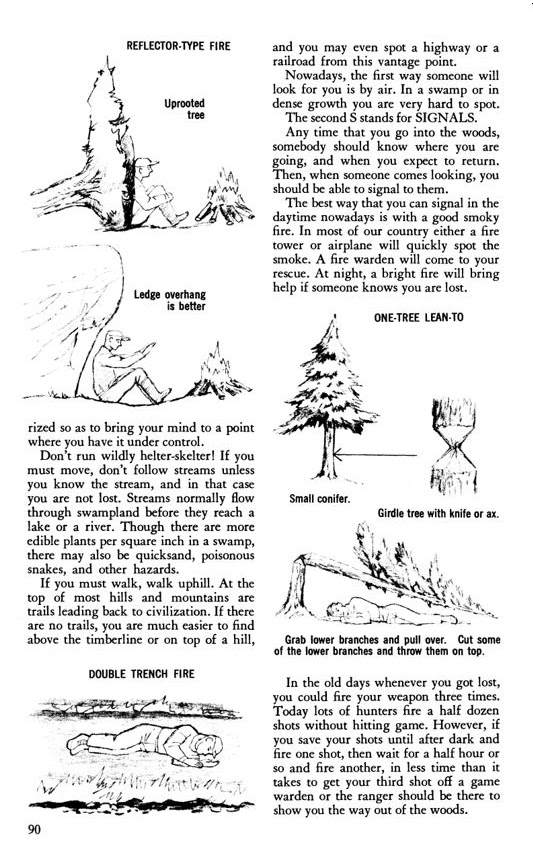
And I really loved the illustrations like this one…

 
An illustration from “But If You Do Get Lost”, Outdoors USA: 1967, by Kenneth M. Cole, page 91.

 
An excerpt from “But If You Do Get Lost”, Outdoors USA: 1967, by Kenneth M. Cole, page 91.

  
And many more including a discussion of the 5 S’s from the Boy Scout “Lean On Survival Training”.  I hope that you enjoy reading the entire article as much as I did.


The article can also be read HERE, pages 89 to 91.


I hope that you continue to enjoy The Woodsman’s Journal Online and my videos at BandanaMan Productions and don’t forget to follow me on both The Woodsman’s Journal Online and subscribe to BandanaMan Productions on YouTube, and if you have questions, as always, feel free to leave a comment on either site.  I announce new articles on Facebook at Eric Reynolds, on Instagram at bandanamanaproductions, and on VK at Eric Reynolds, so watch for me.


Sources

United States Department of Agriculture, Outdoors USA: 1967 Yearbook of Agriculture, [United States Government Printing Office, Washington, DC, 1967], p 87-89, https://archive.org/details/yoa1967/page/n3, accessed 11/02/2019


Sunday, October 6, 2019

Moose Antlers…Why Don’t You Ever Find Them? ©


A bull moose, feeding at the mouth of the Galipo River and Pen Lake, Algonquin Provincial Park, summer of 2014, courtesy of Steve Burgeson


I have been adventuring in Algonquin Provincial Park since I was a kid in 1978.  It wasn’t until this summer that I finally found a moose antler in the woods.  It isn’t that I haven’t been looking for them, I have, for 41 years!

Discarded, or shed, moose antlers are hard to find, and I will tell you why; but first, let us back up a bit.


A shed moose antler, found during the summer of 2019, on the shore of Welcome Lake, near the beginning of the Galipo River.


Every spring bull moose begin to grow new antlers to attract cow moose, to show rivals who is the biggest bull in the bog and come fall to fight with.  Big antlers are the moose equivalent of bling or a tricked-out truck and show other moose, the owner’s social status, dominance and quality as a mate.  Moose antlers are among the fastest growing animal tissue in the world and antlers grow from nothing to over 44 pounds (20 kg) in just 160 days!  While they are growing, a moose’s antlers are covered with soft skin called “velvet” and are easily damaged.  Before the beginning of the breeding season, which starts in late September, when the antlers are done growing, bull moose will rub and scrape the velvet off their new antlers on a handy tree trunk.  Unfortunately for the moose, his antlers are heavy, awkward, cumbersome and make it difficult to move through the woods and avoid predators; especially during the winter.  Every year as winter begins and the breeding season ends, bull moose lose or shed their “disposable” antlers.  When winter ends and spring begins, bull moose begin to grow new antlers and the cycle begins again.

So why is it so hard to find shed antlers?  Because antlers are mostly made of calcium and phosphorus and these two elements are uncommon in the wilderness.  For this reason, many animals will scavenge antlers as soon as they fall to the ground.  Porcupines, squirrels, mice and other rodents are quick to gnaw on them for the minerals that they contain.  Wolves also like to chew on discarded antlers, much like dogs like to chew on bones and for the same reasons.  Chewing on the antlers helps to clean their teeth and provides them with a much-needed vitamin supplement.

Shed moose antlers are also the home, feeding ground, nursery and battlefield for antler flies, protopiophilia litigate, a tiny, little fly that was only officially discovered in 1988.  In the spring male antler flies will claim a section of a discarded antler and will defend it against all commers and the females, after mating, will lay their eggs in the cracks and pores of the antler.  The hatched eggs in turn will become small maggots, feeding on the bone marrow within the antler.  The maggots will remain inside of the antler until they are big enough to spring to the ground near the antler, where they will develop into adult antler flies and begin the cycle all over again.

The reason why shed moose antlers are so hard to find in the wilderness, is that they are such a valuable resource and usually they have already been found by the forest animals and insects and have been consumed.

So, if you do find a shed antler, remember that it is someone else’s home or lunch or multi-vitamin and leave it where you found it.  Take away only pictures, keep only memories.

I hope that you continue to enjoy The Woodsman’s Journal Online and my videos at BandanaMan Productions and don’t forget to follow me on both The Woodsman’s Journal Online and subscribe to BandanaMan Productions on YouTube, and if you have questions, as always, feel free to leave a comment on either site.  I announce new articles on Facebook at Eric Reynolds, on Instagram at bandanamanaproductions, and on VK at Eric Reynolds, so watch for me.


Source

Angell, Chris; “One Moose’s Trash is Another Fly’s Treasure”, The Raven, Vol. 60, No. 2, July 1, 2019 [Queen’s Printer, Ontario, Canada, 2019]

Van Ballenberghe, Victor; “Rutting Behavior of Moose”, Series: Denali Fact Sheets: Biology, [National Park Service, U.S. Department of the Interior, February 5, 2015], https://www.nps.gov/articles/aps-v5-i1-c7.htm, accessed 10/04/19


Friday, December 21, 2018

An Emergency Survival Pot or Boiling Water in Tinfoil


The New and Improved Emergency Tinfoil Pot, Photo by the Author

The idea for this article started with an essay for a couple item survival kit that I have been working on.  This survival kit includes tin foil, which can be used for many survival tasks, from signaling, as an emergency head covering, as heat reflector to throw heat from your fire towards you, or as an emergency survival pot, in which to boil water and kill any disease causing organisms in it.

The book, Games And Recreational Methods For Clubs, Camps And Scouts, first published in 1924, had on page 352, a detailed description how to make a shallow pot from heavy paper or birch bark, to boil water for tea in.  I found several other early examples, explaining how to create a shallow pan for cooking in the wilderness, one that suggested using tin foil to create a shallow pan for frying.  So, I decided to build one and test it.

To build a shallow cooking pan, take a square piece of tin foil, regular or heavy-duty, either eight or twelves inches square.  First, fold it across the corners from A to D: it is very important for the piece of aluminum foil to be square so that it folds diagonally, easily.  Next, unfold it and fold it again diagonally from B to C.  Now, unfold it again, and then fold up all four sides, one inch in from the edges, at EF, GH, IJ and KL.  The diagonal folds will help make corner pleats, which should be folded flat against the outside of your pan.  You need to pin or clamp the corner folds down with a split green stick, and then your shallow cooking pan is done.


Folding Diagram for Tinfoil Pan, Drawing by the Author
Step One, Photo by the Author


Step Two, It is important to fold the corner pleats flat against the outside of your pan, Photo by the Author

Finished Tinfoil Pan, Photo by the Author

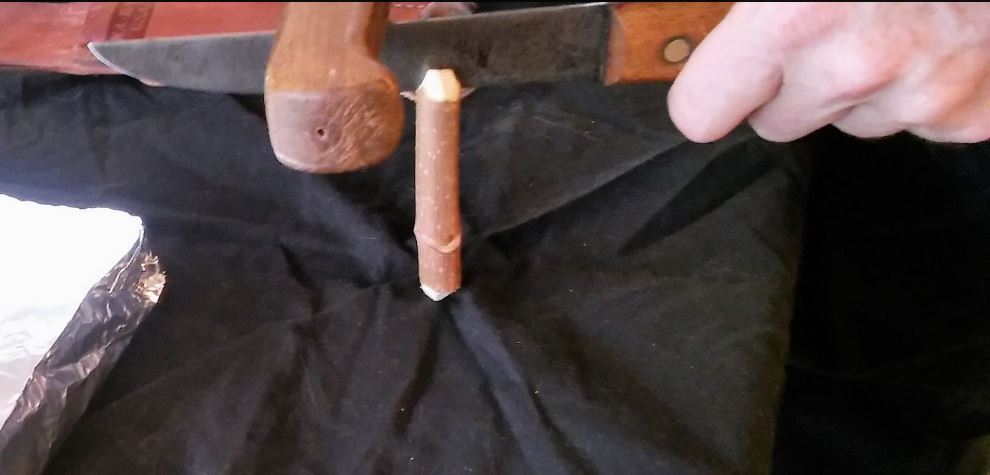
To make split stick corner clamps, cut four sections from a green stick that is between ¼ and ½ inch thick into lengths about two or three inches long.  Using a fixed blade knife, split the stick down the middle by batoning the blade with another stick: the splits should be no more than 1 to 1-½ long.

Peg Making, Needed Supplies and Tools, Photo by the Author

Peg Making, Step One, Batoning the Peg, Photo by the Author

Peg Making, Step Two, Finished Peg, The small stick pushed into the split, keeps it open until you have slid the peg over the tinfoil, remove the stick to close the peg, Photo by the Author


It was damp and cold when I tested out this model of tin foil pan, I started a fire and let it burn down to coals, which I raked forward while keeping the fire lit behind it.  The pan that I built was made from a 12-inch-by-12-inch piece of heavy-duty, aluminum foil, and I was not impressed with this pan: it did not hold much water, it tended to buckle and spill water into the hot coals and it accumulated ash, bark and other fire debris.  It was not a complete failure, the water did start to boil, but it just was not a complete success, either.  For a video of this aluminum foil pot in action, see my YouTube channel at https://youtu.be/QQKbzjnBOYs

Test of the Tinfoil Pan, Photo by the Author

Therefore, I went back to the drawing board and came up with a different design.  I started with a piece of heavy-duty, aluminum foil, 24 inches long by 12 inch wide, that I folded in half so that I had a 12-inch-by-12-inch square of doubled aluminum foil.  Next, I folded over a ½ inch on both of the two sides, AB and GH, and then I folded over a ¼ inch on both of the same two sides again, twice at CD, EF and IJ, KL, to make sure I had a good seal.  To make the pot stand upright, I folded over diagonally, 2 inches on each of the bottom corners, MN and OP, and then flattened the bottom of the pot.  Lastly, I folded the top ½ over at QR and then folded the top ¼ over again at ST, to make a rim.  When done the pot is about 9 inches tall and about 4-½ inches around at the top.

Folding Diagram for Tinfoil Pot, Drawing by the Author

Step One, Photo by the Author


Step Two, Photo by the Author

Finished Tinfoil Pot, Photo by the Author

I tested this aluminum foil pot on a new fire, on a different cold rainy and day and had much better results.  This pot, although it took a lot more folding to make it, is much sturdier, more stable, does not spill water over the rim onto your fire and it holds well over a quart of water.  In addition, while it doesn’t hurt to rake coals out for it to sit on, you can put the pot at the edge of the fire and let the flames heat the closest side, for quicker results than you would get with the shallow pan.  For a video of this aluminum foil pot in action, see my YouTube channel at https://youtu.be/nVPosvejZY0

So, if you are “misplaced” in the woods and you forgot to bring a pot or big cup with you, I hope that you remembered to pack several feet of aluminum foil in your survival kit, that way you build an aluminum foil pot and boil and kill any disease causing organisms in your water, so that you can safely drink it.

Sources:

Charles F. Smith, Games And Recreational Methods For Clubs, Camps And Scouts, [Dodd, Mead and Company, New York, 1925], p. 352