Sunday, May 29, 2022

Making a BandanaMan Emergency Bracelet ©


Examples of string that you might have with you in an emergency in the wilderness, A) a chain knotted line 108 inches (approximately 274 cm) long, that you might include in your emergency supplies; B) two shoe-laces, each 55 inches (140 cm) long; and C) a BanadanaMan Emergency Bracelet, that contains 172 inches (approximately 437 cm) of string, and which is only 14 inches (35 cm) long when looped into a chain knot.


Larry Dean Olsen, wrote in Outdoor Survival Skills, that “Strange as it may seem, a piece of string can become the most important item in a survival situation, for the construction of nearly everything requires this simple item”.


It’s true and it’s much easier to build the frame of a three-pole lean-to if you have some string to whip together a quick survival tripod1.  But how often on your journeys through the wilderness are you without this vital bit of equipment?


An illustration of a three-pole lean-to from the Arctic Survival Guide, by Alan Innes-Taylor, page 55.


One of the problems with taking string with you on your journeys in the wilderness, is keeping it from becoming a messy tangle in your pack or pocket.  But, if you make and always remember to wear a BandanaMan Emergency Bracelet, then just like a Boy Scout you will always be prepared and will have this important tool to hand in a nice, neat package.


Making a BandanaMan Emergency Bracelet


A chain knot, an excerpt from the The Ashley Book of Knots, page 472.


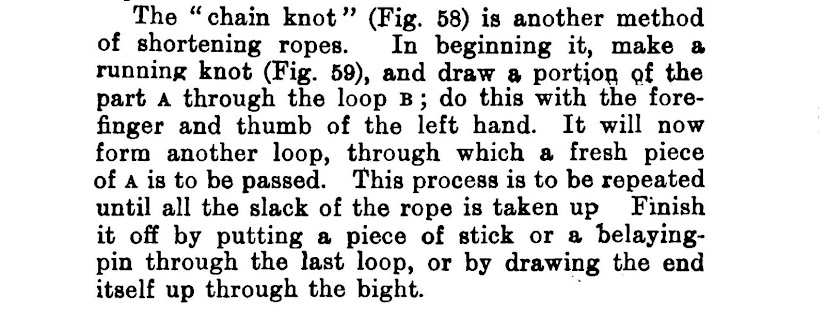
An emergency bracelet can be made from any length of line, by simply looping or braiding, it with a “chain knot”, which is also known as a “chain sinnet”, and, according to The Ashley Book of Knots, on page 472, is a “a uniform series of single loops and is completed by drawing the working end through the final loop, which prevents raveling”.  This knot is a method of shortening a line, and is also known as a “monkey chain, monkey braid, single trumpet cord, single bugle cord, chain stitch, crochet stitch, and chain braid 2.


Nylon line, photograph by the Author.


To get started making a bracelet like the one labeled “C.” in the front picture, start with 172 inches (approximately 437 cm) of orange nylon string3, and double it over so that you have two strands, which measure 86 inches (218 cm) long.  Now, fold it over again so you have four strands which measure 43 inches (109 cm) long and make an overhand knot in both ends4, as in the picture below.


An overhand knot, an excerpt from the The Ashley Book of Knots, page 14.


Your twice doubled line with an overhand knot tied in each end.  Photograph by the Author.


Now about three inches (7.5 cm) from each end tie another overhand knot, so that your line looks like the picture below.


Your twice doubled line with an overhand knot at the end and one three inches (7.5 cm) in from the end, on both sides.  Photograph by the Author.


Now it is time to start looping your twice doubled string into a BandanaMan Emergency Bracelet using a chain knot.


Author’s Note -- to demonstrate making the chain knot, in the photographs below, I will only use one line, as it makes it easier to follow the pictures. 


An overhand knot (top) and the beginning of a chain knot, which is just an overhand knot with a loop pulled through.  Photograph by the Author.


Tying a chain knot, excerpts from Knotting and Splicing Ropes and Cordage, by Paul Nooncree Hasluck, Page 51-52.


To make your bracelet, start your chain knot at the overhand knot that you tied three inches (7.5 cm) in from the doubled end of the line.


Start you chain knot just past the overhand knot tied three inches (7.5 cm) in from the doubled end of the line.  Photograph by the Author.


There are two ways to start your chain knot, you can either wrap the line around your index and middle finger, and with your other hand pull a loop of the working end under and through the loop wrapped around your fingers, as below.


Steps one and two in starting a chain knot, a loop of line wrapped around your index and middle finger, and a loop of the working end of the line pulled through.  Photograph by the Author.


Or, if you prefer, you can simply make a loop and then pull a pull a loop of the working end behind and though your first loop, as below.


Steps one and two in starting a chain knot, make a loop and pull a loop of the working end behind and though the first loop.  Photograph by the Author.


Continue to pull loops behind and through the previous loops.  Keep looping and re-looping the working end of your line until your chain knot has reached the desired length.


Steps three and four, snugging down the first loop and pulling the third loop through the second loop.  Photograph by the Author.


There are some applications where a loose series of loops is preferred to a tight series of loops.  However, when making a BandanaMan Emergency Bracelet, a tight series of loops is best, so make a tight braid, by pulling tight and snugging the previous loops as you go. 
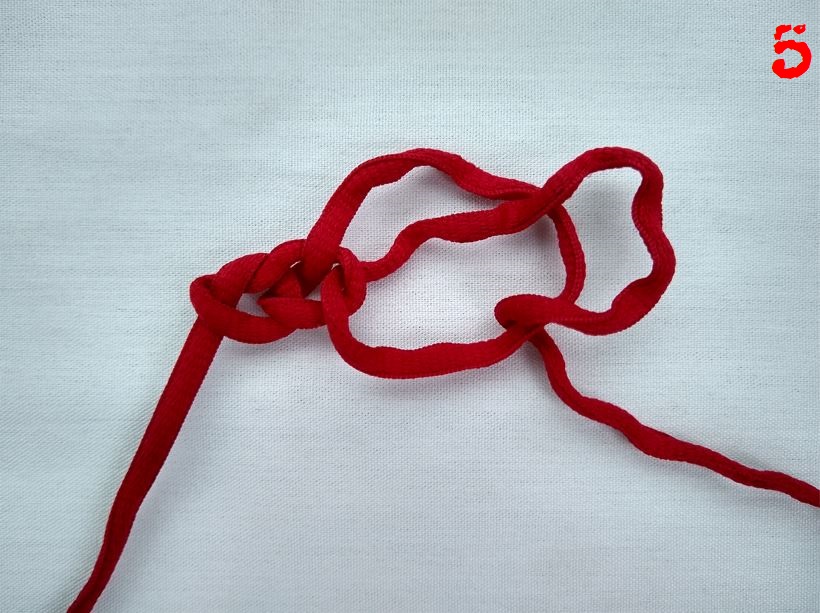
 

Step 5, keep pulling a loop behind and through the previous loop, until you have you have braided as much line as you need.  Photograph by  the Author.


Finishing the chain knot by drawing the end through the final loop, an excerpt from Knotting and Splicing Ropes and Cordage, by Paul Nooncree Hasluck, Page 51-52.


Next, as you near the overhand knot that you tied three inches (7.5 cm) from the end of the bracelet, simply draw the working end of the line through the final loop, like in the photographs below, this will keep your chain knot from unraveling.


Finishing up your BandanaMan Emergency Bracelet by drawing the working end through the final loop.  Photograph by the Author.


And to complete your BandanaMan Emergency Bracelet, tie a square knot to join the ends of the bracelet together between the two overhand knots which your tied earlier, three inches (7.5 cm) from the ends.  You now have 172 inches (approximately 437 cm) of line, which because it has been finger-looped into a chain knot and shortened, now measures only 14 inches (35 cm) long, in an easy to wear bracelet.  And as long as you remember to always wear it or throw it into your pack or pocket, you will always have string with you as you adventure through the wilderness.


The finished BandanaMan Emergency Bracelet.  Photograph by the Author.


Don’t forget to come back next week and read “Washing Your Sleeping Bag ©”, where we will talk about how to clean your sleeping bag and get ready for the summer wilderness season.


I hope that you continue to enjoy The Woodsman’s Journal Online and look for me on YouTube at BandanaMan Productions for other related videos, HERE.  Don’t forget to follow me on both The Woodsman’s Journal Online, HERE, and subscribe to BandanaMan Productions on YouTube.  If you have questions, as always, feel free to leave a comment on either site.  I announce new articles on Facebook at Eric Reynolds, on Instagram at bandanamanaproductions, and on VK at Eric Reynolds, so watch for me.


That is all for now, and as always, until next time, Happy Trails!


Notes


1 For more on survival tripods, see “How To Make A Survival Tripod ©”, HERE.


2 From The Ashley Book of Knots, by Clifford W. Ashley, page 472


Copies of The Ashley Book of Knots are available from most bookstores as it is still in print, and it is also available at used bookstores.  An excellent PDF copy is available HERE


3 Don’t forget to use a lighter or match to melt the cut ends of your nylon string to prevent it from unraveling.


4 If you want to make a fob or a lanyard instead of a bracelet, leave enough space between the overhand knot and the doubled end of the line to put a carabiner through the loops.


Sources


Ashley, Clifford W.; The Ashley Book of Knots, [Geoffrey Budworth, Kent, England, 1993], page 472, https://www.liendoanaulac.org/space/references/training/Ashley_Book_Knots.pdf, accessed January 25, 2022


Hasluck, Paul Nooncree; Knotting and Splicing Ropes and Cordage, [David McKay, Publisher, Philadelphia, PA, 1912], page 51-52, https://books.googleusercontent.com/books/content?req=AKW5QadbkrmBx1Gbt4sXfsubEY1Yuq59o5ydbt5SVplV3e8TM4myCFqis5bVfvEV0s-OvwU5BGbaRJcUGrxnzC7Asu1o6uXg62MvTbBQ_6QYOYckKpGoiqHzbVyoAU66wZ0JnfA4CFwlarClPIOfsXJtL241YGwdSq8QP4JVmlXseXQKcnUBebmDlnQU5GLULW42r9WlDMqAZ0679kpgvlvS8sYEFqoXRgHj9hdJuBHcvLagnY8TexhtJKTcbVSsNQEx1uaBeUiT0hMs0kb-cMldIr69Q0lNyu0XQduelZjK7KRd7eNivL0, accessed January 27, 2022


Olsen, Larry Dean; Outdoor Survival Skills, [Pocket Books, New York, 1976], page 198


Sunday, May 22, 2022

Could You Survive, Survival Priorities©


An excerpt from “Could you survive?”, in the Spokane Daily Chronicle, page 24, September 8, 1981, HERE.


Which of the following should be given first priority when planning for possible survival situations”, is the question posed to us by the author of the September 8th, 1981, installment of “Could you survive”?  What is the first thing that you would pick to take with you, would it be “A. food, B. water, C. fire starting materials, or D. emergency shelter materials?


According to the author, who was an Air Force Survival School instructor at Fairchild AFB, the answer is “C. fire starting materials”.


By the way, did you get the right answer”?  It doesn’t really matter if you did, or if you didn’t, lets take a closer look at this question and see what we can learn.


“The Rule of Threes, graphic by the Author.


“The Rule of Threes”, is a survival maxim that is lists and prioritizes survival actions, it was originally developed, so the story goes, by the U.S. Military, to act as a framework to help you take survival steps in the right order.  It lists your most important survival need, after air, as fire and shelter.


“The Rule of Threes” points out that you will need to establish fire and a shelter within three hours of being dropped into a survival situation.  This is not an absolute deadline, it was created to help you prioritize your activities - depending on the climate you might have more than three hours, then again, you might also have significantly less!


I usually teach that you should build a shelter first, or at least find a windbreak before attempting to light a fire, because a shelter or a windbreak will make it easier to start and sustain your fire.  Plus, it easier, and smarter, especially if your fire-starting supplies are limited, to only build your fire once and place it in front of your shelter.  So going by that logic, you might have thought that the correct answer was “D. emergency shelter materials


However, what action to take first in a survival situation wasn’t the question the author of this 1981 newspaper column asked, he asked “Which of the following should be given first priority when planning for possible survival situations: A. Food, B. Water, C. Fire starting materials, or D. Emerge cy shelter materials”?  In other words, what is the first thing you plan on putting into your pack, pocket, or survival kit before heading out into the wilderness?!


And now for the rest of the story, an excerpt from “Could you survive?”, in the Spokane Daily Chronicle, page 24, September 8, 1981.


The author of the column very correctly felt that the ability to make and sustain a fire is critically important to survival in the wilderness.  You might not die if you can’t get a fire going, but your chances for continued survival and your comfort will be vastly diminished without a fire.  Fire was and still is a technology that is hugely important to survival in the wilderness.  Without a fire, you can’t disinfect your water1, you can’t harden wooden tools, like spears and fishing harpoons, you can’t cook food, heat your shelter, or make smoke and fire signals to call for help, among other things.  Being able start a fire is also a huge psychological help, which will help you combat fear and panic that is often brought on by stressful survival situations.


An excerpt from “Could you survive?”, in the Spokane Daily Chronicle, page 24, September 8, 1981.


So, before you leave for the wilderness, you should always plan and bring with you at least one way of starting and building a fire.  Personally, I always have a lighter and a small roll of toilet paper2 in a waterproof bag in a pocket my vest or life preserver and I always a survival kit, that has three different ways of starting a fire in it as well as windproof candle3, some cotton balls, a packet of Landsmann Fire Starter, one piece of a Coghlan's Waterproof Fire Stick, and some tubes of triple antibiotic ointment which being mostly petroleum jelly can be used in a pinch to help sustain a just started fire.


The contents of the comfort pouch that I keep in a pocket of my vest or life preserver.  Clockwise from the top, a micro first aid kit, two spare Ziploc® quart bags, a pump spray bottle of insect repellant, a headlamp, a small roll of toilet paper, a BIC lighter with three feet (1 meter) of duct tape wrapped around it, and a 50 SPF broad spectrum sunscreen stick, all kept in two plastic Ziploc® quart freezer bags, all of which weigh 8 ounces (227 grams).  Photograph by the Author.

The contents of the Author’s survival kit, 1) Fire starting supplies, (from bottom left to right), a mini plastic Ziploc® bag containing two CakeMate® Relight trick birthday candles and four UCO Stormproof matches and a striker; a metal match; a BIC Mini lighter, one packet of Landsmann Fire Starter; one piece of a Coghlan's Waterproof Fire Stick; and some cotton balls.  2) Multiple use aluminum foil, two, 1 foot (30 cm) square pieces.  3) First aid, one antibiotic ointment packet and three Band-Aid Butterfly Closures.  4) Water storage and Disinfection, one Reynolds® Slow Cooker Liner, 13 x 21 inches (330 mm x 533 mm), holding up to 6.5 quarts (6 liters).  5) Food gathering and repair, one mini fishing kit, which contains 5 hooks and 5 split shot sinkers, two large safety pins, a needle and two feet (60 cm) of thread, and that has just over 26 feet (8 meters) of monofilament fishing line wound around the outside of it.  6) Signaling and direction-finding, (from bottom left to right), a Fresnel lens, a compass, a signal mirror, and a signal card.  7) Food gathering and repair, 17 feet (5 meters) of 12-pound test fishing line.  8) Signaling, one Maglite Solitaire LED Flashlight.  Photograph by the Author.


Don’t forget to come back next week and read “Making a BanadanaMan Emergency Bracelet ©”, where we will talk about string, why it is important to always have some in the wilderness and how to make a BandanaMan Emergency Bracelet!


I hope that you continue to enjoy The Woodsman’s Journal Online and look for me on YouTube at BandanaMan Productions for other related videos, HERE.  Don’t forget to follow me on both The Woodsman’s Journal Online, HERE, and subscribe to BandanaMan Productions on YouTube.  If you have questions, as always, feel free to leave a comment on either site.  I announce new articles on Facebook at Eric Reynolds, on Instagram at bandanamanaproductions, and on VK at Eric Reynolds, so watch for me.


That is all for now, and as always, until next time, Happy Trails!


Notes


1 Boiling water is the best way to disinfect water.  Disinfected water is not purified water as it might still have harmful dissolved chemicals in it, however the heat of boiling will have killed most if not all the protozoa, bacteria, and viruses in it.  The CDC considers boiling water to be the best way to disinfect it.  For more on water disinfection and boiling read “Water Disinfection: When is boiled, boiled enough…? ©”, HERE, “True or False, You Should Drink Water From The Spring Where Horses Drink?©”, HERE, and “Fire Burn and Cauldron Bubble...The 5 Stages of Boiling©”, HERE.


2 Toilet paper isn’t just for going to the bathroom, it can also be used as tinder to get your fire started.


3 Betty Croker or Casemate® Relight trick birthday candles are great to help you get a fire going since the wicks contain magnesium powder and will relight by themselves, if they are blown out by the wind, usually within about 90 seconds.  To put them out you must submerge them in water until the wick is cool, plan on at least 5 minutes, and to be safe an hour.  Birthday candles will burn for about 45 seconds, or about the time it takes to sing the Happy Birthday song twice, or about nine times longer than a wooden kitchen match.


Sources


“Could you survive?”, Spokane Daily Chronicle, September 8, 1981, page 24, https://books.google.com/books?id=OkoaAAAAIBAJ&pg=PA13&dq=%22spokane+daily+chronicle%22+%22could+you+survive%22&article_id=4732,1925865&hl=en&sa=X&ved=2ahUKEwjWvMbi0fTwAhXJGVkFHb5zAq44ChDoATABegQIBhAC#v=onepage&q=%22spokane%20daily%20chronicle%22%20%22could%20you%20survive%22&f=false, accessed May 14, 2022


Sunday, May 15, 2022

Wild Garlic, One of the First Plants of Spring ©


Field garlic, also known as wild garlic, allium vineale.  Photograph by the Author.


It’s early spring, maybe there is still snow on the ground, maybe not, but you see some onion like stalks in the field and when you pick one you smell onions or garlic.  Or maybe it is later spring, and you are mowing your yard for the first time, you run over and grind up some onion like greens and suddenly you smell onions or garlic.  Either case, you wonder what plant did you just stumble upon?


Field Garlic, allium vineale


Field garlic, allium vineale, photograph by the Author.


What you found was field garlic, allium vineale, an invasive non-native species of wild onion that was introduced into North America.  Field garlic is also sometimes known as wild garlic, onion grass, crow garlic or stag's garlic and it is a perennial wild onion which grows from a bulb, it was originally native to the Middle East, northwestern Africa and Europe  It was later introduced into North America and Australia where it is an invasive, noxious weed.  It is commonly found in disturbed, overgrazed, or compacted soils, like your garden or back yard.  Of the two invasive wild onions1 in North America, field garlic is the most common and can be found throughout the United States, except in the Rocky Mountains, and in Canada, except in the far north. 


From “Allium vineale L., wild garlic”, by  the Natural Resources Conservation Service; United States Department of Agriculture, HERE.


Field garlic, just like its other cousins in the wild onions or allium family, is one of the first plants to begin to grow during the spring, and in its more southern parts of its range it will sprout as early as January, in more northern range the greens will emerge through the snow from the underground bulbs later in the spring. 


“Allium vineale”, by Christiaan Sepp, from Flora Batava, Volume 2, 1807, by Jan Kops, from Wikimedia, HERE.


Characteristics of field garlic, allium vineale

* It has an unmistakable onion-like

aroma

* It grows from an aromatic underground

bulb

* It has many small six-petaled flowers

in a cluster on top of the stem

* It has smooth, thin, chive like hollow

leaves2


Field garlic, allium vineale, just like the three-cornered leek, allium triquetrum, are both invasive plants and are very difficult to get rid of.  Their leaves are water resistant, which makes them impermeable to chemical herbicides and getting rid of them by pulling them out by hand, once they have taken over an area, is an exercise in futility. 


So, what do you do you do with them”?  Well, some people eat them.  But before you start foraging for those wild greens...


Remember this rule...“When in doubt, leave the plant out”

Field Guide To North American Edible Wild Plants, page 5


Always, ALWAYS, ALWAYS, positively identify any plant before you even think of eating it, if not, you might accidently eat a poisonous look-alike plant and that can kill you, or at the very least it will make you sick!  Also, be sure that the area that you are collecting your wild plants from has not been exposed to chemicals.


When it comes to wild onions, Greene Deane, the author of the blog, “Eat The Weeds”, HERE, writes “If a plant looks like an onion and smells like an onion, you can eat it.  If a plant looks like a garlic and smells like a garlic, you can eat it”. 


“Deadly Zigadenus, Meadow Death-camas”, by Walter Siegmund, June 5, 2009, from Wikimedia, HERE.


The authors of Field Guide To North American Edible Wild Plants, further clarified this by stating that you should avoid any plant that looks like an onion, but lacks the onion smell, because it might be a poisonous plant such as the death camass, zigadenus venenosus.4  Also, there are plants that smell like onions and garlic, but don’t look like them, such as the edible, but invasive in North America, garlic mustard, alliaria petiolate.


Garlic Mustard blooming along the edge of a field within the Franklin Farm Park in the Franklin Farm section of Oak Hill, Fairfax County, Virginia”, by Famartin, April 11, 2021, from Wikimedia, HERE.


In recent years, during the early spring, people have begun to tramp through the woods looking for wild ramps, allium tricoccum, because it is considered by some to be a gourmet food.  This has, unfortunately for this native onion, pushed it to extinction in many areas it once was found in.  The problem is that this plant reproduces very slowly, in fact the average wild ramp might not produce seeds until it’s over seven years old, and then the plant might only produce seeds every other year.  And just to slow things down even further, the seeds might lay dormant for several years before germinating!3


So, if you want to gather wild onions, instead of gathering increasingly rare ramps, gather invasive field garlic instead!  The author of the article “How to Identify Edible Wild Onions - Field Garlic, Ramps, Wild Leeks and More”, HERE, suggested gathering as many of these plants as you would like.  This article, among other tips, gave the following:


“...bulbs are best gathered after the aboveground portion of the plant has begun dying back in summer or fall


Gather the greens by chopping off a clump and dicing them up to use like you would green onions or chives


The bulb of a field garlic, allium vineale.  Photograph by the Author.


So, next time you smell onions as you are walking through the spring woods or fields, or even you own back yard, you might have found some ramps, but more than likely you will have found some field garlic


For more on spring plants read “Yellow Flowers, Speckled Leaves...What Is It? ©”, HERE.


Don’t forget to come back next week and read “Could You Survive, Survival Priorities©”, where we will talk about what should be given first priority when planning for possible survival situations, food, water, shelter and fire.


I hope that you continue to enjoy The Woodsman’s Journal Online and look for me on YouTube at BandanaMan Productions for other related videos, HERE.  Don’t forget to follow me on both The Woodsman’s Journal Online, HERE, and subscribe to BandanaMan Productions on YouTube.  If you have questions, as always, feel free to leave a comment on either site.  I announce new articles on Facebook at Eric Reynolds, on Instagram at bandanamanaproductions, and on VK at Eric Reynolds, so watch for me.


That is all for now, and as always, until next time, Happy Trails!


Notes


1 The second invasive wild onion found in North America, is the three-cornered leek, allium triquetrum, which can be in the United States in California and Oregon.  Three-cornered leek will appear during the rainy season on the west coast and by April, when its flowers are in bloom, will seem to be everywhere.


2 This is unlike the leaves of the three-cornered leek, allium triquetrum, which has a three-sided, triangular stem or the leaves of ramps or wild leeks, allium tricoccum, which have one or two wide, flat, oval-shaped leaves terminating in (pink-red) stems.  These two plants are native to North America.


3 From “How to Identify Edible Wild Onions - Field Garlic, Ramps, Wild Leeks and More”, by Good life Revival


4 According to the Field Guide To North American Edible Wild Plants, page 259, which describes death camass, zigadenus venenosusAll plant parts, especially the bulbs, contain alkaloids that can cause gastrointestinal distress, weakness, loss of motor function and death ... All 12 native zigadenus species should be considered extremely poisonous”.


Sources


Elias, Thomas S. and Dykeman, Peter A.; Field Guide To North American Edible Wild Plants, [Outdoor Life Books, Times Mirror Magazines, Inc., New York, NKY, 1982], pages 29 to 30 and 58 to 61.


Good life Revival; “How to Identify Edible Wild Onions - Field Garlic, Ramps, Wild Leeks and More”, https://thegoodliferevival.com/blog/edible-wild-onions-garlic, accessed May 8, 2022, accessed May 8, 2022


Mazur, Kellie; “The ever-elusive ramp”, The Buffalo News, April 24, 2020, (updated Jun 22, 2020), [© Copyright 2022 The Buffalo News Buffalo, NY], https://buffalonews.com/buffalo-magazine/the-ever-elusive-ramp/article_53d728d1-5a9a-5723-a3d5-bd7441368c1f.html, accessed May 8, 2022


Natural Resources Conservation Service; “Allium vineale L., wild garlic”, [United States Department of Agriculture], https://plants.usda.gov/home/plantProfile?symbol=ALVI, accessed May 8, 2022


Wikimedia; “Allium vineale”, by Christiaan Sepp, from Flora Batava, Volume 2, 1807, by Jan Kops, https://commons.wikimedia.org/wiki/File:Allium_vineale_%E2%80%94_Flora_Batava_%E2%80%94_Volume_v2.jpg, accessed May 14, 2022


Wikimedia; “Deadly Zigadenus, Meadow Death-camas”, by Walter Siegmund, June 5, 2009, https://commons.wikimedia.org/wiki/File:Zigadenus_venenosus_0116.JPG, accessed May 14, 2022


Wikimedia; “Garlic Mustard blooming along the edge of a field within the Franklin Farm Park in the Franklin Farm section of Oak Hill, Fairfax County, Virginia”, by Famartin, April 11, 2021, https://commons.wikimedia.org/wiki/File:2021-04-11_17_59_15_Garlic_Mustard_blooming_along_the_edge_of_a_field_within_the_Franklin_Farm_Park_in_the_Franklin_Farm_section_of_Oak_Hill,_Fairfax_County,_Virginia.jpg, accessed May 14, 2022