Sunday, December 8, 2019

The O in S. T. O. P. ©


BSA Risk Ready hanger, picture by the author

Most people who follow the outdoors and survival have heard of the acronym S. T. O. P., which stands for Stop, or stay put, sit down, stay calm; Think and evaluate; Observe; Plan and put the plan into action.  But when it comes to observing, what are you supposed to observe?

Recently I read about the “Survivorman Zones of Assessment”, in an article by Les Stroud, which was published in the January/February 2018 edition of Scouting magazine, as “Zone of Assessment”.  I have always enjoyed Les Stroud’s writing, and this was no exception.  His article, “Zones of Assessment” was about how and what to observe and how to inventory what resources you have and what resources are available to you in the event of an emergency, wilderness or otherwise.

For a number of years, as a trainer for the Boy Scouts, I have taught S. T. O. P. as part of an outdoor education program.  It wasn’t until I read Survivorman’s Zones of Assessment, that it occurred to me that I hadn’t been telling people what to look for, I had just been telling them to observe.  In my defense, I knew what to look for and I knew what I meant, but as a trainer if you aren’t clear, then you are a failure.  So, in some ways, this article is an attempt to correct the sins of the past: if I ever taught you about S. T. O. P in the past, keep reading and that old lesson will get clearer.

Mr. Stroud breaks down the O in S. T. O. P. into three zones, Zone 1: Your Body and Clothes; Zone 2: Your Immediate Vicinity and Zone 3: Your Extended Area.  Additionally, he developed a set of questions to help you assess yourself and the nature of the emergency that you are experiencing.  The three zones make a very useful framework and with the questions, they will help you concentrate and focus on the situation and what resources you have to deal with it. 
 
An excerpt from “Zones of Assessment” by Les Stroud, Scouting magazine, pages 44-45, photograph by the author.

The Survivorman started with the most important survival tip first, “Calm down”.  If you panic you are no good for yourself of, for that matter, anyone else: remember PANIC KILLS!  Panic is also catchy, and one panicky person can infect an entire group with this potentially fatal malady.  If you are scared or your thoughts are racing, sit down and take three to five tactical breathes, this will help you calm down and focus.  Repeat the tactical breathing until you are in control of your thoughts.  If you are in a group; and let’s face it you should always have a buddy, or even better two buddies, when ever you are in the wilderness (for more on “The Buddy System” go HERE), other members of your group might be scared.  Encourage them to sit down and calm down, have them take tactical breathes and repeat as necessary.  This would be a good group exercise to do once you have realize you are “misplaced”, have everyone sit down and do a round of tactical breathing before starting the assessments: unless there is an obvious and severe emergency, such as a medical or a weather situation, that demands immediate action, in which case skip the breathes, deal with the situation, breathe later.
 
From U.S. Navy, Navy and Marine Corps Public Health Center, Combat Tactical Breathing

Now that everyone is calm and able to think clearly, and before you check your pockets to see what you might have in them, that could be useful in your present situation, the Survivorman suggests that you stop and ask yourself these questions…

Are you hurt?
Are you tired or hungry?
What are you wearing?

I would add one other question to the list…

Are you cold or wet?

Be honest, because the answers to these questions are important.  These questions need to be asked of everyone in the group before any decisions are made, because your answers will shape the decisions that you make and here is why.
 
Graphic by the author.

Are you hurt?  Remember the Rule of Threes, if you or anyone in your group has a severe injury; you have only three minutes to assess the situation, make a plan and begin treatment, before the injured person goes into shock, loses consciousness or dies!  Even if the wound isn’t immediately life threatening, you should assess and deal with all injuries before doing anything else.  A minor injury today, might be a raging infection within three days.  Also, injured people are normally scared and are not able to think clearly.  Help them to think clearly and stay calm, by attending to their injuries.  Additionally, severely injured people are not going to be able to walk out, they will have to remain in place until you are found by rescuers, in which case, it is time to set up an emergency campsite. 

Are you tired or hungry?  Are you thirsty?  Tired, thirsty and hungry people don’t make good decisions.  This is why many survival manuals tell you, that when you first realize you are “misplaced”, you should sit down, drink some water, have a snack, relax and calm down.  If you are tired and hungry, it might be better to conserve your energy and setup an emergency campsite, particularly if it is within two hours of dusk.  Also, when you are exhausted you are accident prone and can stumble.  Since falls are the number one form of accidental death in the wilderness, it might be better to stay put and not try to walk out, even if you know exactly where you are, if there is a chance that you could fall.
 
How to determine how much daylight you have remaining. Picture by the Author.  You should always start back to camp, or if you are misplaced, start building a shelter and a fire, when there are eight fingers or about two hours of daylight remaining.  For more information on how to determine how much daylight, you have remaining, read my article “Estimating The Time Till Sunset”, HERE.

What are you wearing?  Your clothes are your primary shelter and your first line of defense from bugs and the elements, like rain or snow, heat, cold or the Sun.  Are you dressed for the worst possible conditions?  Did you bring spare warm clothes, in case it turns cold?  Did you bring a hat?  Heat loss from your bare head can be up to 33% at 60oF (15oC), up to 50% at 40oF (4oC) and up to 75% at 5oF (-15oC)1.  Hopefully, you remembered the Boy Scout motto and are prepared and the answer to these questions is yes!  If the answer to these questions is no, then it might be time to build a shelter and then a fire.


Are you wet?  Are you cold?  Do you have dry clothes?  I added this one because, statistically, other than cardiac issues, the three leading killers outdoors are falls, drowning and hypothermia; and hypothermia is hastened by wet clothes.  If you are wet or cold, it is time to pick an emergency camp site, build a shelter and a fire.  It is critical that you keep your body temperature within its normal ranges.  Also, cold or mildly hypothermic people do not make good decisions and often have the “stumbles” and are likely to fall, making everything just that much worse.

What do you have in your pockets?  Now that the self and group assessments are done, it is time to move on to making an inventory of useful supplies and resources.  Just like Gollum in The Hobbit, you have to ask yourself and everyone in the group, “But what has it got in its pocketses, eh…”2?  What you have in your pockets might be the difference between a fairly comfortable night or one that is entirely miserable: it also might be the difference between life and death!  You should always have “The 10 Essentials” with you whenever you travel in the wilderness, the best place for them is in your pockets, not in a pack which can get lost.

An excerpt from “Zones of Assessment” by Les Stroud, Scouting magazine, pages 44-45, photograph by the author.


After you have answered the questions from Zone 1 and inventoried your pockets, it is time to move onto Zone 2: Your Immediate Vicinity.  What can you see around you and what do you have in your pack?  The things around you, firewood, a large rock, a big tree, a creek and the things in your pack are all resources that you can use to overcome the challenges of your current situation.  Do you have a tent?  Do you have a large trash bag, to make a shelter with (for more on trash bag shelters go HERE and HERE)?  Do you have food and water, first-aid supplies, warm and dry clothes, a sleeping bag?  Is there plenty of firewood around you, that is easy to gather?  Is there a sheltered area or shelter building supplies within eyesight?  Is there a source of drinking water?  Did you bring a pot to boil water in?  Can you take apart any of your equipment to make the things you need?

An excerpt from “Zones of Assessment” by Les Stroud, Scouting magazine, pages 44-45, photograph by the author.


Now it is time to inventory Zone 3: Your Extended Area.  This is the area around you for a couple of miles.  This assessment is like Zone 1, in that it is questions and the answer you give will help you create a plan.   Some of this assessment must be done in your memory…so hopefully you were paying attention! 

Do you know of anything not too far away that can help you, like a cabin?

How soon can you move…if you can move?

I added the next two questions, because if the answer is yes, it will make it easier to answer the last three questions.

Do you have a compass?

Do you have a map of the area, can you orient it so that you know exactly where you are?

Without a compass and a map and the training to use them, you will not be able to answer the next three questions “Yes”, unless you have been walking on a marked trail and have not left it. 

How far are you from safety?

Which direction is safety, and how difficult will it be for each individual to get there?

What are the challenges to getting to safety and can you overcome them easily?

If the answer to any of the questions above is “No”, then it might be time to find an emergency campsite, build a shelter and start a fire. 

And the last and most important question is…

Does anyone know you are there and, if so, how long will it be before they attempt a rescue?

Does anyone know where you are and when you will be back? Will they miss you when you don’t arrive on time?  It is vital that you tell at least one person where you are going and when you will be back, telling two people is better.  If you have told someone your plans, searchers will be out looking for you, you will be okay, over 90% of “misplaced” people are found within 72 hours  If you didn’t tell anyone about your plans then even if someone has missed you, no one knows where to begin the search: now you are on your own! 

Now that you have an inventory and you have assessed the situation; you can make a plan.  However, you must be absolutely certain of your observations and assessments.  One over-confident assumption on your part can make your whole plan fail and potentially land you in an even worse survival situation within a couple of hours.

Perhaps your plan will be to wait in place for the search team, in that case pick an emergency campsite, build a shelter and a fire, gather plenty of firewood, and remember one arm load of wrist sized sticks is needed each hour3.  Perhaps your plan will be to try to walkout.  Remember though, if you don’t know exactly where you are and you try to walk out, chances are good that you are going to get even more lost and end up in a worse situation.

So, in any case, make a plan and stick with it, nothing is worse than indecision!  Sure, you can, and should, re-evaluate your answers and the situation whenever conditions change or at the beginning of a new day, but don’t change your plans willy-nilly, because then you are just wasting energy and resources.

I hope that you continue to enjoy The Woodsman’s Journal Online and look for me on YouTube at Bandanaman Productions for other related videos, HERE.  Don’t forget to follow me on both The Woodsman’s Journal Online and subscribe to BandanaMan Productions on YouTube, and if you have questions, as always, feel free to leave a comment on either site.  I announce new articles on Facebook at Eric Reynolds, on Instagram at bandanamanaproductions, and on VK at Eric Reynolds, so watch for me.

That is all for now, and as always until next time, Happy Trails


Notes

1 Captain Earland E. Hedblom, MC, USN; Polar Manual, Fourth Edition, [National Naval Medical Center, Bethesda, MA, 1965], p. 37

2 J. R. R. Tolkien, The Hobbit: Or There And Back Again, p. 74

3 Craig White, Canadian survival trainer, personal conversation, November 9, 2019

Sources

U.S. Navy, Navy and Marine Corps Public Health Center, Combat Tactical Breathing, https://www.med.navy.mil/sites/nmcphc/Documents/health-promotion-wellness/psychological-emotional-wellbeing/Combat-Tactical-Breathing.pdf, accessed 12 01/2019

Hedblom, Captain Earland E. MC, USN; Polar Manual, Fourth Edition, [National Naval Medical Center, Bethesda, MD, 1965], p. 37, https://ia800305.us.archive.org/33/items/PolarManual4thEd1965/Polar%20Manual%204th%20ed%20%281965%29.pdf, accessed 12/07/2019

Moye, Jayme; “Day hikers are the most vulnerable in survival situations”, [National Geographic, April 11, 2016], https://www.nationalgeographic.com/adventure/2019/04/hikers-survival-tips/, accessed 12/06/2019

Ravenscraft, Eric; “Use the Combat Breathing Technique to Help Control Nervous Shaking”, 9/16/2015 [Life Hacker, 2019 G/O Media Inc.], https://lifehacker.com/use-the-combat-breathing-technique-to-help-control-nerv-1730993811, accessed 12/4/2019

Stroud, Les; “Zones of Assessment”, Scouting, January-February 2018, Volume 106, Number 1, page 44-45

Tolkien, J. R. R.; The Hobbit: Or There And Back Again, [Houghton Mifflin Company, Boston, MA, 1996], p. 74


Sunday, December 1, 2019

Hardtack, The 18th and 19th Century Survival Ration ©


An example of hardtack made by the author, picture by the author


Everyone has heard of hardtack, or hard bread, plain biscuit, ship’s biscuit, sea biscuit, sheet-iron crackers or tooth-dullers.  Since it is close to the American Thanksgiving holiday, I thought that I would do an article on food; I hope that you enjoy it and have fun making your own plate of hardtack.

During the 18th and 19th centuries hardtack wasn’t a survival ration and in fact, was part of the regular ration when soft bread wasn’t available, such as when you were aboard a ship or marching.  Today, hardtack can be used as a survival ration. 


Excerpts from Hardtack and Coffee, by J. D. Billings, page 113 and 114


So just what is hardtack?  How nutritious is it and how do you make it? 

Hardtack is simply a water and flour paste that is baked into a biscuit and dried until it has the consistency of a ceramic tile.  Some recipes from the internet, call for the addition of salt or even sugar to the flour and water, but as Jeff Pavlik writes on page 8 of “Reproducing The Eighteenth-Century Biscuit”, “Biscuit makers of the period were well informed of the detrimental effects of salt in a biscuit and were advised to ‘not use salt…salt can make it more likely to attract moisture from the air’.  Along with no mention of salt in any documents on biscuits…” and “Sea-bisket-of excellent use for the Sea, because baked without Salt…”.   Additionally, numerous writers have written that the addition of sugar to the recipe, while it makes it more palatable, will likely reduce your ability to store the biscuits for long periods of time.  So, don’t use salt or sugar when making your biscuits, if you want a ration with a long shelf life.

So, what was a day’s ration of hardtack and just how nutritious is it?  According to John D. Billings, writing on page 112 of Hardtack And Coffee, an American Civil War Union Soldier, as part of their daily ration, was supposed to receive “…one pound six ounces of soft bread or one pound of hard bread”.  When the soldiers were on the march, they only received the hard tack.  Billings also wrote that while the hardtack was shipped to the Union Army by weight, it was passed out to the men by number, with some regiments passing out nine biscuits as a ration and in others a ration of hardtack was ten biscuits.

An excerpt from Hardtack and Coffee, by J. D. Billings, page 113

  
The recipe that I am using, calls for three American measuring cups of whole-wheat stone-ground flour.  I am using Hodgson Mills stone-ground, whole-wheat flour, but you can use whatever stone-ground, whole-wheat flour is available where you live.  Jeff Pavlik, the author of “Reproducing The Eighteenth-Century Biscuit”, states on page 7 that these three cups of flour will weigh a pound.  Additionally on page 9, he states that “The recipe I have created will make 1 ½ pounds of unleavened dough…The water lost baking and drying the biscuits will reduce the weight by 1/3”, which will leave you with one pound of finished biscuits.  When I was finished baking my biscuits; I had ten biscuits, each three inches (7.6 cm) wide by ½ inch (1.27 cm) thick, that did weigh altogether one pound.  However, this left me a little confused, because according to the Hodgson Mills label, each cup of flour is supposed to weigh four and a quarter ounces or 120 grams; and three cups would weigh 13 ounces or 360 grams: this is three ounces short of a pound?!  The answer turned out to be the difference between sifted versus scooped-out-of-the-bag flour: sifted flour is fluffed up and less fits into the measuring cup, while flour that you have scooped-out-of-the-bag is packed down and more is in the measuring cup.  Okay, mystery solved.
 
Hodgson Mills whole wheat flour nutrition information, picture by the author.
  
So, how nutritious is hardtack?  Well, if three packed cups of flour equal a pound, and a pound is equal to 453 grams, then the daily ration of hardtack would have the following nutrition facts printed on the side of the box.


Okay, so hardtack isn’t the most nutritious food choice out there and is lacking in most of the necessary vitamins and nutrients, but it isn’t the least nutritious food choice available to the modern American, either. 
 
An excerpt from “Reproducing The Eighteenth-Century Biscuit”, by Jeff Pavlick, page 11
   
Now to make some hardtack.  I used Jeff Pavlick’s recipe for hardtack in the preparation of this article, because Mr. Pavlick is both a baker and a historian: for more information about him and baking in the late 18th and early 19th centuries, go to http://colonialbaker.net/.  Use the recipe above, supplemented with my notes and pictures below to make your own hardtack.


The ingredients, picture by the author
  
The recipe calls for 3 cups (453 grams) of white whole-wheat flour and a cup, plus 2 tablespoons (.28 liters) of water.  The recipe says that if the dough is too stiff to mix by hand add an additional tablespoon (.015 liter) of water, when I made this recipe the last time, I found that I needed to add an extra 1 ½ tablespoons (.02 liters) of water to wet all of the flour. 
 
The resting dough, picture by the author
  
Combine the flour and dough and then let the stiff dough rest for ten minutes, so that the flour will completely soak up the water.
 
Kneading the dough, picture by the author
  
Knead the dough until it is smooth, this will take some time, but as the flour absorbs all the water it will become easier.

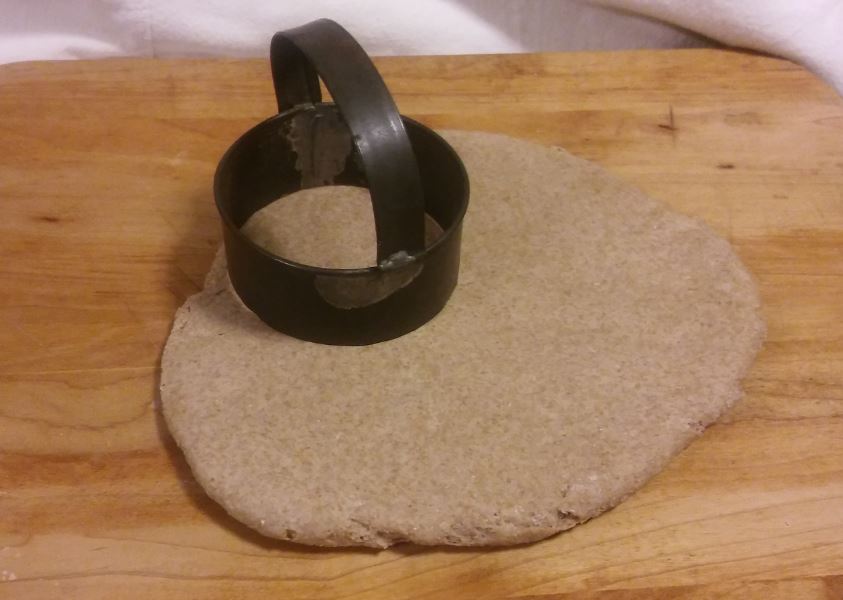
The author’s antique biscuit cutters.  The one in the foreground, measures 3 inches (7.62 cm) across, picture by the author


Cutting the rolled dough with the biscuit cutter, placing it on a cutting board and getting ready to poke evaporation holes into the biscuits, pictures by the author

Instead of dividing the dough into three to five pieces, rolling them into a ball and then pressing them flat, as I did the first time I made this recipe; this time I rolled the dough out flat with a rolling pin until it was a half inch (1.27 cm) thick.  When I was done rolling the dough out, I cut out the biscuits with my biscuit cutter, although you could use a drinking glass just as easily.  It helps to lightly flour whatever surface you are rolling your dough on, as well as lightly flouring the rolling pin; also dip your biscuit cutter or glass into flour as well.


Poking evaporation holes into the cut-out biscuits, picture by the author.
  
Mr. Pavlick’s recipe calls for using a pizza docker or ice pick to make evaporation holes into the biscuits before baking.  I didn’t have a pizza docker or an ice pick, so I used a meat fork on my last batch and a dinner fork on my first batch.
 
Just out of the oven and dehydrating while they cool, picture by the author.
  
After the biscuits are baked, it is very important that you let them continue to dry for several days.  On one of my earlier batches, I made the mistake of putting them into plastic storage containers before they were fully dehydrated: they turned all green and fuzzy with mold before I could eat them.
 
The biscuits are now done, enjoy!  Picture by the author.
 
An excerpt from Hardtack and Coffee, by J. D. Billings, page 114-115
  
Hardtack is one of the most indestructible foods you can carry, if it doesn’t get wet.  If it gets wet or if it is packed away too soon after baking, it will mold.  So, keep your hardtack dry!  If it is dry, and kept free of bugs, it will last almost forever.  I have been at museums that have pieces of hardtack from the American Civil War on display that are technically still edible, and I have seen pictures of even older pieces of hardtack that are on display at other museums. 

So, when you need a survival ration for your next wilderness adventure, perhaps you should carry some hardtack, it will last forever, and you certainly won’t be tempted to eat it until it is truly needed!

This piece of hardtack, is from the first batch that I ever made and is 12 years old, picture by the author.

  
I hope that you continue to enjoy The Woodsman’s Journal Online and my videos at BandanaMan Productions and don’t forget to follow me on both The Woodsman’s Journal Online and subscribe to BandanaMan Productions on YouTube, and if you have questions, as always, feel free to leave a comment on either site.  I announce new articles on Facebook at Eric Reynolds, on Instagram at bandanamanaproductions, and on VK at Eric Reynolds, so watch for me.


Sources

Billings, John Davis; Hardtack and Coffee: Or, The Unwritten Story of Army Life, [George M. Smith & Co., Boston, MA, 1889] page 114-117

Colleary, Eric; “CIVIL WAR RECIPE: HARDTACK (1861)”, June 26, 2013, [The American Table,], http://www.americantable.org/2013/06/civil-war-recipe-hardtack-1861/, accessed 11/29/2019

Farmer, Dennis and Carol; The King’s Bread, 2nd Rising: Cooking At Niagara, 1726-1815, [Old Fort Niagara Association, Inc., Youngstown, NY 1989]

Pavlik, Jeff; “Reproducing The Eighteenth-Century Biscuit”, Journal of the Early Americas, Volume1, Issue 11, April/May 2011, p. 7-11


Sunday, November 24, 2019

Survival Tips From Jack London, Part Two©


“As he looked apathetically about him, his eyes chanced on the dog.” An illustration by Frank E. Schoonover1, which appeared in “To Build A Fire”, The Century Magazine, August 1908, Vol. LXXVI, No. 4, p. 531


An excerpt from “To Build A Fire”, The Century Magazine, August 1908, page 525


Last week in “Survival Tips From Jack London, Part One”, HERE, I discussed how the unnamed main character of Jack London’s short story To Build A Fire, did several things right during his struggle for survival in the Alaskan wilderness and the lessons we could draw from him.  In part two of “Survival Tips From Jack London”, I am going to explore the mistakes he made and what we can learn from them.

Just as the main character of To Build A Fire did five things right, he also made five mistakes during his journey to meet the “boys”, who were camped at the old claim on the left side of Henderson Creek: two of the mistakes were more critical than the rest.  So just what did he do wrong and what can we learn from his mistakes?


Excerpts from “To Build A Fire”, The Century Magazine, August 1908, page 525 and 529

  
The main character of To Build A Fire lacked imagination and was arrogant, and his first and biggest mistake was his general attitude of “…it can’t happen to me…”.  As a matter of fact, it can, and probably will happen to you, just as a series of accidents happened to the unnamed character.  It can happen to you and you need to take steps to prepare for emergencies.  Whether you are travelling through the wilderness, or just through life, it always pays to follow the Boy Scout motto of “Be Prepared”!

If it does happen to you and you have a survival emergency, remember, just like with anything, survival is 80% mental.  You have to know that survival emergencies can happen to you, and remember boy scouts, you have to “Be Prepared”; also when the worst happens, you have to stay calm, don’t panic; and keep a positive, can-do mental attitude.


Excerpts from “To Build A Fire”, The Century Magazine, August 1908, page 529 and 530
  
His arrogance and his belief that it couldn’t happen to him, lead him to break “…the law that no man must travel alone in the Klondike after fifty below”.  He didn’t listen to the old-timer’s advice to always travel with a trail-mate and this was his second biggest mistake.  Summer or winter, wherever and whenever you are travelling in the wilderness, you should always have a partner, a trail-mate or buddy with you: better yet you should always have two buddies with you.  I recently took a survival class, taught by Craig White, a Canadian survival expert who used to train the Canadian Military, and he emphasized that you should always be in a three-person buddy group, (for more on the buddy-system, see “The Buddy System”, HERE.


An excerpt from “To Build A Fire”, The Century Magazine, August 1908, page 529 to 530
  
The unnamed main character of To Build A Fire knew how to build a fire.  However, in his haste to get a fire going after his feet got wet, either he forgot to place his fire in the open, out from under any snow covered branches; he was lazy or careless; or maybe he just never imagined that the snow on the branches could avalanche down onto him and his fire: probably it was a combination of all three. 
 
An excerpt from Arctic Survival Guide, by Alan Innes-Taylor, page 66


Never build your fire under snow covered boughs, always build it out in the open.  If you need a wind break, look for an open spot in the lee of a thicket or stand of trees, as Alan Innes-Taylor explains in the excerpt from Arctic Survival below:
 
An excerpt from Arctic Survival Guide, by Alan Innes-Taylor, page 63
  
Obviously in the winter it is important not to build your fire under a tree, but it is just important not to build your fire under a tree in the summer as well.   Shrubs, overhanging branches, trees and sparks from a campfire, these things do not go together and no one wants to be that guy, you know the one who is responsible for starting a forest fire!


Excerpts from “To Build A Fire”, The Century Magazine, August 1908, page 526

The unnamed main character of To Build A Fire thought that it was 50oF below zero (-45oC), when it was actually 75oF below zero (-59oC).  He simply couldn’t imagine just how cold and dangerous 75oF below zero (-59oC) truly was. 
 
An excerpt from Arctic Survival Guide, by Alan Innes-Taylor, page 76

When you are in the wilderness, your clothes are your primary shelter from the elements, and you should always dress for the worst possible weather.
  This is something that the main character of To Build A Fire did not do.  And while our unnamed main character was dressed warmly, wearing thick socks, warm moccasins, mittens, a jacket and a hat with ear flaps, he simply wasn’t dressed warm enough for the conditions.  Also, because he didn’t wear a parka with a hood or a scarf over his nose and cheeks, he was at risk of freezing his face.  

Winter or summer, you should always dress for the worst possible conditions and bring extra warm clothes.  In the summer this would mean an insulating layer and a windproof and waterproof outer layer.  In the winter you would want to dress in multiple layers, so that you can put on or take off layers as you warm up or cool off.  Your outer layer in the winter, just like in the summer should be windproof and waterproof.  Always take off layers as you get too warm and before you begin to sweat, damp clothes can kill you in a wilderness emergency.  You should always try to be comfortably cold, no sweating!
 
An excerpt from Arctic Survival Guide, by Alan Innes-Taylor, page 77

Also, you should always have a hat.
  In the summer a wide-brimmed, waterproof hat that will protect you from the sun, rain and bugs is a must.  In the winter a knit cap or hood and a windproof and waterproof outer layer for your head is a must, as you can lose a great deal of heat from your bare head: it can be as much as 50% at 40oF (10oC) and 75% at 5oF (-15oC). 
 
An Excerpt from “To Build A Fire”, The Century Magazine, August 1908, page 529

In addition, the only way the unnamed main character could stay warm, without a fire, was by walking at a four mile an hour pace (6.4 km per hour), as soon as he stopped, his feet and hands began to grow numb from the cold.  During winter journeys you should always bring extra warm clothes to put on when you stop for a meal or to rest, something that the main character did not do


Excerpts from “To Build A Fire”, The Century Magazine, August 1908, page 526 to 529

The unnamed main character of To Build A Fire was going to thaw his frostbitten feet by rubbing them with snow before warming them at the fire, he also struck his frostbitten fingers against his leg or chest to get the blood circulating again and he constantly rubbed his frozen nose and cheeks: in 1898 these practices were considered medically sound.  In fact, rubbing frostbitten areas with snow was considered by experts to be medically sound until 1956, when H. T. Merryman proved that is was harmful and that rapid rewarming was more beneficial.  So, with the medical understanding that existed at the time, he wasn’t doing anything wrong; however, with today’s medical knowledge we would consider it to be a mistake.  Today we know that by rubbing a frozen spot roughly with your hands or with snow or stomping or banging frozen hands or feet, you damage the already damaged body parts.  The most important thing to remember with frostbitten or frozen body parts, is not thaw them until you can be sure that they won’t be frozen again.  While the initial freezing damages the tissues, re-freezing, after thawing, does a great deal more damage.  Also, rewarming frozen parts in front of a fire or by submerging them in hot water, can burn the frozen areas, because the circulation is impaired and excess heat can not be carried off.  Since field rewarming techniques to treat frostbite have changed very little since the 1950’s, and in keeping with the other 1950’s era arctic survival tips in this article, I have included some great tips from Arctic Survival: The Air Ministry Pamphlet 226, circa 1950, below.


Excerpts from Arctic Survival: Air Ministry Pamphlet 226, pages 51-53

  
In the end as the weather conditions and all his prior mistakes caught up with him, the unnamed main character of To Build A Fire, panicked and ran down the trail, before falling and collapsing in the snow.  In the end he accepted his fate, sat down and froze to death. 
 
An excerpt from “To Build A Fire”, The Century Magazine, August 1908, page 534
  
Jack London, the story’s author, clearly understood the Five Stages of Woodshock and accurately described the unnamed main characters progression from the Urgency stage, to the Panic stage, to the Planning stage, followed by the Fatigue stage and finally to the Resignation and Death stage; for a more in depth discussion of Woodshock, see “Getting Lost And What To Do About It”, Circa 1915”, HERE.

Hopefully we have all learned something from the mishaps, mistakes and things that that the unnamed main character of To Build A Fire does right, as he blunders through the final hours of his fictional life.  I hope that, if nothing else, I have inspired you to read Jack London’s short story To Build A Fire. 

I hope that you continue to enjoy The Woodsman’s Journal Online and look for me on YouTube at Bandanaman Productions for other related videos, HERE.  Don’t forget to follow me on both The Woodsman’s Journal Online and subscribe to BandanaMan Productions on YouTube, and if you have questions, as always, feel free to leave a comment on either site.  I announce new articles on Facebook at Eric Reynolds, on Instagram at bandanamanaproductions, and on VK at Eric Reynolds, so watch for me.


That is all for now, and as always until next time, Happy Trails


Sources

Air Ministry, Arctic Survival: Air Ministry Pamphlet 226, [Penguin Books, Bungay, United Kingdom, 2017, (reprint of 1953 original)], p 51-53

Innes-Taylor, Alan; Arctic Survival Guide, [Scandinavian Airlines System, Stockholm, 1957], page 64-65