|
Ice camping on Cuba Lake, New York, circa 1978 or 1979. Photograph from the Gerry L. Reynolds collection
For more on how to sleep warm in the winter, watch
“How to Sleep Warm in the Winter Part One”, HERE,
“How to Sleep Warm in the Winter Part Two”, HERE,
and read “Some Additional Thoughts on How to Sleep Warm in the Winter©”, HERE
– Authors Note.
Recently,
I read an article titled “Eight essentials for staying warm while cold-weather
camping” and I agreed with seven of the eight points that the author made1. So, I thought I would talk about each of these
topics briefly, although each could be expanded into a full discussion all its
own.
1) Layering...Dressed
for success!
 |
Dress in layers, so that you can easily add or remove clothing, as you become warmer or colder. You must avoid sweat soaking your clothes. An excerpt from Naval Arctic Operations Manual: Part 1 General Information, pages 159.
The
first and most important habit of highly successful winter campers is “layering”
your clothes. Clothes are your first
line of defense for temperature regulation and shelter against the wind, the
wet, and the cold. When out in the
wilderness, in any season, but in the winter particularly, always dress in
layers for the worst weather you might meet and plan accordingly for the
expected daytime and night-time temperatures and weather. Maintaining your body temperature in the
normal range of 98.6oF (37oC) is your priority! When dressing in layers, remember the “three
W’s”, the wicking or base layer, the warm or middle layer, and the
windproof/waterproof or outer layer.
For
snow walking, wear a hiking rain jacket with a hood and rain pants as your
windproof/waterproof layer. According to
Michael Rohani, who wrote “The Fifteen Essentials for
Winter Backpacking”, these work the best1.
Don’t
forget to layer your hand coverings just like you layer the rest of your body,
waterproof shell mittens should be worn over top of a thin pair of knit gloves,
and if it is very cold, add a pair of insulating mittens over your gloves, and
under your outer layer. Also, remember
that your gloves or mittens will get wet, so always pack extras.


 |
Shoes and clothes must
fit loosely when it is cold, don’t lace your shoes or boots tightly, otherwise
it might cut-off the circulation in your feet, excerpts from the Naval
Arctic Operations Manual: Part 1 General Information,
page 166-167 |
Baggy
is in! Dress in loose layers and avoid
tight clothing because tight clothing restricts your circulation, particularly
in your extremities, and because loose clothing helps trap warmed air-pockets
in your clothes next to your body.
And
don’t forget your head, face, and eyes.
A knit cap is necessary, because heat loss from your bare head can be up
to 33% at 60oF (15oC), up to 50% at 40oF (4oC)
and up to 75% at 5oF (-15oC). If it is very windy and cold, wear a
balaclava or ski mask to protect your face and snow goggles to protect your
eyes. And if it is sunny, ALWAYS wear
dark wraparound sunglasses or glacier glasses to protect your eyes from snow
blindness, as the snow and ice will reflect the UV rays.
Some
layering tips. Your head is your
thermostat, if you are feeling warm take off your hat, if cold put it on. If you keep chest and abdomen warm, your arms
and legs will be warm, as warmed blood can flow to them. If you took off a warm layer while moving or
working, put it back on as soon as you stop.
And put your windproof/waterproof outer layer back on whenever you
remove or put on a warm layer.
 |
The Author’s wraparound sunglasses, which block 99.9% of harmful UV rays, with retaining strap, photograph by the Author.
For
more on layering and what to wear in the winter, read “Accidental Lessons …
Boots Freeze!©”, HERE;
“Comfortably Cold, What’s That?©”, HERE;
“The Top Ten Wilderness Survival Skills...Number One ©”, HERE;
and “Could You Survive? Hiking in the Desert, Sun blindness or Dehydration? ©”,
HERE.
2) Fuel the
furnace, stay hydrated, and go to bed warm...
The
second habit of highly effective winter campers is eating enough calories to
keep the heat going, staying hydrated and going to bed warm. During the winter you will need more calories
to stay warm and travel through the wilderness and more water than you might
expect to stay hydrated. And to sleep warm
when it is cold you will need fuel to keep your internal furnace burning all
night long, you must be hydrated, and you need to go to bed warm.
You
need more calories to stay warm and travel in the winter, than you normally
would, about 3,600 to 6,000 per day depending on your activity level, body size
and the weather. This works out to about
two pounds or about one kilogram of food per person per day. Carbohydrates such as starches and sugars
should be about 50-60% of your caloric intake, remember they are metabolized
quickly and easily and don’t supply long lasting energy. Proteins, which should be about 15 to 20% of
your total daily calories, burn more slowly than carbohydrates because they are
more complex molecules. Fats, such as
margarine, butter, nuts, cheese, etc., take the longest amount of time to
metabolize and should be about 25 to 35% of the calories that you consume per
day while you adventure in the winter wilderness.
Some
winter food tips. Eat often and eat
plenty. If you are feeling cold, eat a
snack. Eat your dinner just before bed
and include some dried cheese with it, as the protein and fats will supply fuel
for your furnace late into the night2. Carry both ready-to-eat food, such as foil
pouches of food, candy bars, nuts, crackers, pita bread, jerky, etc., and food
that needs to be prepared, like fresh food or dehydrated meals, because you
aren’t always able to heat up food when you are hungry and need to fuel up your
furnace.
 |
Ready to eat, foil wrapped pouches of food, photograph by the Author.
During
the winter you need to drink more water than you might think, because the
winter air is dry. Your body needs the
water to digest your food, particularly those slow burning fats and proteins,
and to move heat around your body. So,
drink plenty of water, you will need about two to four quarts/liters every day
to replace the water that is lost to respiration, perspiration, evaporation,
and excretion. Often during the winter,
since it is cold, people don’t drink enough water, so drink often, even if you
aren’t thirsty, and don’t let your water bottle go empty.
 |
An
excerpt from FM 90-3 Desert Operations, p. 1-22 |
Some
winter water bottle tips. Use sturdy wide
mouthed water bottles, like Nalgene® bottles, for
water storage, not water bladders because they will freeze and are difficult to
thaw. Use wide mouth water bottles, not
narrow mouthed ones because wide mouthed bottles are easier to fill, and narrow
mouthed bottles can jam up with ice.
Carry your water bottle upside down in your pack, this way if it freezes
the ice is at the bottom and the lid won’t freeze on. You can bury your water bottle in a snowbank,
this will insulate it from the cold, but remember to bury it upside down, and
don’t forget where it is!
 |
Nalgene® bottles, photograph by the Author.
For
more on the effects of dehydration and how to avoid it read, “What is
Dehydration and How Do You Avoid It? ©”, HERE.
3) Have a
cooking system and a reliable firestarter
The
third habit of highly effective winter campers is carrying a cooking system and
a reliable firestarter. Fires as a
heating and cooking system, is a system of last resort in the winter, because
in high snow areas, firewood is often underneath several feet of snow and is
hard to find. Also, in deep snow
conditions it is dangerous to approach snow covered trees, because of “tree
wells”3. It is safer to
use a stove, and alcohol or white gas stoves are more reliable in the winter
than are butane canister stoves.

The Author’s Coleman Dual Fuel stove, photograph by the Author.
To
save on cooking time and fuel when using a stove, use a windscreen or a stove
that is designed to be wind resistant, this keeps the keep the heat focused on
the pot and always use a lid to hold the heat inside the pot.
Here
are some winter stove tips. Start each
meal or brew-up with a full tank of gas, because white gas and alcohol can be
explosive. Be careful when refilling
your stove, because gasoline and alcohol can become super cold in the winter
and fuel spilled on your hands can cause frost bite. Since wet or sweaty hands can freeze to a
metal fuel bottle, wear gloves, or wrap your metal liquid fuel bottles with
duct tape, the duct tape will help insulate you from the cold metal and it is a
good way to store duct tape.
You
should plan on melting snow and ice for your drinking water, and then boiling
it to disinfect it. If you do find a
source of running water, don’t use a water filter, the cartridges will just
freeze and be unusable and it will be damaged by freezing solid. If you are melting snow for water, plan on
using a quarter of a quart or liter of white gas per person, per day, just for
making water4. And be careful
when melting snow for water since you can burn the pot, first you must “prime”
the pot with some liquid water, before you put it on the stove to melt.

A pot of snow waiting to be turned into drinking water, photograph by the Author.
For
more on turning snow and ice into water read “Melting Snow and Ice ©”, HERE,
and watch the video “Melting Snow and Ice”, HERE. Also, read “Water Disinfection: When is
boiled, boiled enough…? ©”, HERE.
Having
a reliable way to start a fire or light a stove is necessary, since both
hydration and food cooking are necessary.
According to Michael Rohani, in “The Fifteen Essentials for Winter
Backpacking”5, the most reliable firestarter is a solid (not clear)
sided BIC® Lighter.
I have used BIC® Lighters for years with good
success and never had a problem. I
usually have three with me at any time, one BIC® Mini in my survival kit, one
full-sized BIC® in an inside pocket (since they are fueled by butane, it is
important to keep them warm, so that they light easily) and a spare full-sized
one in my fire-starting kit.
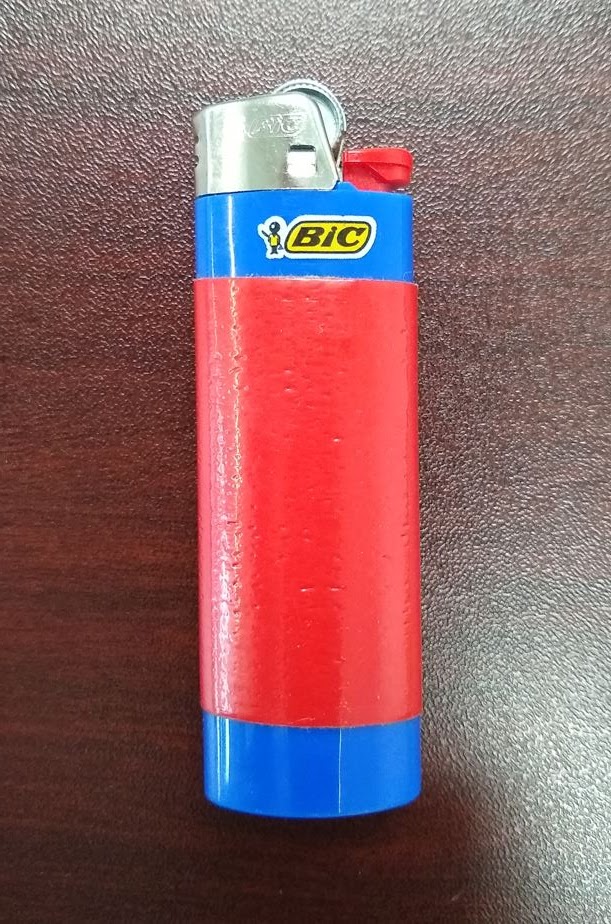
A full-sized BIC® Lighter. I like to keep 24 inches (60 cm) of duct tape wound around my lighter. That way it is always with me when I need to repair something. Some people wrap duct tape around their water bottle, for the very same reason. Also, a couple of inches (about 5 cm) of duct tape when crumpled into a ball and lit on fire will burn for a minute or two and help your tinder catch fire on those rainy, drippy days. Photograph by the Author.
4) Use a
pee-bottle...
The
fourth habit of highly effective winter campers is peeing when your bladder is
full. Wow! Do we really need to talk about this? As a matter of fact, it is important, and here
is why if you have to pee, you shouldn’t hold it. Your body’s furnace will burn a lot of valuable
calories just to keep the waste liquid in your bladder warm, fuel that you will
need to keep your body warm later in the night.
So, get up and go pee, or use a spare Nalgene bottle as pee-bottle if
you don’t want to leave the tent. Just
don’t get confused and drink out of the wrong bottle in the middle of the night!
5) Have a
reliable winter shelter
The
fifth habit of highly of highly effective winter campers taking a good tent
with you whenever you enter the wilderness in the winter, because you never
know when the weather conditions will change and you will need shelter,
fast!
A
four-season, free-standing tent is ideal, but three-season tents will also
work. In deep snow conditions during the
winter, normal sized tent stake won’t work, so use “snow stakes”, which are
extra-long stakes that are designed to work in snow and bring extra utility
cord to attach the snow stakes to the tent’s corner loops, because are not long
enough to bury the stakes.
Winter
tenting tips. If there are other people
in your tent, sleep close together to share body heat, but beware of having too
many people in a tent, because it can lead to icing from all the moisture from
in their breath. Keep the vents open so
that the moisture from your breath can escape the tent. Use a larger tent in the winter than you
might in the summer, in the winter you will have more gear and might need the
room. Also stomp the snow flat under the
spot where your tent will be, otherwise it will compress below you while you
sleep, leaving you sunk in the middle.
6) Have a
winter rated sleeping system

The Author’s winter sleep system, a full-sized and ¾ sized closed-cell foam pad, my NeoAir® All Season™ SV and my HQ ISSUE Military Style Sleep System, 3 Piece sleeping bag set. Photograph by the Author.
The
sixth habit of highly effective winter campers is bringing a sleeping system
made up of ground pads and a sleeping bag.
For winter camping, the best practice is to use both a closed-cell foam
pad and an inflatable air mattress between you and the cold ground, no matter
what you will need to have a minimum 4 R-value between the ground and your
sleeping bag, or you will be cold!6
In
the upper left picture above, I am showing both a ¾-sized closed-cell foam pad,
which I have used for years, and a full-sized foam pad, both of which have an
R-value of 1.4. During winter camping,
if it is cold, I will use them both, with the ¾-sized pad under my head and
torso. The inflatable air mattress in
the upper right picture above is a NeoAir® All Season™ SV, which has 2.5” of
loft and an R-value of 4.9. By combining
the three sleeping pads together, I will have a total R-value of 7.7 between
the ground and me.
The
sleeping bag set shown above in the bottom picture is a HQ ISSUE Military Style
Sleep System, 3 Piece sleeping bag set, which is two nested sleeping bags,
inside of a bivvy-bag. When all three
parts of the sleeping bag are used together, they are rated for minus 4o
Fahrenheit to minus 22o Fahrenheit (-15o to -30o
Celsius).
Some
other tips for sleeping warm in the winter.
Make sure that you are warm before you get into your sleeping bag. Do some jumping jacks or pushups, just enough
to warm you up without making you sweat.
If you are cold when you go to bed, you will be cold all night long. Shake up your sleeping bag, before you go to
bed. If your sleeping bag has spent the
day compressed into its stuff sack, the insulation will need to be fluffed and
redistributed, so that there are not cold spots. Since your sleeping bag depends on you to warm
it up and then keep it up to temperature, use hand warmers or, fill your
Nalgene bottle with boiling water and put it into a large sock, and use these
to help get your sleeping bag up to temperature. If there is room in your sleeping bag, put
your next day’s clothes into your bag with you.
You don’t want to have big pockets of empty space around you, since it
is just space that you will have to warm up.
Pull your backpack up over the foot of your sleeping bag. This will help insulate your feet. Also, don’t sleep with your mouth inside of
your sleeping bag, the moisture in your breath will wet your sleeping bag and
make you cold.

A Nalgene® bottle shoved into an old wool sock. To make a hot water bottle, fill the Nalgene with hot water and then put the sock on it. Photograph by the Author.
Also,
put your boots, things that can stop working when they are cold, like
batteries, cell phones and lighters, or anything else that can freeze into your
sleeping bag stuff sack and push it to the bottom of your sleeping bag.
7) Beware
of winter travel hazards...
The
seventh and final habit of highly effective winter campers is knowing the risks
and dangers around them in the winter wilderness and learning how to avoid
them. There are a great many dangers in
the winter wilderness, the cold, the wet, tree wells, avalanches, falling
through the ice, etc., maybe that is why it is so much fun! Always learn about the dangers in the area
that you are planning on being in and how to avoid or manage them.
Oh, and one
more thing...

The Author’s possible kit, photograph by the Author.
You
should always carry the supplies and the tools to repair any critical
gear. In my “possible” kit7,
I keep the things to repair my glasses, sew my clothes and even repair
shoes!
Also,
as Michael Rohan, wrote in “The Fifteen Essentials for Winter Backpacking”, you
should always carry the tools and spare parts to repair your stove, materials
to repair your tent, your air mattress, a couple of extra tent stakes,
etc. You should carry these winter,
spring, summer, and fall, never leave home without them.
For
more on this read “Field Repairs, or What I Learned on My Canoe Trek ©, HERE,
and “So, What’s in Your Possible Kit!? ©”, HERE.
And
a last winter tip for staying warm and dry.
In the winter, and often during the spring and fall, I carry a ¾ sized closed-cell foam pad as a utility pad, it makes
a great seat and keeps me dry and insulates me from the cold, wet ground, it
can be used as a wind screen for my stove, as a kneeling pad, etc.

The Author’s ¾ sized closed-cell foam pad, being used as a winter seat in a snowbank. Photograph by the Author.
For
more on all of these topics I recommend that your read “The Fifteen Essentials
for Winter Backpacking”, by Michael Rohani, HERE,
and “What Pro Mountain Climbers Eat & Drink”, by Felix, HERE.
Don’t forget to come back next week and read “Clue! The Woodland Edition ©”, where we will ask who
killed and ate Professor Squirrel, in the woods, by the creek!

I
hope that you continue to enjoy The Woodsman’s Journal Online and look for me
on YouTube at BandanaMan Productions for other related videos, HERE. Don’t forget to follow me on both The Woodsman’s
Journal Online, HERE,
and subscribe to BandanaMan Productions on YouTube. If you have questions, as always, feel free
to leave a comment on either site. I announce
new articles on Facebook at Eric Reynolds, on Instagram at
bandanamanaproductions, and on VK at Eric Reynolds, so watch for me.
That
is all for now, and as always, until next time, Happy Trails!
Notes
1
The author wrote “Wet feet?
Grab a bag – a bread bag, that is.
The long plastic can stretch over your foot and serve as a liner between
your sock and your boot”. Now all of
us 50-somethings will remember putting on bread bags over your socks before
sliding your feet into your boots, and we all remember how our feet still got
wet! Yes, the bread bag will stop
outside water from leaking through your boots and wetting your socks, provided
there are no holes in it. But your feet sweat,
and the sweat will condense on the inside of the bread bag getting your socks
and feet wet.
2
One source that I consulted suggested taking a candy bar to bed with you in
case you needed a quick energy boost to rev up the old internal furnace. This is a great idea, and there have been
several occasions when my furnace was dead, I was cold, and I wished I had a
candy bar. This will work in the dead of
winter, however one thing to keep in mind is, if it is warm enough for the
local bears, raccoons, chipmunks to be out and about, then the smell of your
midnight snack might attract some unwelcome and unwanted nighttime visitors.
3 A
“tree well”, which is also known as a “spruce trap”, is the space
around the trunk of a tree that has been sheltered from snowfall by the tree’s
branches, this creates an open space or area of loose snow around the trunk
which is dangerous to hikers, snowshoers, skiers, snowboarders, and
snowmobilers who fall into it. Tree
wells up to 20 feet (6 meters) deep have been found and if someone falls into such
a well, it can be too deep for them to climb up and out through the loose snow
before they are buried. Often people who
fall into tree wells, fall head-first, which can leave them injured or
unconscious. Victims often suffocate in
the loose snow around the tree, just as if they were buried by an avalanche. Beware, similar “wells” can also be found
near large rocks and alongside streams.
4
From “10 Essentials for Winter Camping”, by Outdoor Research.
5
From “The Fifteen Essentials for Winter Backpacking”, by Michael Rohani, this
is an excellent beginner’s guide to modifying the standard ten essentials for
winter backpacking, it can be found HERE.
6 Ibid.
7
To
see what the Author keeps in his possible kit read, “So, What’s in Your
Possible Kit!? ©”, HERE.
Sources
Allen, Tom; “8 Ways to
Stay Warm When Winter Camping”, January 21, 2016, [© 2021 ADVENTURE JOURNAL
LLC], https://www.adventure-journal.com/2016/01/8-ways-to-stay-warm-when-winter-camping/,
accessed February 3, 2022
Department of the Navy, Naval
Arctic Operations Manual: Part 1 General Information, [Department of
the Navy, 1949, Revised in 1950], p. 157-175,
https://ia600301.us.archive.org/27/items/navalarcticopera00unit/navalarcticopera00unit.pdf, accessed August 28, 2018
Felix;
“What Pro Mountain Climbers Eat & Drink”, https://mountainhomies.com/what-professional-mountain-climbers-eat-and-drink/,
accessed February 4, 2022
FM 90-3 Desert
Operations, [Headquarters, Department of the Army, US Marine Corps,
Washington DC, 1993]
Outdoor
Research; “10 Essentials for Winter Camping”, November
24, 2013, https://www.outdoorresearch.com/blog/10-essentials-for-winter-camping,
accessed February 1, 2022
Rohani,
Michael; “The Fifteen Essentials for Winter Backpacking”,
November 27, 2020, [© 2022 Winter Backpacking], https://winterbackpacking.com/the-fifteen-essentials-for-winter-backpacking/, accessed January 23, 2022