Sunday, January 31, 2021

Melting Snow and Ice ©


A fire-safe pot half full of snow, photograph by Author.


To watch a video on “Melting Snow and Ice” for drinking water, go HERE – Author’s Note


You are out in the woods in the winter wilderness and your canteen is getting a little low, you are surrounded by snow and ice, you don’t need to worry about water, right?  Right?


Well yes and no.  All that snow and ice is just as pure as the source it came from, which might not be that pure.  You should always disinfect any water you melt out of snow or ice.


You must turn all that snow and ice into liquid water to disinfect it.  If there is plenty of fuel and you can get a fire started or have a stove, and you have a pot that can withstand the fire, boiling your water to disinfect it might be your best option.  Don’t forget, during winter treks warm drinks can help you maintain your core body temperature.


For more information on how long to boil your water to disinfect it, read “Water Disinfection: When is boiled, boiled enough…?”, HERE.


But, before you boil it, first you must melt that snow and ice!  Did you know that, since snow is such a good insulator, if you just put a pot of snow over a fire or on a stove you will either scorch the pot, giving the resulting water an awful smell and a burnt taste, or you will melt a hole in the bottom of your thin-walled cook pot! 


To avoid burning the bottom of your pot, you need to “prime” the pot with some liquid water before you put it on the stove or fire to boil.  You should always put a small amount of water into the pot as “seed” water, it acts as a barrier between the heat source, the pot, and the snow or ice.  The article “How to Melt Snow...” recommends putting a cup (8 ounces or 237 ml) of water into a two-liter (68 ounce) pot and bringing it to a boil, before you add snow or ice to the pot.  Other sources recommend adding about an inch (2.5 cm) water to the pot and bringing it to a boil before you start adding snow or ice. 


A picture of my fire-safe pot, setting by the fire, photograph by the Author.


If you don’t have any liquid water to “prime” the pot, something you can do with a fire, but not with a stove is, you can put your pot full of snow and ice near the fire1 so that the pot and the ice slowly warm up and then as the pot slowly fills with water, add more ice or compacted chunks of snow to your “seed” water, stirring occasionally, until you have enough water to “prime” your pot so that you can put it over the fire to boil.


But what if you don’t have a fire-safe pot to melt your snow or ice in?  The United States Military Manual, Survival FM 21-76 has the following suggestions regarding how to melt snow and ice.  You could use your body heat to melt the snow, by placing the snow or ice in a plastic waterbag between your layers of clothing.  This is a slow process, and it might chill you and put you at risk for hypothermia, but it could be used if you don’t have a way to make fire or are on the move.  Additionally, they suggested that you could put the snow or ice in a cloth bag, such as a Millbank water pre-filtration bag, and then hang the bag near (but not over) the fire, above a container to catch the resulting melt water.  In both cases, if you don’t have a fire-safe pot that can withstand the heat of a fire or stove, you will have to use UV, mechanical or chemical means2 to disinfect your water.  For more on this read, “True or False, You Should Drink Water From The Spring Where Horses Drink? ©”, HERE.


A Ziploc® bag of snow, that you could put inside your coat, photograph by the Author.


A cloth bag in front of a fire, used to melt water, hanging on a tripod.  Photograph by the Author.


Remember in a short-term survival situation it is better to drink suspect water, than not drink any at all.  As Peter Kummerfeldt teaches, “A doctor can fix giardia, but he can’t fix dead”, or “doctors can cure a lot of things, but they can’t cure dead”, I have echoed this survival refrain since I first heard it in 2005.  When worst comes to worst, and you are facing dehydration, drinking actually or potentially infected water is better than not drinking any water at all. 


Not all snow and ice are created equal, and all things being equal, you should use ice, old granular snow and last of all, fresh, new, fluffy snow in that order when you are trying to make melt water.


An excerpt from How To Survive On Land And Sea, 1956, by Frank C. and John J. Craighead, page 43.


The reason for this is that the denser the snow or ice you put into your pot the more water it contains and the more that you will have to drink when it is fully melted.  Ice, which is the densest of all, is almost all water.  Old granular snow, which is basically small pellets of irregularly shaped ice, is less dense than ice, but more dense than new snow, it contains more water than new snow, but less than ice.  New-fallen snow is the least dense and contains the least amount of water.


Additionally, ice has the least amount of dead air trapped between the individual pieces.  Old, granular snow still has a significant amount of dead air space surrounding the individual crystals, even if you pack it.  New fallen, fluffy snow is, well...fluffy, and it has the most dead air space trapped around the individual crystals of snow.  The reason why this is important is that this dead air space is what makes snow such a great insulator and why it can burn your pot!


The author’s firepan, photograph by the Author.


I built my fire on a firepan, which you can see in the picture above, as I was putting out my fire.  Originally, my firepan was the base of a broiler tray from an old toaster oven that I re-purposed after it broke several years ago.


So, why did you build your fire on a firepan?”, you ask.  That is a good question, and here is the answer.


There are two reasons and the first is that when you use a firepan, it does less damage to the ground below; particularly, since in this case the firepan is resting on a bed of gravel.  It is always a good idea to leave as small a footprint as possible, when you wander through the woods.


The second, and more important reason in this case, is that if the ground is wet or you are in a low spot where the water table is close to the surface, as the fire grows it warms up the moisture in the ground below and draws the resulting water vapor upwards, this can make it difficult to keep the fire going.  I built this fire on a gravel bank, along a frozen creek and the water table was only inches below it.  Plus, there was a lot of wind-blown snow and ice mixed in with the gravel.  None of this would have been good for my fire, so I put a firepan down and built my fire on top of it.


Don’t forget to put your fire out when you are done.  If you don’t feel any heat coming up from the charcoal and the ashes, then it is out.  I doused my fire with some water and after I pulled my firepan out, I heaped snow on the remains and stirred it around until everything was a soggy cold mess. 


The soggy, cold remains of my fire.  Don’t forget to put your fire out when you are done.  If you don’t feel any heat coming up from the charcoal and the ashes, then it is out.  Photograph by the Author.


I hope that you continue to enjoy The Woodsman’s Journal Online and look for me on YouTube at Bandanaman Productions for other related videos, HERE.  Don’t forget to follow me on both The Woodsman’s Journal Online, HERE, and subscribe to BandanaMan Productions on YouTube.  If you have questions, as always, feel free to leave a comment on either site.  I announce new articles on Facebook at Eric Reynolds, on Instagram at bandanamanaproductions, and on VK at Eric Reynolds, so watch for me.


That is all for now, and as always, until next time, Happy Trails!


Notes


1 Survival FM 21-76 recommends this, especially if you are using improvised pot.


2 For and excellent article on emergency disinfection of drinking water, read the EPAs “Ground Water and Drinking Water: Emergency Disinfection of Drinking Water”, HERE.


Sources


Department of the Army, Headquarters; Survival FM 21-76, March 1986, [Washington, DC], pages 5-2 to 5-3 and 15-15 to 15-16


Craighead, Frank C., and Craighead, John J.; How To Survive On Land And Sea, [United States Naval Institute, Annapolis, MD, 1956], page 43


Lewicky, Andy; “How To Melt Snow For Water”, May 17, 2008, http://www.sierradescents.com/2008/05/how-to-melt-snow-for-water.html, accessed January 23, 2021


Nesbitt, Paul H., Pond, Alonzo W., Allen, William H.; A Pilot’s Survival Guide, [Van Nostrand Reinhold Company, New York, 1978], pages 130-131


Schimdt, David; “Winter Camping Skills: Melt Water”, October 29, 2010, updated February 14, 2017, [© 2021 Pocket Outdoor Media Inc.], https://www.backpacker.com/skills/winter-camping-skills-melt-water, accessed January 23, 2021


Werner, Philip; “How to Melt Snow…Without Burning a Hole in Your Cooking Pot”, [© Copyright 2007-2020, SectionHiker.com and Fells Press LLC], https://sectionhiker.com/how-to-melt-snow-without-burning-a-hole-in-your-cooking-pot/, accessed July 29, 2020


Saturday, January 30, 2021

Sunday, January 24, 2021

Looking for Shed Antlers ©


A shed whitetail deer antler, photograph by the Author.


It’s the middle of December, or maybe it is as late as February, and if you go down in the woods today1...go looking for shed antlers! 


Have you ever found a shed antler?  I have only ever found three, the first was a whitetail deer (odocoileus virginianus) antler that I found decades ago, it had been gnawed to thin slivers by hungry porcupines and other rodents; later I found part of a shed moose (alces alces) antler in Algonquin Provincial Park, on the shores of Welcome Lake, but the best one was the whitetail deer antler in the picture above.  Even knowing where and when to look for them, they are hard to find since, they blend in with the bare winter branches and can become covered by leaf litter.  Also, since they are a valuable nutritional supplement to the forest animals, they will very quickly be gnawed to nothing, by the residents of the forest, in their quest for calcium and phosphorus, for more on this read “Moose Antlers…Why Don’t You Ever Find Them? ©”, HERE.


Do you want to know the wheres and whens of finding shed antlers?  Okay, but before I answer that question you need to know a little bit more about how antlers grow on deer and moose.


A shed whitetail deer antler, photograph by the Author.


The yearly cycle of antler growth starts in the spring when the increasing daylight signals the coming of summer and the return of plants and more available food.  Antler growth peaks in mid-summer and the antlers reach their maximum size in late August.  At the end of summer as the daylight begins to decrease and the testosterone of the buck deer or bull moose begin to increase, the “velvet”, which is a fuzzy, furry skin that covers the antlers and supplies them nutrients, begins to dry up and peel off, a process that both deer and moose speed up by rubbing on trees.  Usually by the middle of September the hard, bony antlers are at last revealed.  Antlers advertise their owner’s dominance during breeding season, the more dominant the buck or bull moose, the more impressive the antlers2.  After the November breeding season is over, declining testosterone levels cause the antler to separate from its base or “pedicel” and the antler falls off and is shed.  Biologist Bill Samuel of the University of Alberta says that shedding antlers is thought to be painless and according to Art Rodgers, the author of Moose, “usually both antlers are shed within hours or days of one another”.  He continued by saying that bull moose will sometimes speed up the process by knocking old antlers against a tree to shed them, whitetail deer bucks probably do the same.  Antlers can shed as early as the middle of December and as late as the middle of February.  After the antlers fall off, the skin will grow over the pedicel and the cycle is ready to begin again. 


The base of a shed antler, showing the pedicel or base where the antler joined the skull, photograph by the Author.


An excerpt from The Woodsman’s Journal Online Field Guide, graphic by the Author.


Looking for shed antlers.  The best time to start looking is in January, since shed season can begin as early as mid-December and it ends in mid-February.  You should search wherever you see signs of moose or deer, the more signs the better.  Search near “yards”, which are areas near food sources where deer or moose winter.  Artist Tom Yacovella, who has found more than 300 shed antlers in the last 50 years, likes to search 40 to 60 yards (37 to 55 meters) to the lee of a “yard”.  Look for white or ivory colored, curved objects.  Bill Healy who wrote about finding deer antlers in “Searching for Sheds”, says antlers that fall with the tines pointing down are easier to find than the ones that fall with tines up, because when the tines point down, the beam of the antler will look like a white crescent rising above the ground.  He also noted that the contrast between a shed antler and the undergrowth is the greatest on an overcast day and then antlers are easiest to see.  On bright sunny days, it can be hard to see into thickets and dead and bleached branches can resemble antlers.  To save on walking, use a pair of binoculars and search the ground from a distance, also remember to look back occasionally, it keeps you from getting “misplaced” and sometimes a different point of view can make a shed antler suddenly visible.


A shed antler, tines down, photograph by the Author.


A shed antler, tines up, which do you think is easier to see?  Photograph by the Author.


So good luck and I hope you find a shed antler, but remember even if you don’t find one, you still had a nice walk in the woods!


I hope that you continue to enjoy The Woodsman’s Journal Online and look for me on YouTube at Bandanaman Productions for other related videos, HERE.  Don’t forget to follow me on both The Woodsman’s Journal Online, HERE, and subscribe to BandanaMan Productions on YouTube.  If you have questions, as always, feel free to leave a comment on either site.  I announce new articles on Facebook at Eric Reynolds, on Instagram at bandanamanaproductions, and on VK at Eric Reynolds, so watch for me.


That is all for now, and as always, until next time, Happy Trails!


Notes


1if you go down in the woods today”, is from The Teddy Bears Picnic, by Henry Hall, 1932


2 Contrary to popular belief, the number of points on an antler does not indicate the age of the buck.  In New York and other northern latitudes fawns will often grow polished knobs for their first antlers and yearlings usually sport only single spikes.  A whitetail buck’s antlers increase in size each year until they reach 6½ years of age, after this the size of their rack usually begins to decline.


From Bill Healy, “Searching for Sheds”


Sources


Frohn, Jim; “Looking for Moose Antlers”, May 2, 2017, [© 2021 University of New Hampshire], https://extension.unh.edu/blog/looking-moose-antlers, accessed January 19, 2021


Healy, Bill; “Searching for Sheds”, New York State Conservationist, April 2005, pages 12 to 14,

https://www.dec.ny.gov/docs/administration_pdf/0405searchsheds.pdf, accessed January 15, 2021


Howard, Brian Clark; “Watch: The moment a moose loses an antler”, March 7, 2016, [© 2015-2021 National Geographic Partners, LLC.], https://www.nationalgeographic.com/news/2016/03/160307-moose-drops-antler-video-wyoming/#:~:text=Samuel%20says%20bull%20moose%20typically,a%20younger%20adult%2C%20he%20notes, accessed January 18, 2021


Raykovicz, Mike; “Antlered Art”, New York State Conservationist, October 2005, page 6 to 8


Sunday, January 17, 2021

Finding Your Way by the Sun...©


A picture taken at 2:13 pm, on a sunny day in the Canadaway Creek gorge.  So what direction was my wife walking?  Photograph by the Author.


This is another addition for the Oelslager Files, I hope that you enjoy it – Author’s Note


In our high-tech society today, many of us have become so dependent on our modern tech and toys that we no longer remember, if we ever bothered to learn, how to find our way from the clues that nature leaves for us.


Maybe you are taking a daylight stroll down a city street, maybe you wandered out of camp on a short daytime hike and now you find yourself “misplaced”, in either case how do you tell north from south without a compass?


Why by the position of the Sun of course!  You can use the Sun’s position in the sky and the time of day (the approximate time, if you also don’t have a watch) to get a general idea of the direction of north, south, east and west.


An excerpt from Bushcraft, Scouting & Woodcraft Notes, Volume I, page 210 to 211, by Dr. R. W. Oelslager, this volume can be found HERE.


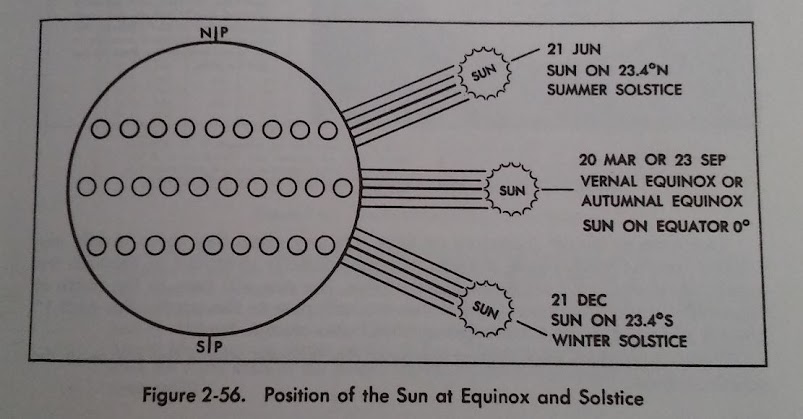
A better version of “Figure 357 Position of the Sun at Equinox and Solstice”, from Outdoor Survival Skills: How to Survive on Land, Sea and Ice!, page 2-86, showing the Sun’s position on the equinoxes and the solstices.  Author’s note, 23.4 degrees is the same as 23 degrees, 24 minutes.


The Sun rises in the east and sets in the west, everyone knows that , right?  Well sort of, the Sun only comes up exactly in the east and sets exactly in the west twice a year, on the spring and fall equinox.  It is close enough to the truth though, that you can use the travel of the Sun through the sky to get a general sense of your direction.  On every other day but the equinoxes, the Sun rises either a little south or north of true east and sets either a little north or south of true west, for more on this read “How to Find Your Way Without A Compass, Part One, Orientation By The Sun ©”, HERE.


Adapted from Survival: Land, Sea, Jungle, Arctic, by The Infantry Journal, 1944, p. 41, Fig. 16, by the Author.  Another way of looking at the Sun’s position on the equinoxes and solstices.


So, if you know the time of day and the position of the Sun, you can get a general direction of where north, south, east and west is.  The Soldiers’ Own Note Book and Diary For 1918, has a great illustration which shows the general position of the Sun in its journey through the sky and if you are towards the Sun, what direction you are facing. 


An excerpt from Soldiers’ Own Note Book and Diary For 1918, page 30, showing the position of the Sun at different times during the day in the northern temperate zone on the equinoxes.


In the northern temperate zone, which is from 23.4 degrees north latitude to the Arctic Circle, the Sun is always south of you, rising in the east, traveling through the south, and then setting in the west.  So, if you are facing south and it is between sunrise and an hour or so before noon the Sun will be shining on the left side of your head, between 11:00 am to 1:00 pm the Sun will be mostly overhead and ahead of you, and from around 1:00 pm to sunset the sun will shine on the left side of your head.  All this reverses if you are facing north, so from morning to about 11:00 am the Sun will shine on your right side, from 11:00 am to 1:00 pm the sun will be mostly overhead and behind you, and from 1:00 pm until sunset the Sun will shine on the right side of your head.


In the southern temperate zone, from 23.4 degrees south latitude to the Antarctic Circle the situation is reversed, with the Sun always north of you, as it rises in the east, travels through the north, and then sets in the west.  So, if you are facing south then the rising Sun will shine on your left side, around noon it will be mostly overhead and behind you, and in the afternoon the Sun will be on your right side.  If you are facing north the Sun as it rises will shine on your right side, around noon it will be overhead, and in the afternoon, it will be on your left side.


In the area from the equator to either 23.4 degrees north latitude or 23.4 degrees south latitude, things are more confused with, of course, the Sun rising in the east and setting in the west, however at noon the Sun can either be north or south of you, depending on the time of the year, in these latitudes.


The arrow in this picture points towards the sun, photograph by the Author.


So what direction was my wife walking when I took the picture of her in the Canadaway Creek gorge?  Do you know?  I bet you can figure it out.


The correct answer is my wife was walking north.  If you didn’t get the answer right, here is how you figure it out.  Okay, the first thing that you need to know is, that I took that picture on September 19th at 2:13 pm in the northern temperate zone.  The first things you need to remember is that in September your watch is probably set to daylight savings time, so subtract an hour from the time on your watch to get standard time.  So, in standard time the picture was taken at 1:13 pm and the Sun is just a little past its zenith or highest point in its daily travel across the sky (for more information read “Daylight Savings Time in the Wilderness ©”, HERE).


When you look at the picture, it is clear from the shadow that the Sun is directly above and behind my wife’s head.  In the northern hemisphere, at noon if the Sun is above and behind you, then the Sun must be close to its most southern point in the sky.  From this you can tell that my wife was walking north! 


A portion of the Earl Cardot Eastside Overland Trail, from Chautauqua County Parks.  The red arrow shows the approximate location where the picture was taken.


Just to prove to you that this is the case, the red arrow on the map shows the approximate location where the picture was taken, and the Canadaway creek at this point flows mostly north.  Since we were walking downstream along the creek, when I took the picture, we were walking north.


This method of determining north and south is not as exact as the shadow-tip method1 (for more information on this method , read “How To Find Your Way Without A Compass, Part Three, The Shadow-tip Method©”, HERE) and will only give you a general idea of your directions, but hey, a general direction is better than no direction at all! 


So, if you ever find yourself “misplaced” or even simply curious as to where north, south, east and west are you can simply look to the Sun.  You should still, always carry a compass with you, though, because it is hard to find the Sun on a cloudy day!


I hope that you continue to enjoy The Woodsman’s Journal Online and look for me on YouTube at Bandanaman Productions for other related videos, HERE.  Don’t forget to follow me on both The Woodsman’s Journal Online, HERE, and subscribe to BandanaMan Productions on YouTube.  If you have questions, as always, feel free to leave a comment on either site.  I announce new articles on Facebook at Eric Reynolds, on Instagram at bandanamanaproductions, and on VK at Eric Reynolds, so watch for me.


That is all for now, and as always, until next time, Happy Trails!


Notes


1 The shadow-tip method was devised by Robert S. Owendoff in 1959.  This method was adopted by the U.S. Army as a field expedient way of finding your direction on January 26, 1962.


From a review of Better Ways of Pathfinding, by Robert S. Owendoff, [Stackpole Company, Harrisburg, PA, 1964], by Major William C. O’Connell on page 62 of the March-April 1965 Infantry magazine (Vol. 55, No. 2)


Sources


Department of the Airforce, Outdoor Survival Skills: How to Survive on Land, Sea and Ice!, (originally published as Survival), [Info Books, Toronto, Canada, 1980] p. 2-86


Gibson, J.; Soldiers’ Own Note Book and Diary For 1918, [Charles Letts & Co., London, 1918], page 30, http://heritage.christchurchcitylibraries.com/Archives/OSullivan/Clutterbuck/Diary/PDF/0050.pdf, accessed August 16, 2018


O’Connell, William C., Major; Infantry, March-April 1965, Vol. 55, No. 2, page 62 (page 147 on the PDF), https://books.googleusercontent.com/books/content?req=AKW5QadY2HyR7rtXN-uioWEUpk97F9F0CgT4dSkl9SoxeL8m42Bjr5jqB3Fj046OBs3RGLuNRKqntX0fkTQXK5te9FhDV73UBmkafb_JeiRQerGrIjDndlcwiT2OKH21ZzH3WQ3H0zeapMh-VfXOnMF0tzd0bm2M_2uZjFawsNErdY64HlI9w2s8Ak1Cng9awgMN232ijuoAjvZz2ZsUpVA-wjqvtxQJ8a74P18We-KRSVDxyNdAN7U, accessed January 13, 2021


Oelslager, R. W., Dr.; Bushcraft, Scouting & Woodcraft Notes, Volume I, [privately published], https://ia801603.us.archive.org/27/items/BushcraftNotes/Bushcraft%20Notes.pdf, accessed January 8, 2021


Airlines War Training Institute, Survival: Land, Sea, Jungle, Arctic, [The Infantry Journal, Washington, D.C., 1944] p. 41-42


Sunday, January 10, 2021

Could You Survive – First-Aid Supplies for a Survival Kit©


During the late 70s and early 80s, the Spokane Daily Chronicle, printed a column in the Outdoors section, called “Could You Survive”, which was written by U.S. Air Force survival instructors. 


An excerpt from the Spokane Daily Chronicle, March 28, 1978; “Could You Survive”; by Master Sergeant Ronald Kluck.


Soap dishes and Altoids tins make great survival containers, photograph by the Author.


In the column that was printed on March 28, 1978, Master Sergeant Ronald Kluck1, asked what first aid supplies you would choose for a small, personal survival kit.  His question assumes that space is limited and that you must prioritize your first aid needs, since you only have room for one type first aid supplies in your two small containers.


So, what would you choose?  Would it be a pain killer, like aspirin or acetaminophen; some antibiotics, such as triple antibiotic ointment2; maybe some gauze pads, band aids and tape; or maybe you would choose an antiseptic, like BZK towelettes (read “Alcohol Prep Pads...BZK Towelettes…Hand Wipes…Wound Wipes...What?! ©”, HERE, for more on antiseptics).


Choice “C.  Compresses and tape”, photograph by the Author.


Air Force Master Sgt. Ronald Kluck wrote that, “In most survival emergencies your concern will be to stop bleeding and protect any injury...”.  This follows the military “Rule of Threes”, which prioritizes survival tasks and, according to the “Rule of Threes”, dealing with medical issues, particularly bleeding, is at the top of priority list.


Because of this, Master Sgt. Kluck, stated that the correct answer would be “C.  Compresses and tape”.  He felt that in most circumstances a few various sized band aids and two or three 2 x 2 inch (5 x 5 cm) sterile gauze pads would be enough to take care of most minor injuries and most situations.  The Master Sgt. continued by saying that “Any injuries that cannot be handled by these items would probably be beyond anything that you could carry in a personal survival kit”.


So, what item did you choose?  Did you choose “C.  Compresses and tape”, or did you pick a different first aid item?  If you didn’t choose “C.”, maybe you chose “A.  Pain killers such as aspirin”?


Choice “A.  A pain killer such as aspirin”, photograph by the Author.


Master Sgt. Kluck thought that “A.” was a bad choice because pain killers and other drugs or medicines can have negative survival side effects.  In the case of pain killers they might lessen your alertness, which he felt could increase your danger.  Many common drugs have side effects that can negatively affect you in a survival situation, for example the caffeine in a cup of coffee or the nicotine in a cigarette, are both vasoconstrictors of the blood vessels of the skin and by reducing the blood flow these drugs can lower the temperature of your arms, legs, fingers, ears and nose.  This is why the Master Sgt. recommended the following general survival rule, “Don’t do anything that will hamper the natural defenses of the body”.


All of this being said, if you do require medication for a personal medical situation, before including it in your survival kit, check with your Doctor and explain the situation so that he or she can prescribe a medication with the fewest number of negative survival side effects. 


Choice “B.  Antibiotic” and choice “D.  Antiseptic”, photograph by the Author.


Did you pick option “B.” or maybe choice “D.”?  Master Sgt. Ronald Kluck didn’t think that including antiseptics or antibiotics in your survival kit was a good option, if space is limited.  He also noted that since most “survival emergencies are of short duration”, and since statistics show that 97% of “misplaced” persons are found within 24 hours3, any infections from wounds, which will take some time to develop, can be taken care of by medical personnel after your return or you’re your rescue.


A small bar of soap inside a Ziploc® bag, from my large first aid kit, photograph by the Author.


Master Sgt. Kluck also suggested that you carry a small bar of soap in your survival kit, which you could use to clean any minor wounds to prevent infection.  Additionally, soap can be used to keep yourself clean, good hygiene and hand washing can prevent diseases from being spread4.


So, you are probably saying, “Okay BandanaMan, what did you choose?”  Well, that is a good question.  I built my current survival kit several years ago, long before I read Master Sergeant Ronald Kluck’s article and I included a couple of foil packets of triple antibiotic ointment in my kit.  I did this for two reasons: first, because it can be used to prevent infections in minor cuts or abrasions, but second, since it is made with a petroleum jelly base, it makes an excellent fire extender which will keep a flame going long enough for tinder to catch the kindling on fire.  I always like survival kit items that can be used for more than one purpose. 


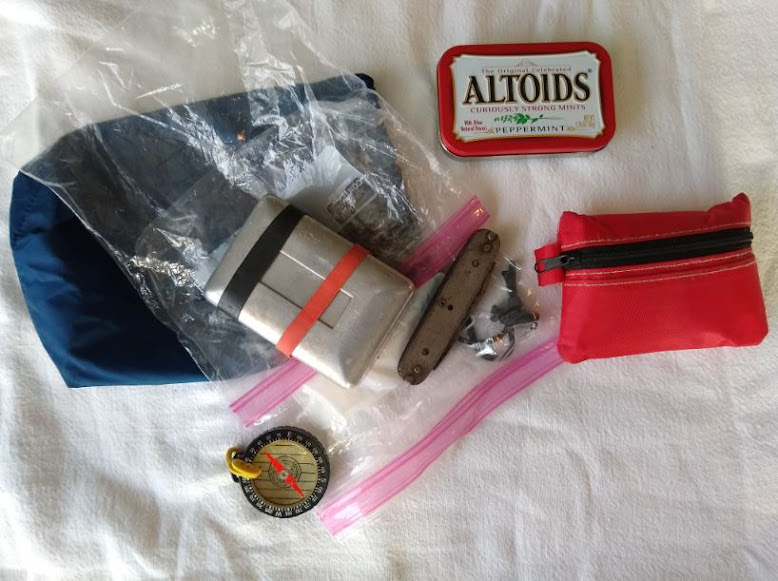
The Author’s survival kit and his pocket first aid kit, with an Altoids tin for comparison.  For reference my survival kit weighs 7 ounces (198 grams) and my first aid kit weighs 2 ounces (57 grams).  Photograph by the Author.


Also, I always carry a small first aid kit in my vest pocket or in a pocket of my life jacket, in addition to my survival kit.  This first aid kit contains, pain killers, antibiotics, band aids, gauze pads, tape, and antiseptic.  So quite honestly, I had never thought of having to limit myself to just one first aid item, and I don’t!


Incidentally, I do carry a small bar of soap inside a Ziploc® bag, for hygiene purposes, in my large first aid kit, which I carry in my pack.


“Could You Survive”; by Master Sergeant Ronald Kluck, from the Spokane Daily Chronicle, March 28, 1978; which can be found HERE.


I hope that you continue to enjoy The Woodsman’s Journal Online and look for me on YouTube at Bandanaman Productions for other related videos, HERE.  Don’t forget to follow me on both The Woodsman’s Journal Online, HERE, and subscribe to BandanaMan Productions on YouTube.  If you have questions, as always, feel free to leave a comment on either site.  I announce new articles on Facebook at Eric Reynolds, on Instagram at bandanamanaproductions, and on VK at Eric Reynolds, so watch for me.


That is all for now, and as always, until next time, Happy Trails!


Notes


1 As far as I can tell, Richard Kluck was born August 27, 1938 in Milwaukee Wisconsin.  He entered the U.S. Air Force on October 9, 1957, retiring as a master sergeant on April 30, 1978.  He died on December 10, 2007 at the age of 69.


From https://www.findagrave.com/memorial/27512844/ronald-alexander-kluck and https://images.findagrave.com/photos/2013/357/27512844_138795058642.jpg, both accessed December 26, 2020.


2 Triple antibiotic ointment contains neomycin, bacitracin, and polymyxin, antibiotics work by stopping the growth of bacteria”.  Triple antibiotic ointment is only effective when used to treat bacterial skin (topical) infections.


From https://www.webmd.com/drugs/2/drug-1254/triple-antibiotic-topical/details


3 The searchers should find you in the next 72 hours, as long as you stay put, if you wander you simply make it harder for the searchers to catch up with you.  Devon O’Neill, writing in Outside online, noted that statistically most “misplaced” persons are found within 72 hours of being reported missing.  He also wrote that, according to Paul Anderson a 42-year veteran of the National Park Service who spent 11 years as superintendent of Denali National Park, 85% “misplaced” persons are found within the first 12 hours and 97% within the first 24 hours of being reported missing.


From “Survival Drill”, Updated and Explained ©”, HERE.


4 For more read “Winning The Germ War” by Morgan Atwood, if you don’t receive the magazine it can be found here, HERE.


Sources


Kluck, Ronald, Master Sergeant; “Could You Survive”, Spokane Daily Chronicle, Tuesday, March 28, 1978; https://books.google.com/books?id=fftLAAAAIBAJ&pg=PA10&dq=survival+kit&article_id=2906,2947774&hl=en&sa=X&ved=2ahUKEwjb17Sp7-rpAhWRcc0KHY4ABvo4qgEQ6AEwAXoECAUQAg#v=onepage&q=survival%20kit&f=false, accessed December 26, 2020


Morgan Atwood, “Winning The Germ War”, Offgrid, Issue 40, [© 2021 Recoil Offgrid], page 50 to 55