Sunday, August 29, 2021
Dunk Testing Matches...Say What!? ©

UCO Stormproof and UCO Titan Stormproof matches, photograph by the Author.
UCO Stormproof
matches...

The 4-1/8 inch (10.5 cm) long UCO Titan Stormproof matches, left, and the 2-3/4 (7 cm) long UCO Stormproof matches, right. Photograph by the Author.
UCO
makes three different types of Stormproof matches, the Titan Stormproof match, with
a 25-second-long burn time, the Stormproof match, which will burn for
15-seconds, and the Survival Stormproof, match that burns for 12-seconds. Now the good news about all these matches is
that they are windproof, waterproof, and submersible, the bad news is that they
are not strike-anywhere matches, they are strike-on-the-box matches and must be
struck on the striker to light. However,
UCO ships two extra strikers inside the box, besides the two that are on the sides
of the box.
If
your UCO matches become wet, just wipe them dry, before you light them. If the box and striker get wet, the striker
will still work, but it must be dried first, so until it is dry, use one of the
spare strikers.
These
are great additions to your survival kit; I keep four UCO Stormproof matches
and a striker in my survival kit and have for years. Also, I am going to add several of the UCO
Titan Stormproof matches, with their 25-second-long burn time and their ability
to get wet and still burn, to my tinder-bag, since they would make starting a
fire on a rainy day a lot easier. For
more on tinder-bags and starting fires when it is wet read “The Book of
Knowledge, Camping and Camp Lore, 1957©”, HERE,
and “Could You Survive? Building a Fire When it is Wet ©”, HERE.
The Dunk
Test...

The Author dunking a lit UCO Titan Stormproof match into a pot of water, photograph by the Author.
“BandanaMan,
what about dunk testing the match”, you ask, “what happened!?”
I
dunk tested both the UCO Titan Stormproof and the UCO Stormproof match, by
dipping the lit matches into a pot of water.
Both matches sizzled and bubbled under the water and when I pulled them
out, they both burst back into flames!
So,
next time you go into the woods pack some UCO Stormproof matches, because you
never know when the weather will turn wet.
For
more on UCO Stormproof matches watch my video “Dunk Testing UCO Stormproof Strike-on-the-box
Matches...Say What!? ©”, HERE, or go
to UCO Gear, HERE.

Lighting an UCO Titan Stormproof match, photograph by the Author.
Don’t forget to come back next week and read “Survival
Kits, Your Ace In The Hole ©”, where we will talk about Richard C. Young III’s
August 1972 article, “Ace In The Hole” and survival kits.

An ace in the hole, photograph by the Author.
I
hope that you continue to enjoy The Woodsman’s Journal Online and look for me
on YouTube at Bandanaman Productions for other related videos, HERE. Don’t forget to follow me on both The
Woodsman’s Journal Online, HERE,
and subscribe to BandanaMan Productions on YouTube. If you have questions, as always, feel free
to leave a comment on either site. I
announce new articles on Facebook at Eric Reynolds, on Instagram at
bandanamanaproductions, and on VK at Eric Reynolds, so watch for me.
That
is all for now, and as always, until next time, Happy Trails!
Sources
UCO
Gear, “Award-Winning Fire Starting Collection, https://www.ucogear.com/award-winning-fire-starters,
accessed August 28, 2021
Saturday, August 28, 2021
Sunday, August 22, 2021
Pandemic Masks...1918 Style©

From Wikimedia, originally published in Illustrated Current News, New Haven, CT. Volume 1, no. 785, 1918, by Paul Thompson, HERE.
Pandemic
masks are back in the news again, and so I thought we would look way back to
1918, to see what people did during the Spanish flu
pandemic.
“But
Bandanaman, masks...”, you say, “normally you write about
survival and the wilderness!”
You’re
right, I do, and I would rather be out in the woods than in the city, but hey,
you have to be able to survive in the city as well as survive in the wilderness. So, you must be prepared for both, and remember
knowledge is power.

A picture of a Red Cross nurse wearing an influenza mask, from “How To Make Your Own Influenza Mask”, The Argus, Albany, New York, October 15, 1918, page three, HERE.
During
the Spanish flu pandemic of 1918, the Red Cross of America, at least in the
city of Albany, New York, recommended that people make and wear masks to
protect themselves from the flu. So just
how did Grandma make them during the Spanish Flu pandemic, of 1918?
The 1918
Red Cross Pattern mask

An excerpt from “How To Make Your Own Influenza Mask”, The Argus, Albany, New York, October 15, 1918, page three.
On
page 3 of the October 15, 1918, edition of The Argus, an Albany, New York
newspaper, in an article called “How To Make Your Own
Influenza Mask”, the Red Cross provided instructions on how to make
pandemic masks from unbleached muslin1. Muslin is a plainly woven cotton fabric of
various weights, from sheer to coarse sheeting.
Unfortunately, the author of “How To Make Your Own Influenza Mask”
didn’t mention what weight (thickness) of muslin to use, so I am using an old
cotton sheet for my mask, it might not be the right weight, but at least it
will be the right pattern.

The 1918 Red Cross Pattern mask, created by the Author.
After
cutting out an 18 inch (45.7 cm) square piece of muslin, fold the cloth in half
and then measure down 5 inches (12.7 cm) and make a cut 3 inches (7.6 cm) long
in from the fold towards the sides, through both layers of cloth. Make another cut 1 inch (2.5 cm) below the
first cut, also 3 inches (7.6 cm) long, from the fold towards the sides. Join the two cuts together to make the eye
slit. Next sew on the two ties, one on
each side, at the edge of your mask just below the eye slit, 6 inches (15.2 cm)
down from the top of your mask. And you
are done!

The finished 1918 Red Cross Pattern mask, photograph by the Author.
To
wear the mask simply tie the ties behind your head and then pull the part of
the mask hanging down from your chin back and behind you head pinning the
fabric from the sides and bottom of the mask, there with a safety pin. I was unable to duplicate the 1918
instructions and pin the top sides of my mask back, there just wasn’t enough
fabric.


 |
Three views of the Author wearing the finished 1918 Red Cross Pattern mask, photographs by the Author.
For
your convenience, the entire “How To Make Your Own Influenza Mask” article, is
reproduced below.

“How To Make Your Own Influenza Mask”, The Argus, Albany, New York, October 15, 1918, page three, HERE.
For
more on pandemic masks read “COVID-19, And A Simple, Homemade Respiratory Mask
©”, HERE,
“COVID-19, And A Simple, Homemade Respiratory Mask, Part Two ©”, HERE,
or watch my video “COVID-19, And A Simple, Homemade Respiratory Mask ©”, HERE.

An excerpt from The Evening Gazette, Port Jervis, New York; October 28, 1918, page 7, HERE.
Don’t forget to come back next week and read “Dunk Testing
Matches...Say What!? ©”, where we will talk about UCO Stormproof Matches and
whether or not you can really dunk them in water and have them relight.

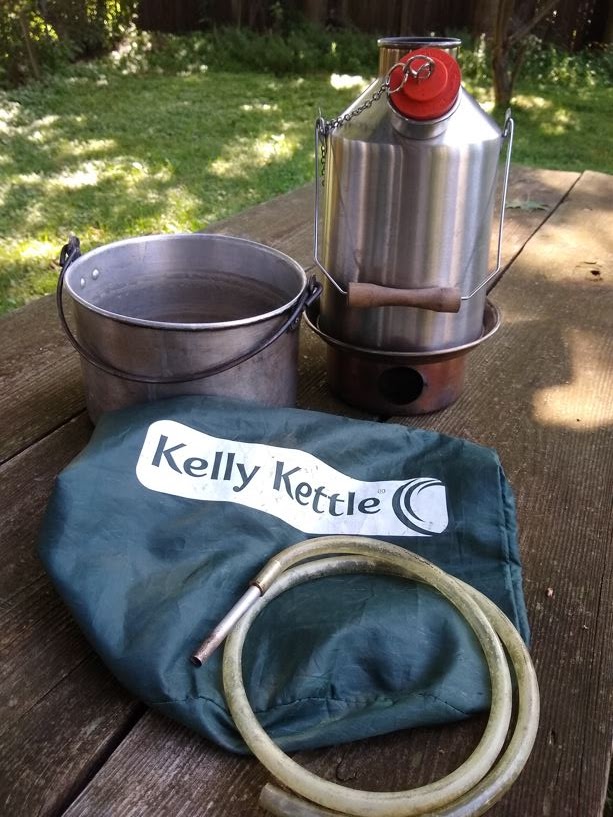
UCO Stormproof Matches, photograph by the Author.
I
hope that you continue to enjoy The Woodsman’s Journal Online and look for me
on YouTube at Bandanaman Productions for other related videos, HERE. Don’t forget to follow me on both The
Woodsman’s Journal Online, HERE,
and subscribe to BandanaMan Productions on YouTube. If you have questions, as always, feel free
to leave a comment on either site. I
announce new articles on Facebook at Eric Reynolds, on Instagram at
bandanamanaproductions, and on VK at Eric Reynolds, so watch for me.
That
is all for now, and as always, until next time, Happy Trails!
Notes
1
My thanks to Donny Aben, from the Fort Brewerton Historical Society, in
Brewerton, NY (http://www.fortbrewerton.net/),
for first showing me the article from The Argus.
Sources
“How To Make Your Own
Influenza Mask”, The Argus, Albany, New York; October 15, 1918, page 3, https://nyshistoricnewspapers.org/search/pages/results/?SearchType=prox5&from_year=1725&to_year=2019&ortext=&andtext=&phrasetext=&proxtext=how+to+make+your+own+Influenza+mask&proxdistance=5&dateFilterType=range&date1=01%2F01%2F1725&date2=12%2F31%2F2019&rows=20&searchType=advanced, accessed August 14, 2021
The Evening Gazette,
Port Jervis, New York; October 28, 1918, page 7, https://nyshistoricnewspapers.org/lccn/sn83031647/1918-10-28/ed-1/seq-7.pdf, accessed August 14, 2021
Wikimedia, Illustrated
Current News, New Haven, CT. Volume 1, no. 785, 1918, photograph by Paul
Thompson, https://commons.wikimedia.org/wiki/File:Illustrated_Current_News-1918-Thompson,_Paul.png
Sunday, August 15, 2021
Kelly Kettles®... The Faster Way to Boil Water! ©
The Author’s Scout model Kelly Kettle®, photograph by the Author.
Throughout
the World, and throughout most of humankind’s existence, the only way to cook
food and boil water was a “three-stone fire”. The three-stone fire is a wood-fueled fire,
made by placing three stones 120 degrees apart, in a circle, to make a stand
for a cooking pot. This is the classic campfire
and today many people still rely on this method to disinfect their water by
boiling (for more about disinfecting water by boiling, read “Water
Disinfection: When is boiled, boiled enough…? ©”, HERE).
The Faster
Way to Boil Water...

The
problem with a three-stone campfire is that it isn’t very efficient, having
only an average efficiency of 14%, and because of this it uses a great deal
more fuel to boil water than other methods.1
And
that is why you need to have a Kelly Kettle®!
Kelly Kettles® are a type of rocket stove with a surrounding water-chamber
and as the representatives of both Kelly Kettle USA and Kelly Kettle UK
explained, a Kelly Kettle® channels all the heat of the fire up and over the
large surface area of the chimney and allows a small fire to quickly boil the
water within the water-chamber.2
I
was first introduced to Kelly Kettles® in 2014, when I started as a guide with
Birchbark Expeditions. I was so
impressed with how fast it boiled water (faster than I could boil water on my
gas stove at home in my kitchen) that as soon as I got back from the trek, I
went out and bought a “Scout” model Kelly Kettle®. I couldn’t believe how well and how fast it
worked! And it doesn’t need much fuel to
boil water, either. In fact, I often
feed my Kelly Kettle® on small sticks and chips that have fallen to the ground,
when other larger logs were cut up for fuel, wood scraps that normally are just
left lying on the ground near the fire pit.
Lately, I have been thinking about buying a small, Trekker model Kelly
Kettle® for use when I am backpacking, since space and weight are at a premium
then.
How To Use a
Kelly Kettle...?

Kelly Kettle ® Scout model instructions for use, from the box, photograph by the Author. Always follow the instructions.
“So,
how do you use a Kelly Kettle”, you ask?
Good question let’s go over that.
First,
read and follow the instructions that come with your kettle. As with any stove or fire, serious injuries
can occur, if you use the product incorrectly.
Gather
tinder and kindling, but you can skip gathering wrist-sized fuel wood, since
once the fire is burning in the fire base, you will only be feeding the kettle
with kindling. For more on what tinder
and kindling is, and how much to gather before you light your fire, read “Fire
Burns Up! ©”, HERE.

A bird’s nest in the fire base, photograph by the Author.
You
build and light your fire in the Kelly Kettle® fire base, just like you would
for any other fire. When you have
gathered all the tinder and kindling that you will need to light and sustain
the fire, in the fire base of your Kelly Kettle®, you will need to make a “Bird’s
Nest” with a circle of kindling, with some tinder in the center of it.

Tilt the fire base on its side and let the hot flames of the match or lighter rise and light the bird’s nest, photograph by the Author.
Tilt
the fire base up, just like you would if you were using a piece of bark to protect
your fingers and hold your bird’s nest together, so that the hot flames and
gases of your match or lighter will rises into it. Don’t forget fire burns up!
Next
fill the Kelly Kettle® with water. Never
put your kettle over a fire when it is empty, I have seen earlier, aluminum
models melt when heated while empty. The
newer stainless-steel models handle heat better, but it is still a bad idea to
heat the kettle when it is dry. Also,
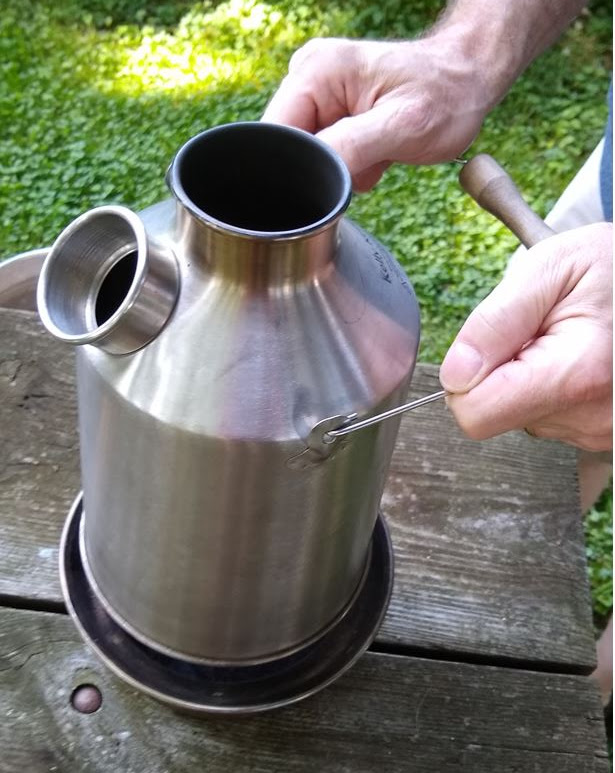
always remove the orange stopper or any other plug from the spout before you
put it on the fire, to avoid serious burns.
The only exception to this rule is if your Kelly Kettle® came with a
green whistle-stopper. A couple of years
ago, Kelly Kettle introduced a new green, whistle-stopper for the larger “Base
Camp” and medium “Scout” model kettles, that you can leave in as the water
boils and which whistles so that you know when the water is boiled.

The Author’s smoke shifter, photograph by the Author.
Something
that will make it easier to light and sustain a fire in a Kelly Kettle® is a “smoke
shifter”, a flexible, plastic tube with a metal end, that you can use to
blow into the wind-hole of the fire base.
I made mine out of three feet (.9 meters) of 5/16 (8 mm) diameter
flexible, plastic fish tank air tubing and a piece of an old metal wind chime. I keep it coiled up in the fire base, when it
is not in use.

The Author demonstrating how to use a smoke shifter, photograph by the Author.
Once
you have the fire going in the Kelly Kettle® and the flames are rocketing out
of the chimney, voilà, you will have boiled water in just a few minutes. Follow the instructions from your Kelly
Kettle® when removing it from the firebase so that you don’t get burned.
Always remove the kettle from the fire base this way and DO NOT put your hands over the chimney! Picture by the Author.
You
can find a lot more information and how-to videos on Kelly Kettles® on the Kelly
Kettle UK website, HERE,
and the Kelly Kettle USA website, HERE.
Don’t forget to come back next week and read “Pandemic Masks...1918
Style©”, where we will talk about how to make pandemic masks the way Grandma
did during the Spanish Influenza pandemic, of 1918.

Originally published in "Illustrated Current News", New Haven, CT. Volume 1, no. 785, 1918, by Paul Thompson.
I
hope that you continue to enjoy The Woodsman’s Journal Online and look for me
on YouTube at Bandanaman Productions for other related videos, HERE. Don’t forget to follow me on both The
Woodsman’s Journal Online, HERE,
and subscribe to BandanaMan Productions on YouTube. If you have questions, as always, feel free
to leave a comment on either site. I
announce new articles on Facebook at Eric Reynolds, on Instagram at
bandanamanaproductions, and on VK at Eric Reynolds, so watch for me.
That
is all for now, and as always, until next time, Happy Trails!
Notes
1
The average thermal efficiency for campfires is 14%, but it can be as low as 5%
if it is poorly tended, if there is wind or if the wood is moist, and it can be
as high as 20-30% if it is protected from the wind and tended with care. The skill of the person tending the fire and
the weather conditions are responsible for how efficient the fire is. A tip to increase the efficiency of a
three-stone fire is to push the sticks of wood further into the center of the
fire as they burn, this allows the wood to dry out as it is approaching the
flames and when this is done the fire can burn hotter and more efficiently.
Just
to compare, the thermal efficiency of a metal can rocket stoves have an efficiency
of between 23% and 54% (although most sources state that the average efficiency
is 20%), natural gas cooking stoves have an efficiency of 23%, microwave ovens
have an efficiency of 19% and electric stove tops only have an efficiency of
only 13%!
From
“Improving
the three-stone fire”, by C. Ballard-Tremeer and H. H. Jawurek
“Well-Tended
Fires Outperform Modern Cooking Stoves”, by Low-Tech Magazine
2
From personal communications with representatives of Kelly Kettle USA and Kelly
Kettle UK.
Sources
Ballard-Tremeer,
C. and Jawurek, H. H.; “Improving the three-stone fire”, Boiling Point No.
36, November 1995 (ITDG, 1995, page 35), http://www.nzdl.org/cgi-bin/library.cgi?e=d-00000-00---off-0fnl2%2E2--00-0----0-10-0---0---0direct-10---4-------0-1l--11-en-50---20-about---00-0-1-00-0-0-11-1-0utfZz-8-00&cl=CL2.7.3&d=HASHb8c186878d47dbd7754211.7.3>=1, accessed
August 9, 2021
“Well-Tended
Fires Outperform Modern Cooking Stoves”, Low-Tech Magazine,
https://www.lowtechmagazine.com/2014/06/thermal-efficiency-cooking-stoves.html,
accessed August 9, 2021
Sunday, August 8, 2021
Fire Burns Up! ©
From Wikimedia, “Fire triangle.svg”, by Gustavb, March 7, 2006, HERE.
Whenever I teach people how to build a fire,
besides confusing kindling for tinder and not gathering enough wood, the one
thing that everyone gets wrong when lighting a fire, is they forget that fire
burns up!
 |
A Kelly Kettle® fire-base filled with kindling, you can’t light this by dropping a match on it. Photograph by the Author.
This happened again recently, I sat and watched,
while some scouts who were going canoeing with me through the Adirondacks, tried
to start a fire in the fire-base of a Kelly Kettle® and they made exactly this mistake. They made a pile of pencil-sized kindling
sticks, without adding any tinder, and then dropped a match onto the top of the
pile and wondered why the fire wouldn’t light.
So,
let’s go over the basics of lighting a fire!
Gather
Tinder, Kindling and Wood...
 |
An excerpt from Combat and Survival Volume 4, page 227.
Most
people don’t know the difference between tinder, kindling and fuel wood. Tinder isn’t kindling and kindling isn’t fuel
wood.
In
a nutshell, tinder catches the sparks from your flint and steel or flame from
your match and ignites your kindling, kindling takes up the glowing embers of
your tinder and turns it into flames to light your fuel wood on fire.
To
get a fire going quickly and easily, you need to have the right amounts of all
three on hand before you light that first match. Oh, and your tinder and the kindling must be bone
dry.
 |
The biggest difference between tinder, kindling and fuel wood is size. An excerpt of “How To Build A Campfire”, from Scoutmastercg.com, HERE.
Remember
to have plenty of fuel wood on hand, as it always burns faster than people
imagine. Craig White, a Canadian
survival expert, teaches that you will burn through a generous armload of wrist
sized sticks in an hour. A good rule
of thumb to remember is that just over two pounds (one kilogram) of wood is
required to boil one quart (approximately a liter) of water when cooking over a
campfire1.
Make a
Bird’s Nest ...
 |
A bird’s nest, photograph by the Author.
A “Bird’s Nest” is a circle of kindling with tinder in the center. Just like birds, who build a strong ring of
twigs to hold soft grasses and padding to cushion their eggs, you should build
a ring of kindling with tinder in the center to help your fire grow.
 |
A ring of fine pine twigs, surrounding a tinder ball made with a ring of yellow birch bark, around toilet paper and a piece of fuzzed up jute string. Note that I am holding it against a piece of bark, this bark will shield my fingers from the heat of the flames when I light the bird’s nest and will prevent any ground water from extinguishing the new fire. Photograph by the Author.
Remember
Fire Burns Up!
 |
While pinching the bird’s nest against the bark shield, turn it so that the flames will light the tinder and flare up into the kindling surrounding it. Photograph by the Author.
Don’t
forget hot flames and gases rise, which means that you must turn your bird’s
nest, so that the hot flame of your match or lighter rises into it
Now
all you have to do is feed your fire and keep it going. Remember to not put too much wood onto it too
quickly and smother it, start with small pieces of kindling, and then gradually
add wrist-sized pieces of fuel as the flames grow.
Don’t forget to come back next week and read “Kelly Kettles... The
Faster Way to Boil Water!”, where we will talk about how to use a Kelly Kettle®
to boil your drinking water.
For
more on fire building check out these articles, “The Book of Knowledge, Camping
and Camp Lore, 1957©”, HERE
and “Survival Tips From Jack London, Part One©”, HERE. Also, I hope that you enjoy the excerpts from
The Woodsman’s Journal Online Field Guide, below, and I hope that they will
help you build your fire.


 |
Excerpts from The Woodsman's Journal Online Field
Guide, by the Author. |
I
hope that you continue to enjoy The Woodsman’s Journal Online and look for me
on YouTube at Bandanaman Productions for other related videos, HERE. Don’t forget to follow me on both The
Woodsman’s Journal Online, HERE,
and subscribe to BandanaMan Productions on YouTube. If you have questions, as always, feel free
to leave a comment on either site. I
announce new articles on Facebook at Eric Reynolds, on Instagram at
bandanamanaproductions, and on VK at Eric Reynolds, so watch for me.
That
is all for now, and as always, until next time, Happy Trails!
Notes
1
From Introduction to Biomass Energy Conversions, by Sergio Capareda.
Mr. Capareda calculates that “1 kg (2.2 lbs.) of wood has several times
more energy than that required to boil 1 L of water”, however since campfires
are very inefficient much of that energy will be lost and thus one kilogram of
wood per one liter of water is a good rule of thumb.
Sources
Capareda,
Sergio; Introduction to Biomass Energy Conversions,
[CRC Press, Taylor and Francis Group, Boca Raton, Florida, 2014], p. 69,
https://books.google.com/books?id=eFLOBQAAQBAJ&pg=PA69&lpg=PA69&dq=how+many+kilograms+of+wood+does+it+take+to+boil+1+liter+of+water&source=bl&ots=3DEm8Rl7ad&sig=ACfU3U034BzjsPtB1B0Hp1hhn--ZzGft5w&hl=en&sa=X&ved=2ahUKEwj4ioeAoZ_yAhVtKVkFHQPOB-sQ6AF6BAgaEAM#v=onepage&q=how%20many%20kilograms%20of%20wood%20does%20it%20take%20to%20boil%201%20liter%20of%20water&f=false,
accessed August 7, 2021
Combat
and Survival Volume 4, [H. S. Stuttman, Inc., Westover,
Connecticut, 1991], p 227
Green, Clarke; “How to Build a Campfire”, November 7, 2012, [Dynamik-Gen,
2019] https://scoutmastercg.com/how-to-build-a-campfire/
Wikimedia, “Fire
triangle.svg”, by Gustavb, March 7, 2006, https://en.wikipedia.org/wiki/Fire_triangle#/media/File:Fire_triangle.svg, accessed August 1, 2021