Sunday, September 26, 2021

There And Back Again...What in the Blazes?!©


Blazes painted on a tree, photograph taken along Hunter's Creek Park, near East Aurora, New York, October 10, 2020, by the Author.


This is this is the second of a series of articles, you can find the first article called “There and Back Again...Finding Your Way©”, HERE – Authors Note.


Sometimes you are following a trail that has been well marked with flags or painted rectangles on the trunks of nearby trees or piles of rocks alongside the path, rock piles being frequently used if you are above the tree line or are in a desert or other treeless place.  Other times you are blazing your own trail and are making and marking a path as you go.  Now you should always practice your “Leave No Trace” manners and not disturb the wilderness any more than you must when you travel through it, however in an emergency all bets are off! 


In an Emergency...


Trail markers, an excerpt from The Book Of Woodcraft, by Ernest Thompson Seton, page 162-163.


In an emergency, if you must move, you should mark your trail as you walk, so that you can find your way back again if you must.  This is called trail marking and you can mark your trail with broken branches, piled stones, arrows made of twigs, twists of grass, or blazes.  There are two reasons why, in the case of an emergency, you should mark your trail, one, you might have to retrace your footsteps or, two, other people, such as rescuers, might be looking for you and it will make it easier for them to follow you1.  But just how should you mark your trail is the question, since there are many ways that you can mark your trail in an emergency, and how and with what you mark it depends mostly on what is at hand around you in the wilderness.


Signs in twigs...


An excerpt from The Book Of Woodcraft, by Ernest Thompson Seton, page 162-163.


Like the twig signs in the excerpt from Ernest Thompson Seton’s The Book Of Woodcraft, shown above, you could break or bend over branches so that the tips of the branches point in the direction you travelled.  If you come to a trail intersection, and turned either to the right or left, bend or break a branch so that its tip points towards your new direction of travel.  Remember the undersides of leaves are lighter in color than are the tops, remembering this will help you to find your trail marks later if you return along the trail.


A Japanese knotweed broken to show the direction of travel, the red arrow points in the direction I travelled.  Note how the undersides of the leaves are lighter than the top side of the leaves, photograph by the Author.


The Native Americans also used to mark trails by bending saplings down so that their tips pointed in the direction of a trail or their travel.  Often these trees would survive and continue to grow and the branches along the bent trunk would grow into new trunks.  Sometimes, if you are lucky, you can still find one!


This was likely an “Indian Trail Tree” since it was located near a known Seneca trail which led toward a favorite passenger pigeon roost, photograph taken by the Author, along the Hearts Content Trail, Allegheny National Forest, October 22, 2010.


You could also mark your trail with arrows made of twigs or stones that point towards your direction of travel, like in the picture below.  Ernest Thompson Seton showed laying broken branches on the trail with the butt (wide) end, pointing in your direction of travel.


Marking a trail with arrows, photograph by the Author.


Signs in stones...


An excerpt from The Book Of Woodcraft, by Ernest Thompson Seton, page 162-163.


Or you could mark your trail with piled up rocks, which are called cairns or “ducks”, or piles of snow, ice, or wood.


Examples of piled rocks marking a trail, on the left “this is the trail” and on the right “important warning”, photographs by the Author.


Examples of piled rocks marking a trail, on the left “turn left” and on the right “turn right”, photographs by the Author.


Signs in grass...


An excerpt from The Book Of Woodcraft, by Ernest Thompson Seton, page 162-163.


You could even twist and knot bundles of grass together to mark your trail.


Signs in blazes...


An excerpt from The Book Of Woodcraft, by Ernest Thompson Seton, page 162-163.


You might even blaze trees, if necessary.  Blazes are simply hack marks or gashes through the bark that expose the light-colored wood underneath and are made with an axe or heavy fixed bladed knife.  One blaze is made on the side of the tree in the direction you are traveling and two are made on the return side of the tree.  Old fashioned blazes are today called “etchings” and modern blazes, which are still commonly used to mark paths2, are now painted rectangles!


An excerpt from Better Ways Of Pathfinding, by Robert S. Owendoff, page, on blazing trees in an emergency.


Gashing the bark of trees to make blazes can leave marks that will last a longtime, and can disfigure the tree, so this method should only be used in emergencies.  The picture below is a picture of a blaze made on a tree that grew near the shore of Lake Louisa in Algonquin Provincial Park.  It survived being blazed and had even started to scar over when it died.  It was blazed sometime in the early to middle years of the 1900s!


Blazes can last a long time, a decades old, blazed tree, found on the shore of Lake Louisa in Algonquin Provincial Park, during July 2015, photograph by the Author.


Don’t forget to come back next week and read “There And Back Again...Walking in Circles ©”, where we will talk about how and why human beings tend to walk in circles, unless they are following a trail, using a compass or practicing “beelining”!  Also continue to come back, because this is the first of a series of articles where we will be discussing some of the points raised in this article in greater depth.


Following a trail, photograph taken along the Earl Cardot Eastside Overland Trail, October 20, 2014, by the Author.


I hope that you continue to enjoy The Woodsman’s Journal Online and look for me on YouTube at Bandanaman Productions for other related videos, HERE.  Don’t forget to follow me on both The Woodsman’s Journal Online, HERE, and subscribe to BandanaMan Productions on YouTube.  If you have questions, as always, feel free to leave a comment on either site.  I announce new articles on Facebook at Eric Reynolds, on Instagram at bandanamanaproductions, and on VK at Eric Reynolds, so watch for me.


That is all for now, and as always, until next time, Happy Trails!


Notes


1 Doing this will also help rescuers, who might be searching for you, but remember they can’t find you if you keep moving, so if you don’t have to move stay put!


2 Below are some trail side blazes that you would commonly see on paths today.


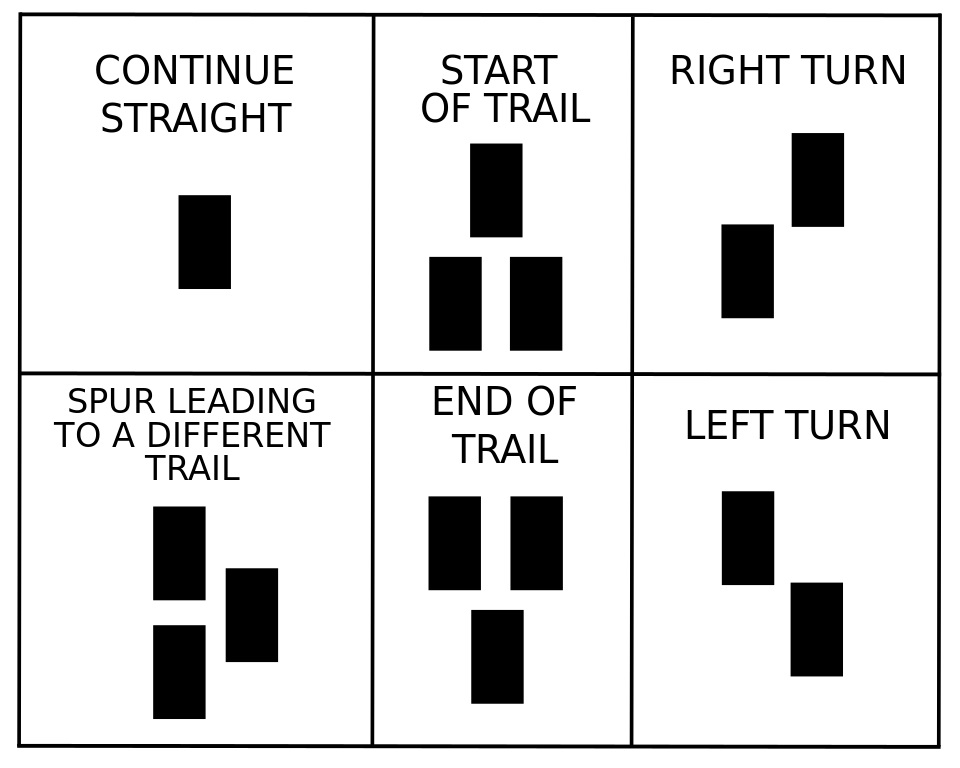
The most common blaze marks, from Wikimedia, HERE.


Examples of trail marking blazes in Hunters Creek County Park, East Aurora, New York.  The left picture shows a double blaze and indicates that there is a right turn ahead and the right picture also shows a double blaze and means that there is a left turn ahead.  Photographs by the Author.


Examples of trail marking blazes in Hunters Creek County Park, East Aurora New York.  The left picture shows a single blaze which means that the trail continues straight, the right picture shows a double blaze indicates an upcoming turn (this blaze was described in “Humpback Rocks Hiking Trails” by the National Park Service, U.S. Department of the Interior), photographs by the Author.


Sources


Del Giudice, Nick; “The Marks of a True Trail”, June 29, 2018, [© 2021 American Forests], https://www.americanforests.org/blog/the-marks-of-a-true-trail/, accessed September 17, 2021


Hodgkins, Kelly; How to Read Hiking Trail Signs, Markers and Blazes, updated January 16, 2021, [© 2021 Greenbelly Meals], https://www.greenbelly.co/pages/how-to-read-hiking-trail-signs-markers-blazes, accessed September 17, 2021


Owendoff, Robert S.; Better Ways Of Pathfinding, [The Stackpole Company, Harrisburg, Pennsylvania, 1964], page 34


National Park Service, U.S. Department of the Interior, “Humpback Rocks Hiking Trails”, https://www.nps.gov/blri/planyourvisit/humpback-rocks-trails.htm, accessed September 17, 2021


Tawrell, Paul; Camping and Wilderness Survival, 2nd, [Paul Tawrell, Lebanon, New Hampshire, 2006], page 41


Thompson Seton, Ernest; The Book Of Woodcraft [Garden City Publishing Co., Inc., Garden City, NY; 1921], page 162-163


Wikimedia, “The most common symbols used in trail blazing”, April 7, 2007, https://commons.wikimedia.org/wiki/File:Trail_blaze-symbols.svg, accessed September 17, 2021


Sunday, September 19, 2021

There and Back Again...Finding Your Way©


An excerpt from The Book Of Woodcraft, by Ernest Thompson Seton, page 162-163.


The ability to travel somewhere in the wilderness, to get “there”, wherever there is, and to come back again, is a vital skill.  But just what does pathfinding, the ability to find your way, mean?


The National Wildlife Foundation, in 1977, published a list of eleven “General Pathfinding Rules”, in Wildlife Country: How To Enjoy It.  These rules can certainly help you find your way, but there is a lot to this list of eleven rules that was left out, so let’s talk about them.


Round and Round...Walking in Circles


Rule number one points out that human beings tend to walk in circles, unless they are using a compass or practicing “beelining, which is when you keep two easily identifiable landmarks, that both lie on the line you wish to travel, constantly aligned.  Researchers believe that the reason that humans tend to walk in circles is not because of a “biomechanical asymmetry [one leg being longer than the other—Author’s Note] or functional dominance (eye, hand...)1, but because of vestibular imbalances of the inner ear.


An excerpt from page 313 of the Professional Guide’s Manual, by George Leonard Herter.


You should always trust your compass; humans are not homing pigeons and do not have built-in sense of direction.  In fact, many times when people are “misplaced2 in the wilderness, they let their fears take over and they will begin to disbelieve their compass and will instead insist that their compass must be broken, because they believe they have a built-in sense of direction and know better.  This refusal to believe your compass is simply a loss of spatial orientation, a bending of the map, as the person frantically tries to fit their panicked, preconceived notions and mental model of the world onto the landscape around them.


General Compass Skills


Rules two and three are about general compass skills and it is obvious that you must practice any skill to become good at it and to stay good at it.  Unfortunately, many people wander into the wilderness with a compass and a map, that they don’t know how to use or read.   So, practice, practice, practice with your compass and map every chance you get!


An excerpt from Better Ways Of Pathfinding, by Robert S. Owendoff, page 34.


Have you ever stopped to wonder how a compass always points to magnetic north?  It is because the needle, which is a small magnet, is free to swing in a horizontal circle around a central pivot pin.  When the needle is influenced by a stronger magnet, it will turn in the direction of the lines of force of that larger and stronger magnet.  Since the Earth itself acts as a large magnet, the needle in your compass will align itself with the Earth’s magnetic lines of force and this is what causes the compass’s needle to point north and south.  In just the same way, the needle in your compass will be attracted to nearby concentrations of magnetic metals, such as steel or iron, or to electrical sources, which create a magnetic field.  That is why, when you are reading your compass, you must stay away from cars or trucks, about 60 feet, or 18 meters away; high tension lines, about 180 feet, or 55 meters away; and rifles, shotguns, or axes, about two feet, or ½ meter away3.


Landmarks...Looking Back?!


Rules four, five and seven talk about the importance of paying attention to distinctive trees, rocks, and other terrain features that are along the path as travel through the wilderness.  You should always pay close attention to these landmarks as you pass by them, on your way to “there”, wherever there is, because these landmarks will be important clues to look for, on your way back.  Memorize where distinctive landmarks are, relative to where your starting point or camp is, so that you can find your way back again.


Another thing that you should always do is to look back along the trail as you travel, so that you will know what your return path will look like.  As you can see in the pictures below, it always looks different.


The same 30 feet, or 9 meters of trail.  Notice how different the trail looks, looking forward (the picture on the left was taken from “a” while looking towards “b”), compared to when you are looking backwards (the picture on the right was taken at “b” while looking towards “a”).  Graphics and photographs by the Author.


Rule number five also mentions “With your pocketknife, put a mark on your compass baseplate 180 degrees around from the index line to help you determine your return bearing if you are walking out a compass bearing”.  This is a clever idea, just scratch a mark on the baseplate of your orienteering style compass, with your pocketknife, to extend your index line/line of travel 180 degrees around from the index line and you will be able to quickly determine the return bearing without using any math.


Marking a return bearing line on your orienteering style compass.  Graphic and photograph by the Author.


Maps and Bending the Map...


You should always have a map anytime that you travel in the wilderness, and rules number six, eight and nine talk about maps. 

Rule number six speaks to the importance of making sure that your map agrees to the terrain that you see around you.  As soon as it doesn’t, S.T.O.P. and reorient yourself.  Once you know exactly where you are and the map now agrees with the terrain, you can either return to where you left your path or continue on your way if you were only momentarily bewildered.  For more on this read “The O in S. T. O. P. ©”, HERE.


The Boy Scouts of America S.T.O.P. card, photograph by the Author.


Rule number eight talks about what to do if for some reason you’re hiking out without a map.  And that is to make your own map as you go!  In a notebook write down the compass directions and distances (if you don’t know the length of your pace, assume that a left foot to left foot pace equals 5 feet or, 1.5 meters) that you travel and any landmarks you pass by, this way if you get “misplaced” you will be able to find your way back to your starting point.


It is always good to carry a pad of paper, you never know when you need to write something down or start a fire!  Photograph by the Author.


Rule number nine talks about local trail guides, and how they can help you by giving you more information than will be found in a USGS topographic map.  If they are available, study them, before you head out!  Also, satellite pictures (thank you Google Maps) can be very helpful, for more on this read “Being Bewildered and Bending the Map©”, HERE.


“…two compasses -- not one…”!


Rule number ten talked of the importance of carrying two compasses, not one.  There are two good reasons for always having a spare compass, the first is in case you lose or break one compass and the second is best explained by Emerson Hough who wrote Out Of Doors in 1915, for more by Mr. Hough read “Getting Lost And What To Do About It”, Circa 1915 ©”, HERE.


Mr. Hough when writing about what to do if you were “misplaced” noted that, “If you have two compasses look at both of them”.  The author explained this point with the following short story: “… ‘One compass is of no use’, said one gentleman.  ‘For that reason I always carry two.’…He went on to explain: ‘I know of this being tried,’ said he.  ‘When a man has the panic of being lost fully upon him he never believes his compass; but when he takes out his second compass and sees it is pointing just the way his first one does, somehow his reason gets a sudden jolt and he concludes that the majority must be right.  That starts him to reasoning again, and then he is usually safe’…  The psychology behind the author’s two compass wrinkle, or tip to use the more modern term, is that when a misplaced person is bending the map to fit his preconceived notion of where he thinks he is, he may believe that one of his compasses is broken, but not that both are broken!


The Author’s survival kit with his spare compass, photograph by the Author.


Your directions can be found in the sky!


The last rule, number eleven, talks about being able to find your cardinal direction points by using clues in the world around you.  The best clues to use are either the stars at night or the Sun during the day. 


Remember, because of the Earth’s rotation, the sun and the stars all rise in the east and set towards the west, in a clockwise fashion.  However, the Sun only rises exactly in the east and sets exactly in the west on two days during the year, the spring and fall equinoxes.  On all other days, the Sun rises somewhere between north-east and south-east and sets somewhere between north-west and south-west.  For more on using the Sun to find your cardinal directions read “How to Find Your Way Without A Compass, Part One, Orientation By The Sun©”, HERE, and “How To Find Your Way Without A Compass, Part Three, The Shadow-tip Method©”, HERE.


At night, in the northern hemisphere you can find your cardinal directions by finding the North Star or, as it sometimes called Polaris.  In the southern hemisphere you can find north and south by finding the Southern Cross.


To find the North Star, first find the Big Dipper, which is also called the Great Bear, count five times the distance between the pointer stars, on the side of the dipper and then you will find the North Star, adapted by the Author from The Air Ministry Survival Guide, pages 111-113.


Finding the Southern Cross, an excerpt from The Air Ministry Survival Guide, page 111-113.


Don’t forget to come back next week and read “There and Back Again...What in the Blazes©”, where since it is fall, and hiking and hunting season, we will talk about trail marking and blazes!  Also continue to come back, because this is the first of a series of articles where we will be discussing some of the points raised in this article in greater depth.


Trail marks, photograph by the Author.


I hope that you continue to enjoy The Woodsman’s Journal Online and look for me on YouTube at Bandanaman Productions for other related videos, HERE.  Don’t forget to follow me on both The Woodsman’s Journal Online, HERE, and subscribe to BandanaMan Productions on YouTube.  If you have questions, as always, feel free to leave a comment on either site.  I announce new articles on Facebook at Eric Reynolds, on Instagram at bandanamanaproductions, and on VK at Eric Reynolds, so watch for me.


That is all for now, and as always, until next time, Happy Trails!


Notes


1 “Is ‘Circling’ Behavior in Humans Related to Postural Asymmetry”, by Emma Bestaven, Etienne Guillaud and Jean-RenĂ© Cazalets


2 For more on the difference between being “misplaced” and being “lost” read “You Are Never Lost, Only Misplaced…©”, HERE.


3 FM 3-25.26 Map Reading and Land Navigation, Department of the Army, page 9-2.


Sources


Air Ministry, The Air Ministry Survival Guide, [Michael Joseph, Penguin Random House, UK, 2018], pages 111-113


Bestaven, Emma; Guillaud, Etienne; Cazalets, Jean-RenĂ©; “Is ‘Circling’ Behavior in Humans Related to Postural Asymmetry”, September 2012, Volume 7, Issue 9, https://journals.plos.org/plosone/article?id=10.1371/journal.pone.0043861, accessed on September 15, 2021


Department of the Army, FM 3-25.26 Map Reading and Land Navigation, [Department of the Army, Headquarters, Washington, DC, July 20, 2021], page 9-2, https://books.google.com/books?id=rpotRDNjO60C&pg=PR1&dq=map+reading+and+land+navigation+fm+3-25.26&hl=en&newbks=1&newbks_redir=0&sa=X&ved=2ahUKEwjCubGa-_7yAhXGITQIHeL0Ai8Q6AF6BAgEEAI#v=onepage&q=map%20reading%20and%20land%20navigation%20fm%203-25.26&f=false, accessed September 14, 2021


Herter, George Leonard; Professional Guide’s Manual, [Herter’s Inc., Waseca, Minnesota, 1971], pages 312-313


Emerson Hough, Out Of Doors, (D. Appleton and Company, New York, New York [1915]) p. 269 - 282, https://books.googleusercontent.com/books/content?req=AKW5QadnZNQ1xrsbkS3T4VJlC_uZQ8t4yj2UNH5POGbNio-1SDyFM8TAqUfl7ciDY5CuNZxvnnE0Pcxf1j6Thu_zOs5kz8rgR9MOtsbTxVgRVa3bwaKo0-D5YX2T4JaBO_z6G8vgwFNgLiJ9XCfBVnn9K4qR7ZFa0faNe3zmvfWDfmEo049sqXQlw697XIHDWNblRJj9niiabZoBB7aQHl82tf4y03cpU2hMdLVADF-7P2pvJKsZbLDnJN8ncLZ9IftMudapmn8E, (accessed 11/8/18)


Owendoff, Robert S.; Better Ways Of Pathfinding, [The Stackpole Company, Harrisburg, Pennsylvania, 1964], page 34


National Wildlife Foundation; Wildlife Country: How To Enjoy It, [National Wildlife Foundation, Washington, DC, 1977], page 90


Thompson Seton, Ernest; The Book Of Woodcraft [Garden City Publishing Co., Inc., Garden City, NY; 1921], page 162-163