 |
Examples
of string that you might have with you in an emergency in the wilderness, A) a chain
knotted line 108 inches (approximately 274 cm)
long, that you might include in your emergency supplies; B) two shoe-laces,
each 55 inches (140 cm) long; and C) a BanadanaMan Emergency Bracelet, that
contains 172 inches (approximately 437 cm) of string, and which is only 14
inches (35 cm) long when looped into a chain knot. |
Larry
Dean Olsen, wrote in Outdoor Survival Skills, that “Strange as it may
seem, a piece of string can become the most important item in a survival
situation, for the construction of nearly everything requires this simple item”.
It’s
true and it’s much easier to build the frame of a three-pole lean-to if you
have some string to whip together a quick survival tripod1. But how often on your journeys through the
wilderness are you without this vital bit of equipment?
 |
An illustration of a three-pole lean-to from the Arctic Survival Guide, by Alan Innes-Taylor, page 55.
One
of the problems with taking string with you on your journeys in the wilderness,
is keeping it from becoming a messy tangle in your pack or pocket. But, if you make and always remember to wear
a BandanaMan Emergency Bracelet, then just like a Boy Scout you will always be
prepared and will have this important tool to hand in a nice, neat package.
Making a
BandanaMan Emergency Bracelet
 |
A chain knot, an excerpt from the The Ashley Book of Knots, page 472.
An
emergency bracelet can be made from any length of line, by simply looping or
braiding, it with a “chain knot”, which is also known as a “chain
sinnet”, and, according to The Ashley Book of Knots, on page 472, is a “a uniform series of single
loops and is completed by drawing the working end through the final loop, which
prevents raveling”. This knot is a
method of shortening a line, and is also known as a “monkey chain, monkey
braid, single trumpet cord, single bugle cord, chain stitch, crochet stitch, and
chain braid” 2.
 |
Nylon line, photograph by the Author.
To
get started making a bracelet like the one labeled “C.” in the front picture,
start with 172 inches (approximately 437 cm) of orange nylon string3,
and double it over so that you have two strands, which measure 86 inches (218
cm) long. Now, fold it over again so you
have four strands which measure 43 inches (109 cm) long and make an overhand
knot in both ends4, as in the picture below.
 |
An overhand knot, an excerpt from the The Ashley Book of Knots, page 14.
 |
Your twice doubled line with an overhand knot tied in each end. Photograph by the Author.
Now about three inches (7.5
cm) from each end tie another overhand knot, so that your line looks like the
picture below.
 |
Your twice doubled line with an overhand knot at the end and one three inches (7.5 cm) in from the end, on both sides. Photograph by the Author.
Now it is time to start
looping your twice doubled string into a BandanaMan Emergency Bracelet using a
chain knot.
Author’s
Note -- to demonstrate making the chain knot, in the photographs below, I will
only use one line, as it makes it easier to follow the pictures.
 |
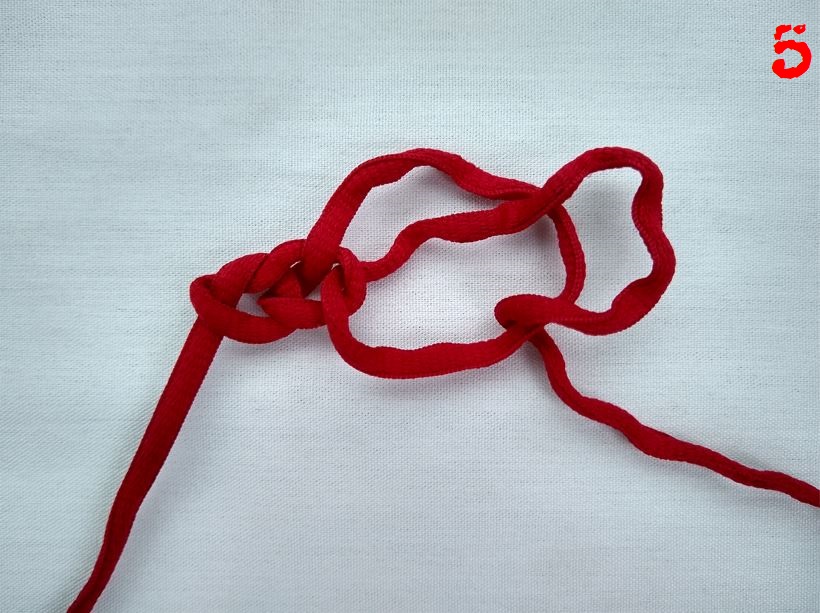
An overhand knot (top) and the beginning of a chain knot, which is just an overhand knot with a loop pulled through. Photograph by the Author.
 |
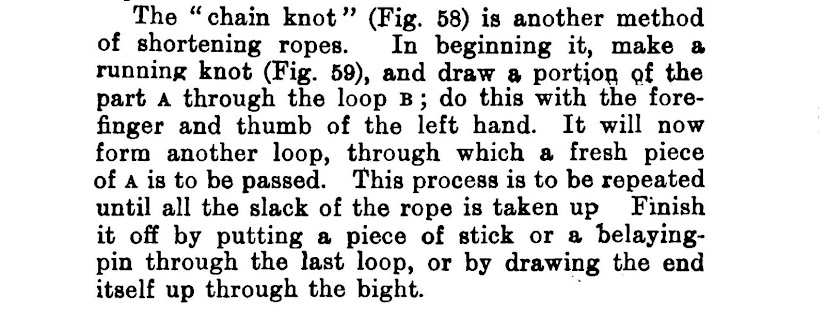
Tying a chain knot, excerpts from Knotting and Splicing Ropes and Cordage, by Paul Nooncree Hasluck, Page 51-52.
To
make your bracelet, start your chain knot at the overhand knot that you tied
three inches (7.5 cm) in from the doubled end of the line.
 |
Start you chain knot just past the overhand knot tied three inches (7.5 cm) in from the doubled end of the line. Photograph by the Author.
There
are two ways to start your chain knot, you can either wrap the line around your
index and middle finger, and with your other hand
pull a loop of the working end under and through the loop wrapped around your
fingers, as below.
 |
Steps one and two in starting a chain knot, a loop of line wrapped around your index and middle finger, and a loop of the working end of the line pulled through. Photograph by the Author.
Or,
if you prefer, you can simply make a loop and then pull
a pull a loop of the working end behind and though your first loop, as
below.
 |
Steps one and two in starting a chain knot, make a loop and pull a loop of the working end behind and though the first loop. Photograph by the Author.
Continue
to pull loops behind and through the previous loops. Keep looping and re-looping the working end
of your line until your chain knot has reached the desired length.
 |
Steps three and four, snugging down the first loop and pulling the third loop through the second loop. Photograph by the Author.
There
are some applications where a loose series of loops is preferred to a tight
series of loops. However, when making a BandanaMan
Emergency Bracelet, a tight series of loops is best, so make a tight braid, by pulling
tight and snugging the previous loops as you go.
 |
Step 5, keep pulling a loop behind and through the previous loop, until you have you have braided as much line as you need. Photograph by the Author.
 |
Finishing the chain knot by drawing the end through the final loop, an excerpt from Knotting and Splicing Ropes and Cordage, by Paul Nooncree Hasluck, Page 51-52.
Next,
as you near the overhand knot that you tied three inches (7.5 cm) from the end of
the bracelet, simply draw the working end of the line through the final loop, like
in the photographs below, this will keep your chain knot from unraveling.
 |
Finishing up your BandanaMan Emergency Bracelet by drawing the working end through the final loop. Photograph by the Author.
And to
complete your BandanaMan Emergency Bracelet, tie a square knot to join the ends of the
bracelet together between the two overhand knots which your tied earlier, three
inches (7.5 cm) from the ends. You now
have 172 inches (approximately 437 cm) of line, which because it has been
finger-looped into a chain knot and shortened, now measures only 14 inches (35
cm) long, in an easy to wear bracelet.
And as long as you remember to always wear it or throw it into your pack
or pocket, you will always have string with you as you adventure through the
wilderness.
 |
The finished BandanaMan Emergency Bracelet. Photograph by the Author.
Don’t forget to come back next week and read “Washing Your Sleeping
Bag ©”, where we will talk about how to clean your sleeping bag and get ready
for the summer wilderness season.
I
hope that you continue to enjoy The Woodsman’s Journal Online and look for me on
YouTube at BandanaMan Productions for other related videos, HERE. Don’t forget to follow me on both The
Woodsman’s Journal Online, HERE,
and subscribe to BandanaMan Productions on YouTube. If you have questions, as always, feel free
to leave a comment on either site. I
announce new articles on Facebook at Eric Reynolds, on Instagram at
bandanamanaproductions, and on VK at Eric Reynolds, so watch for me.
That
is all for now, and as always, until next time, Happy Trails!
Notes
1
For more on survival tripods, see “How To Make A Survival Tripod ©”, HERE.
2 From
The Ashley Book of Knots, by Clifford W. Ashley, page 472
Copies
of The Ashley Book of Knots are available from most
bookstores as it is still in print,
and it is also available at used bookstores.
An excellent PDF copy is available HERE
3 Don’t
forget to use a lighter or match to melt the cut ends of your nylon string to
prevent it from unraveling.
4
If you want to make a fob or a lanyard instead of a bracelet, leave enough space
between the overhand knot and the doubled end of the line to put a carabiner
through the loops.
Sources
Ashley, Clifford W.; The Ashley Book of
Knots, [Geoffrey Budworth, Kent, England, 1993], page 472, https://www.liendoanaulac.org/space/references/training/Ashley_Book_Knots.pdf, accessed January 25, 2022
Hasluck, Paul Nooncree; Knotting
and Splicing Ropes and Cordage, [David McKay, Publisher, Philadelphia, PA,
1912], page 51-52, https://books.googleusercontent.com/books/content?req=AKW5QadbkrmBx1Gbt4sXfsubEY1Yuq59o5ydbt5SVplV3e8TM4myCFqis5bVfvEV0s-OvwU5BGbaRJcUGrxnzC7Asu1o6uXg62MvTbBQ_6QYOYckKpGoiqHzbVyoAU66wZ0JnfA4CFwlarClPIOfsXJtL241YGwdSq8QP4JVmlXseXQKcnUBebmDlnQU5GLULW42r9WlDMqAZ0679kpgvlvS8sYEFqoXRgHj9hdJuBHcvLagnY8TexhtJKTcbVSsNQEx1uaBeUiT0hMs0kb-cMldIr69Q0lNyu0XQduelZjK7KRd7eNivL0,
accessed January 27, 2022
Olsen,
Larry Dean; Outdoor Survival Skills, [Pocket Books, New York, 1976],
page 198


No comments:
Post a Comment