
A prototype Survival Hacksaw Knife/Saw, with a paracord handle, photograph by the Author.
While
hiking along the edge of a steep ravine, you stop to take off your jacket, but suddenly
something happens and you slip and fall down the side of the ravine, smashing your
leg on a rock and knocking yourself out.
When
you come to, sprawled against a large pile of fallen trees and brush, you
realize that your leg is bleeding and badly gashed, and that there are only
about two hours left until the Sun goes down behind the edge of the
ravine. Your survival kit and your first
aid supplies are buttoned into two of the pockets of your jacket, which right
now is snagged on a thorny branch, near the rim of the ravine, far overhead. With your injured leg you can’t climb up to
it or out of the ravine. You are stuck
where you are, with what you have, and right now you need to stop the bleeding
and bandage your leg and then build a windbreak and a fire, and you need to do
it, fast!
“So,
what do I have”, you ask yourself, as you quickly check your pockets. “In my pockets I have my bandanna, my boy
scout knife and a ferro rod, around my neck a whistle, and … oh, right, my
survival knife/saw on my belt”, you exclaim excitedly!
A survival
knife/saw?

The Rule of Threes, a guide to what is most important to do first, second and third, Graphic by the Author.
The
Marine Corp survival experts who wrote FMFM 8-1, Special Operations,
suggested that a hacksaw blade should be included in your survival supplies1. But how would a hacksaw blade be able to help
you bandage your leg and build a shelter and a fire, the two most critical
parts of the Rule of Threes?
Because
a hacksaw blade needs a handle, and you can make a handle for it by wrapping
duct tape, wire, and paracord around the saw blade!

What you need to make a survival hacksaw knife/saw, photograph by the Author.
Survival
uses of duct tape

Photograph by the Author.
There
are a lot of survival uses for duct tape, first aid, fire starting, shelter
building, signaling (with either shiny or brightly colored tape), gear repair
and even making fishing lures. Really
the only limit is your imagination and the amount of tape you have!

An example of the different bandages that you can make from duct tape, from Duct-Aid's First-Aid Medical Grade Duct Tape, HERE.
One
of the most important things that you can do with duct tape is using it for first
aid, because it is great for making wound dressings of various sizes, just like
you would use medical tape. You can make
butterfly bandages to pull the edges of cuts together, make improvise splints
for broken bones and to bandage open blisters and raw spots2 You can also fold the duct tape into a square
and make an “occlusive patch”, to treat a sucking chest wound3. And you can also use duct tape to make
improvised snow goggles to prevent snow blindness, because being blind in a
survival situation is not good thing!

Butterfly bandages made from a piece of duct tape 1” wide by 2” long (2.5 cm wide by 5 cm long). The neat scissor method on the left, the down and dirty, twisted tape method on the right. Photograph by the Author.
In
the story above you would be able to use the duct tape, wrapped around your
survival hacksaw knife/blade to treat the deep and bloody gash in your leg, by
closing the wound with a butterfly bandage.

Burning duct tape, photograph by the Author.
The
second most important thing you need to do is to build a shelter or windbreak
and a fire. Duct tape can help you build
a shelter by binding some poles together to make a tripod or an “X” and a 2”
square (5 cm square) twisted piece of duct tape when lit, will burn for almost
3 minutes, which should be long enough to light even the most stubborn tinder
and kindling.
Survival
uses of wire

The
wire wrapped around your knife/saw, on top of the duct tape, can also be used
to build your shelter or windbreak in just the same way as the duct tape
can. You can hang a pot over a fire or
hang game for skinning, cooking, or smoking with the wire. Also, you can repair damaged gear or make
improvised tools, snares, fish traps and even fishhooks with it.
Survival
uses of paracord

Photograph by the Author.
Most
likely, the paracord that is wrapped around your knife/saw will be used to
build a shelter, but just as with duct tape and wire, the uses for paracord are
limited only by your imagination, and remember, imagination and necessity are
the parents of invention.

The anatomy of paracord, an excerpt from Departments of the Airforce and Army, Survival Uses of the Parachute, page 25 to 26.
Survival
uses of the blade

An improvised bow saw, photograph by the Author.
And
let’s not forget the blade of the knife/saw itself, the entire one side is a
saw blade and the 6-¼ inches (15.9 cm) of the top edge furthest from the handle
is a knife blade, while the unsharpened 1-½ inches (3.8
cm) closest to the handle is for striking sparks with a ferro rod. You can use your knife/saw as is, as a saw,
or you can turn it into an improvised bow saw, by using the two, 6d, 2-inch
long (5.08 cm) nails wrapped into the handle, pounded into a flexible green
stick 4.
Making a survival
hacksaw knife/saw

Start with a hacksaw blade, photograph by the Author.
First
off let’s assemble our supplies and tools.
Obviously, you will need a hacksaw blade, which is 10-¼ inches, or 26
cm, long
and
weighs ½ ounce or about 14 grams. You
will need 16 inches (about 40 cm) of duct tape for the first layer, 102 inches
(259 cm) of 22-guage wire (.73 mm) wire for the second layer, and for the third
layer you will need 102 inches (259 cm) of 550 paracord5.
You
will also need a 11/64” (4.3 mm) metal cutting drill bit,
a drill, a permanent marker, a measuring tape and two, 6d, 2-inch long (5 cm)
nails.
Getting started
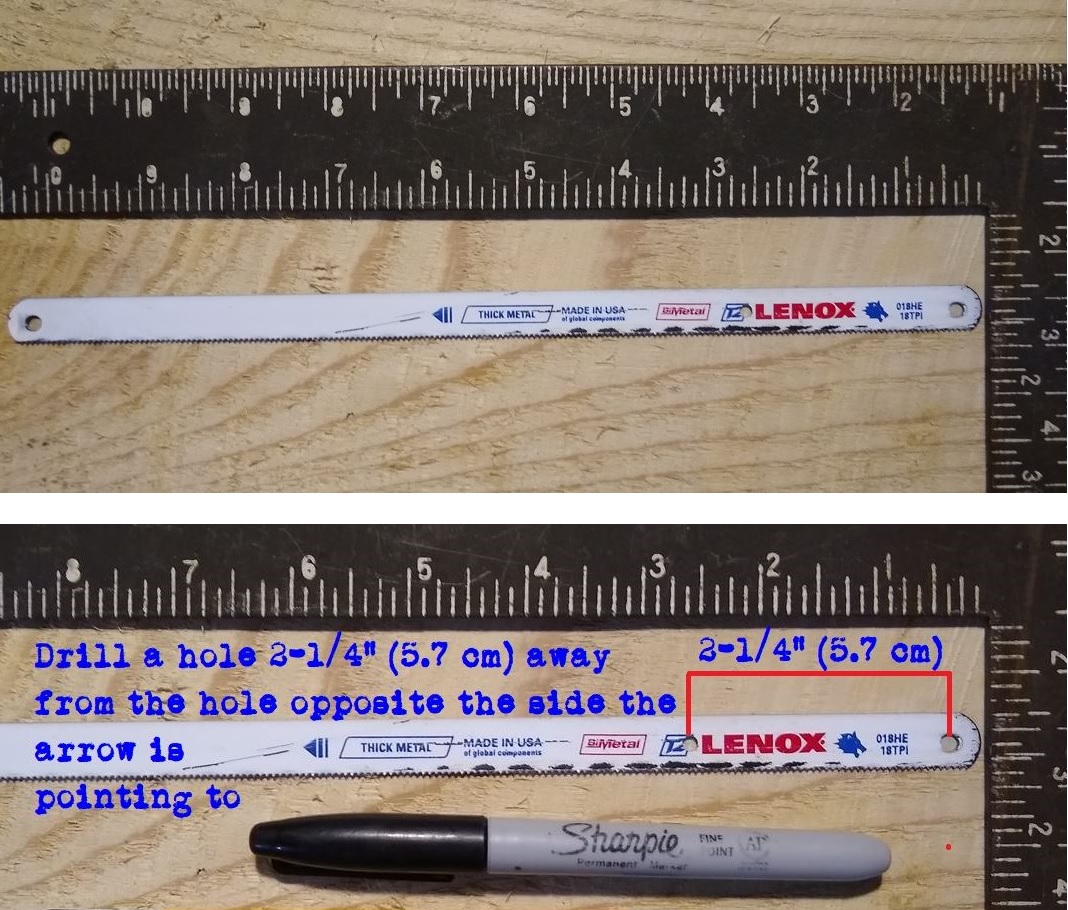
Getting started, photograph by the Author.
First
you need to drill two anchor points or holes in the blade, these two holes will
act as attachment points for your handle.
You will need to use an 11/64” (4.3 mm) metal
cutting drill bit to widen the hole on the end opposite from the direction that
the arrow is pointing. Also, you will
need to drill a hole 2-¼ (5.7 cm) away from the hole, that you just
widened.
First Layer - the duct tape

Duct tape the first layer, photograph by the Author.
Now
make 16 wraps of duct tape, around the blade, in between the two holes that you
drilled. I found that the best way to
wrap the duct tape around the blade is to stick the duct tape between the
holes, pull out several inches of tape and while holding the saw blade out in
front of you and level, slowly rotate the blade and wind the tape onto it.
Fold
over the last ¼” (6 mm) of tape to create a tab, to make it easier to peel up
the tape and put the two, 6d, 2-inch long (5 cm) nails under the top layer of
tape.
Second layer - the wire

22-guage wire, the second layer, note how the wire is anchored in the anchor holes. Photograph by the Author.
Start
by anchoring your wire, by feeding it through the center anchor point, before
beginning to wind the wire around the blade.
Just as with the tape, I found it easiest to let the spool of wire hang
while rotating the blade and winding the wire onto it. When you reach the end of the taped handle,
cut the wire, and anchor the end through the anchoring hole on the end of the
blade.
Third layer - the paracord

A “common whipping”, an excerpt from The Ashley Book of Knots, page 546.
In
this step, you will be whipping the handle with a modified “common whipping”,
that has two loops, so that you can wrap two layers of line around the handle,
instead of a single loop and one layer of line.

Getting started with the paracord, note the double loop, photograph by the Author.
Start
by feeding one of the ends of the paracord line, through the center anchor hole
and make an overhand knot. Pull the line
taut and make a double loop, as in the picture above.
Next
starting from the end of the handle, wrap towards the center anchor point and
pull the end of the last wrap through the first loop as shown in the picture
below.

Pulling the end of first wrapping through the first loop, finishing the first layer of paracord, photograph by the Author.
Next,
begin the second layer by wrapping the paracord over the first layer, working
from the center anchor point towards the anchor point at the end of the
blade. Pull the end of the last wrap
through the second loop as shown in the picture below, and then through the
anchor point below it.

Pulling the end of first wrapping through the second loop, finishing the second layer of paracord, photograph by the Author.
Tie
an overhand knot in the working end of the line, double the remaining line into
a bight or loop and tie one or more overhand knots in the loop to make a
lanyard, and you are done.

The finished survival hacksaw knife/saw, photograph by the Author.
Wrapping up

Sharpening the back of the blade, photograph by the Author.
When
you are all done, it is time to sharpen the bottom 6-¼ inches (15.9 cm) of the
top edge furthest from the handle to make a knife blade. Do this at the end to reduce the risk of
accidentally cutting yourself.
You
can either use a file, working from the center of the blade towards the end, or
use a grinding wheel, or other mechanical tools. If you are using a mechanical tool, remember
to keep the blade cool by wetting it, so that you do not ruin the temper of the
blade.
Finish
up by using a whetstone, and then a leather strop, for a good edge.
Remember
to leave the 1-½ inches (3.8 cm) closest to the handle unsharpened, as it is a
place to put your thumb and for striking sparks with a ferro rod.
Don’t forget to come back next week and read “Situational Awareness
Isn’t Just for Preppers! ©”, where we will talk about staying alert and staying
alive.

I
hope that you continue to enjoy The Woodsman’s Journal Online and look for me
on YouTube at BandanaMan Productions for other related videos, HERE. Don’t forget to follow me on both The
Woodsman’s Journal Online, HERE,
and subscribe to BandanaMan Productions on YouTube. If you have questions, as always, feel free
to leave a comment on either site. I
announce new articles on Facebook at Eric Reynolds, on Instagram at bandanamanaproductions,
and on VK at Eric Reynolds, so watch for me.
That
is all for now, and as always, until next time, Happy Trails!
Notes
1
For more on this read “The Marine Corp Survival Kit, Circa 1974©”, HERE.
2
Always put a small piece of duct tape, smooth side down, facing the injury,
onto to the adhesive side of the duct tape that you are using as a
bandage. This will keep it from sticking
to the raw spot, while the outer duct tape bandage protects the injury from any
further damage and reduces friction.
3
Remember the patch should be large enough to extend beyond the wound by two inches
(5 cm) on all sides, and you should tape the patch over the wound duct tape on
three sides only. The fourth side should
be left untaped, so that when the casualty exhales or breaths out, air is
expelled from the chest cavity and can escape from underneath the untaped
edge. For more on treating sucking chest
wounds in the wilderness read “The Survival Uses of Aluminum Foil ©”, HERE
or read the American Red Cross’s Wilderness and
Remote First Aid, page 50.
7
To
make an improvised bow saw with your hacksaw blade, first cut, or break off a
green branch about 16-½ inches (almost 42 cm) long and no more than ¾ inches
thick (2 cm) on either end. Next, pound
one of your nails into the branch all the way through and attach one side of
your saw by sliding the nail through one of the holes in either end the
blade. Bend the stick and mark with your
other nail where the hole in the other end of the saw blade crosses it. Drive your second nail all the way into the
green stick, bend it and slip the nail through the hole and you have an
improvised bow saw.
Don’t
forget, before turning your saw into an improvised bow saw, remove the duct
tape from the blade, winding it around itself by folding over a 1/4” inch (6
mm) of the tape and then winding it around the doubled section. Alternatively, you could wrap your tape
around a convenient pencil sized stick.
8
For
those of you interested in the math, or for those of you who would like to use
a different blade, such as a Sawzall® blade, instead of a hacksaw blade, here
is how I figured out how much tape, wire and cord would be needed.
Duct
tape is the first layer, and it is 8 mils, or 8 one thousandth of an inch,
thick. So, to wrap a layer of tape, 1/8 inch (32 mm) thick, you will
need 16 layers of tape, because 1/8 inch, is 125 mils,
and 125 mils divided, by 8 mils, is 15.625 layers.
The
circumference of a hacksaw blade , which is a ½ inch (1.27 cm) wide, plus the
thickness of the side, multiplied by two, is about one inch (2.5 cm) and so 16
wrappings of tape, or a layer that surrounds the blade 1/8
inch (32 mm) thick, is 16 inches (40 cm) long. This ignores the creeping error that slips in
because with each winding of tape, the circumference increases.
Wire
is the second layer and 22-guage wire is 28 mils or, .73 mm thick. So, since there are 25 mm in an inch, 25 mm
divided by .73 mm, is 34 windings of wire in each inch (25 mm). Because the circumference of the handle is
now 1-½ inches (3.8 cm), when it is multiplied by its length of 2 inches (5 cm), you have an
area of 3 inches (7.5 cm) squared. Multiplying
the area of 3 inches (7.6 cm) squared, by 34 windings of wire per inch, equals 102
inches (259 cm) of 22-guage wire. Since
22-guage wire is so thin , it doesn’t add much to the circumference of your
handle, and so, after the wire layer, the new circumference of the handle is
still about 1-½ inches (3.8 cm).
The
third layer is going to be made of two layers of 550 paracord, and since
paracord when stretched is about 1/8 inch (32 mm) thick
(when relaxed it is almost 3/16 inches, or 4 mm thick), you
should expect to have 8 wraps of paracord per inch.
The
circumference of the handle at 1-½ inches (3.8 cm), multiplied by its length of
2 inches (5 cm), gives you an area of 3 inches (7.6 cm) squared. Multiplying the circumference of 3 inches
(7.6 cm) squared, by 8 wraps, equals 24 inches (61 cm) of paracord in the first
wrapping. And after adding the first layer
of paracord, the new circumference of your handle is 3 inches (7.5 cm). This is calculated by adding the new width of
7/8 inches, plus the new thickness of 5/8
inches, and multiplying by two, to get a circumference of 3 inches (7.5
cm).
The
second wrapping of paracord will be 48 inches (122 cm) long. This is calculated multiplying the
circumference of the handle at 3 inches (7.5 cm) multiplied by its length of 2
inches (5 cm) which equals an area of 6 inches (15 cm) squared. Multiplying the circumference of 6 inches (15
cm) squared, by 8 wraps, equals 48 inches (122 cm) of paracord in the second
wrapping, and now your handle has its final circumference of 3-¾ inches (9.5 cm). The final circumference is calculated by
adding the new width of 1 inch plus the new thickness of 7/8
inches, and multiplying this sum by two, to get a circumference of 3-¾ inches (9.5 cm).
Add
10 inches (25 cm) for the first knot and the two whipping loops and another 20
inches (50 cm) for the end lanyard, and in total you will have 102 inches (259
cm) of 550 paracord wrapped around the handle of your knife/saw.
Sources
American
Red Cross; Wilderness and Remote First Aid, [American Red Cross, 2010],
page 50 and 78 to 81
Ashley, Clifford W.; The
Ashley Book of Knots, [Geoffrey Budworth, Kent, England, 1993], https://www.liendoanaulac.org/space/references/training/Ashley_Book_Knots.pdf, accessed January 25, 2022
Bowdoin;
“Make Your Own Snow Goggles!”, [Bowdoin Arctic Museum, Brunswick, ME], https://www.bowdoin.edu/arctic-museum/pdf/make-your-own-snow-goggles-activity.pdf, accessed September 14, 2022
Departments
of the Airforce and Army, Survival Uses of the Parachute, AF Manual
64-15, TM 10-1670-1, [Washington, DC: July 1, 1969], page 25-26, https://books.google.com/books?id=GItLC_TBJjoC&printsec=frontcover&dq=survival+air+force&hl=en&newbks=1&newbks_redir=0&sa=X&ved=2ahUKEwjdx_6IzYboAhXNZd8KHQgnCuU4pAMQ6AEwAHoECAkQAg#v=onepage&q=survival%20air%20force&f=false,
accesses March 7, 2020
Duct-Aid's
First-Aid Medical Grade Duct Tape, [© 2022, Duct-Aid The Ultimate First-Aid Kit],
https://duct-aid.com/products/duct-aids-patent-pending-duct-tape,
accessed September 30, 2022
No comments:
Post a Comment