Sunday, August 15, 2021

Kelly Kettles®... The Faster Way to Boil Water! ©


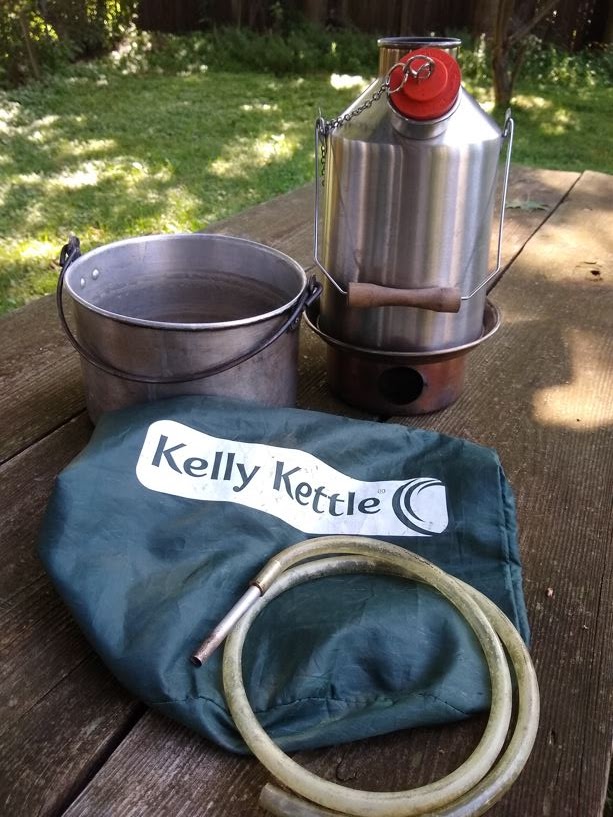
The Author’s Scout model Kelly Kettle®, photograph by the Author.


Throughout the World, and throughout most of humankind’s existence, the only way to cook food and boil water was a “three-stone fire”.  The three-stone fire is a wood-fueled fire, made by placing three stones 120 degrees apart, in a circle, to make a stand for a cooking pot.  This is the classic campfire and today many people still rely on this method to disinfect their water by boiling (for more about disinfecting water by boiling, read “Water Disinfection: When is boiled, boiled enough…? ©”, HERE).


The Faster Way to Boil Water...


A Kelly Kettle ® cut-away diagram, from the box of my Scout model Kelly Kettle®, photograph by the Author.


The problem with a three-stone campfire is that it isn’t very efficient, having only an average efficiency of 14%, and because of this it uses a great deal more fuel to boil water than other methods.1 


And that is why you need to have a Kelly Kettle®!  Kelly Kettles® are a type of rocket stove with a surrounding water-chamber and as the representatives of both Kelly Kettle USA and Kelly Kettle UK explained, a Kelly Kettle® channels all the heat of the fire up and over the large surface area of the chimney and allows a small fire to quickly boil the water within the water-chamber.2


I was first introduced to Kelly Kettles® in 2014, when I started as a guide with Birchbark Expeditions.  I was so impressed with how fast it boiled water (faster than I could boil water on my gas stove at home in my kitchen) that as soon as I got back from the trek, I went out and bought a “Scout” model Kelly Kettle®.  I couldn’t believe how well and how fast it worked!  And it doesn’t need much fuel to boil water, either.  In fact, I often feed my Kelly Kettle® on small sticks and chips that have fallen to the ground, when other larger logs were cut up for fuel, wood scraps that normally are just left lying on the ground near the fire pit.  Lately, I have been thinking about buying a small, Trekker model Kelly Kettle® for use when I am backpacking, since space and weight are at a premium then.


How To Use a Kelly Kettle...?


Kelly Kettle ® Scout model instructions for use, from the box, photograph by the Author.  Always follow the instructions.


So, how do you use a Kelly Kettle”, you ask?  Good question let’s go over that.


First, read and follow the instructions that come with your kettle.  As with any stove or fire, serious injuries can occur, if you use the product incorrectly.


Gather tinder and kindling, but you can skip gathering wrist-sized fuel wood, since once the fire is burning in the fire base, you will only be feeding the kettle with kindling.  For more on what tinder and kindling is, and how much to gather before you light your fire, read “Fire Burns Up! ©”, HERE.


A bird’s nest in the fire base, photograph by the Author.


You build and light your fire in the Kelly Kettle® fire base, just like you would for any other fire.  When you have gathered all the tinder and kindling that you will need to light and sustain the fire, in the fire base of your Kelly Kettle®, you will need to make a “Bird’s Nest” with a circle of kindling, with some tinder in the center of it.


Tilt the fire base on its side and let the hot flames of the match or lighter rise and light the bird’s nest, photograph by the Author.


Tilt the fire base up, just like you would if you were using a piece of bark to protect your fingers and hold your bird’s nest together, so that the hot flames and gases of your match or lighter will rises into it.  Don’t forget fire burns up!


Next fill the Kelly Kettle® with water.  Never put your kettle over a fire when it is empty, I have seen earlier, aluminum models melt when heated while empty.  The newer stainless-steel models handle heat better, but it is still a bad idea to heat the kettle when it is dry.  Also, always remove the orange stopper or any other plug from the spout before you put it on the fire, to avoid serious burns.  The only exception to this rule is if your Kelly Kettle® came with a green whistle-stopper.  A couple of years ago, Kelly Kettle introduced a new green, whistle-stopper for the larger “Base Camp” and medium “Scout” model kettles, that you can leave in as the water boils and which whistles so that you know when the water is boiled.


The Author’s smoke shifter, photograph by the Author.


Something that will make it easier to light and sustain a fire in a Kelly Kettle® is a “smoke shifter”, a flexible, plastic tube with a metal end, that you can use to blow into the wind-hole of the fire base.  I made mine out of three feet (.9 meters) of 5/16 (8 mm) diameter flexible, plastic fish tank air tubing and a piece of an old metal wind chime.  I keep it coiled up in the fire base, when it is not in use.


The Author demonstrating how to use a smoke shifter, photograph by the Author.


Once you have the fire going in the Kelly Kettle® and the flames are rocketing out of the chimney, voilĂ , you will have boiled water in just a few minutes.  Follow the instructions from your Kelly Kettle® when removing it from the firebase so that you don’t get burned.
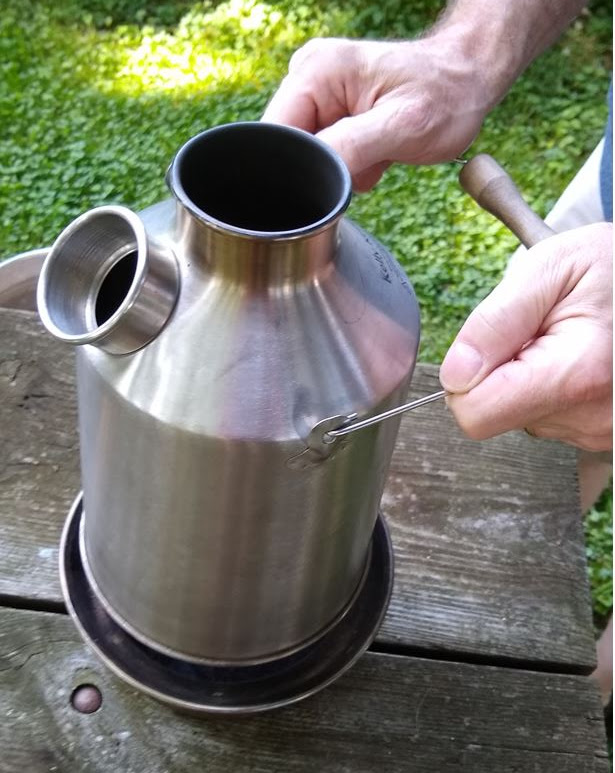
 

Always remove the kettle from the fire base this way and DO NOT put your hands over the chimney!  Picture by the Author.


You can find a lot more information and how-to videos on Kelly Kettles® on the Kelly Kettle UK website, HERE, and the Kelly Kettle USA website, HERE.


Don’t forget to come back next week and read “Pandemic Masks...1918 Style©”, where we will talk about how to make pandemic masks the way Grandma did during the Spanish Influenza pandemic, of 1918.


Originally published in "Illustrated Current News", New Haven, CT. Volume 1, no. 785, 1918, by Paul Thompson.


I hope that you continue to enjoy The Woodsman’s Journal Online and look for me on YouTube at Bandanaman Productions for other related videos, HERE.  Don’t forget to follow me on both The Woodsman’s Journal Online, HERE, and subscribe to BandanaMan Productions on YouTube.  If you have questions, as always, feel free to leave a comment on either site.  I announce new articles on Facebook at Eric Reynolds, on Instagram at bandanamanaproductions, and on VK at Eric Reynolds, so watch for me.


That is all for now, and as always, until next time, Happy Trails!


Notes


1 The average thermal efficiency for campfires is 14%, but it can be as low as 5% if it is poorly tended, if there is wind or if the wood is moist, and it can be as high as 20-30% if it is protected from the wind and tended with care.  The skill of the person tending the fire and the weather conditions are responsible for how efficient the fire is.  A tip to increase the efficiency of a three-stone fire is to push the sticks of wood further into the center of the fire as they burn, this allows the wood to dry out as it is approaching the flames and when this is done the fire can burn hotter and more efficiently.


Just to compare, the thermal efficiency of a metal can rocket stoves have an efficiency of between 23% and 54% (although most sources state that the average efficiency is 20%), natural gas cooking stoves have an efficiency of 23%, microwave ovens have an efficiency of 19% and electric stove tops only have an efficiency of only 13%!


From

“Improving the three-stone fire”, by C. Ballard-Tremeer and H. H. Jawurek

“Well-Tended Fires Outperform Modern Cooking Stoves”, by Low-Tech Magazine


2 From personal communications with representatives of Kelly Kettle USA and Kelly Kettle UK.


Sources


Ballard-Tremeer, C. and Jawurek, H. H.; “Improving the three-stone fire”, Boiling Point No. 36, November 1995 (ITDG, 1995, page 35), http://www.nzdl.org/cgi-bin/library.cgi?e=d-00000-00---off-0fnl2%2E2--00-0----0-10-0---0---0direct-10---4-------0-1l--11-en-50---20-about---00-0-1-00-0-0-11-1-0utfZz-8-00&cl=CL2.7.3&d=HASHb8c186878d47dbd7754211.7.3&gt=1, accessed August 9, 2021


“Well-Tended Fires Outperform Modern Cooking Stoves”, Low-Tech Magazine, https://www.lowtechmagazine.com/2014/06/thermal-efficiency-cooking-stoves.html, accessed August 9, 2021


Sunday, August 8, 2021

Fire Burns Up! ©


From Wikimedia, “Fire triangle.svg”, by Gustavb, March 7, 2006, HERE.


Whenever I teach people how to build a fire, besides confusing kindling for tinder and not gathering enough wood, the one thing that everyone gets wrong when lighting a fire, is they forget that fire burns up! 


A Kelly Kettle® fire-base filled with kindling, you can’t light this by dropping a match on it.  Photograph by the Author.


This happened again recently, I sat and watched, while some scouts who were going canoeing with me through the Adirondacks, tried to start a fire in the fire-base of a Kelly Kettle® and they made exactly this mistake.  They made a pile of pencil-sized kindling sticks, without adding any tinder, and then dropped a match onto the top of the pile and wondered why the fire wouldn’t light.


So, let’s go over the basics of lighting a fire!


Gather Tinder, Kindling and Wood...


An excerpt from Combat and Survival Volume 4, page 227.


Most people don’t know the difference between tinder, kindling and fuel wood.  Tinder isn’t kindling and kindling isn’t fuel wood. 


In a nutshell, tinder catches the sparks from your flint and steel or flame from your match and ignites your kindling, kindling takes up the glowing embers of your tinder and turns it into flames to light your fuel wood on fire. 


To get a fire going quickly and easily, you need to have the right amounts of all three on hand before you light that first match.  Oh, and your tinder and the kindling must be bone dry.


The biggest difference between tinder, kindling and fuel wood is size.  An excerpt of “How To Build A Campfire”, from Scoutmastercg.com, HERE.


Remember to have plenty of fuel wood on hand, as it always burns faster than people imagine.  Craig White, a Canadian survival expert, teaches that you will burn through a generous armload of wrist sized sticks in an hour.  A good rule of thumb to remember is that just over two pounds (one kilogram) of wood is required to boil one quart (approximately a liter) of water when cooking over a campfire1.


Make a Bird’s Nest ...


A bird’s nest, photograph by the Author.


“Bird’s Nest” is a circle of kindling with tinder in the center.  Just like birds, who build a strong ring of twigs to hold soft grasses and padding to cushion their eggs, you should build a ring of kindling with tinder in the center to help your fire grow.


A ring of fine pine twigs, surrounding a tinder ball made with a ring of yellow birch bark, around toilet paper and a piece of fuzzed up jute string.  Note that I am holding it against a piece of bark, this bark will shield my fingers from the heat of the flames when I light the bird’s nest and will prevent any ground water from extinguishing the new fire.  Photograph by the Author.


Remember Fire Burns Up!


While pinching the bird’s nest against the bark shield, turn it so that the flames will light the tinder and flare up into the kindling surrounding it.  Photograph by the Author.


Don’t forget hot flames and gases rise, which means that you must turn your bird’s nest, so that the hot flame of your match or lighter rises into it


Now all you have to do is feed your fire and keep it going.  Remember to not put too much wood onto it too quickly and smother it, start with small pieces of kindling, and then gradually add wrist-sized pieces of fuel as the flames grow.


Don’t forget to come back next week and read “Kelly Kettles... The Faster Way to Boil Water!”, where we will talk about how to use a Kelly Kettle® to boil your drinking water.


For more on fire building check out these articles, “The Book of Knowledge, Camping and Camp Lore, 1957©”, HERE and “Survival Tips From Jack London, Part One©”, HERE.  Also, I hope that you enjoy the excerpts from The Woodsman’s Journal Online Field Guide, below, and I hope that they will help you build your fire.


Excerpts from The Woodsman's Journal Online Field Guide, by the Author.


I hope that you continue to enjoy The Woodsman’s Journal Online and look for me on YouTube at Bandanaman Productions for other related videos, HERE.  Don’t forget to follow me on both The Woodsman’s Journal Online, HERE, and subscribe to BandanaMan Productions on YouTube.  If you have questions, as always, feel free to leave a comment on either site.  I announce new articles on Facebook at Eric Reynolds, on Instagram at bandanamanaproductions, and on VK at Eric Reynolds, so watch for me.


That is all for now, and as always, until next time, Happy Trails!


Notes


1 From Introduction to Biomass Energy Conversions, by Sergio Capareda.  Mr. Capareda calculates that “1 kg (2.2 lbs.) of wood has several times more energy than that required to boil 1 L of water”, however since campfires are very inefficient much of that energy will be lost and thus one kilogram of wood per one liter of water is a good rule of thumb.


Sources


Capareda, Sergio; Introduction to Biomass Energy Conversions, [CRC Press, Taylor and Francis Group, Boca Raton, Florida, 2014], p. 69, https://books.google.com/books?id=eFLOBQAAQBAJ&pg=PA69&lpg=PA69&dq=how+many+kilograms+of+wood+does+it+take+to+boil+1+liter+of+water&source=bl&ots=3DEm8Rl7ad&sig=ACfU3U034BzjsPtB1B0Hp1hhn--ZzGft5w&hl=en&sa=X&ved=2ahUKEwj4ioeAoZ_yAhVtKVkFHQPOB-sQ6AF6BAgaEAM#v=onepage&q=how%20many%20kilograms%20of%20wood%20does%20it%20take%20to%20boil%201%20liter%20of%20water&f=false, accessed August 7, 2021


Combat and Survival Volume 4, [H. S. Stuttman, Inc., Westover, Connecticut, 1991], p 227


Green, Clarke; “How to Build a Campfire”, November 7, 2012, [Dynamik-Gen, 2019] https://scoutmastercg.com/how-to-build-a-campfire/


Wikimedia, “Fire triangle.svg”, by Gustavb, March 7, 2006, https://en.wikipedia.org/wiki/Fire_triangle#/media/File:Fire_triangle.svg, accessed August 1, 2021


Sunday, August 1, 2021

Field Repairs, or What I Learned on My Canoe Trek ©


The Author’s favorite pair of canoe pants, which tore twenty minutes into my trek through the William C. Whitney Wilderness Area in the southwestern Adirondacks, after field repairs.  Photograph by the Author.


All good things die, and you know it is going to be one of those treks, when your favorite pair of canoe pants rip twenty minutes after getting onto the water on day one of your trek.  What a bummer!


Duck Tape® or Gorilla Tape® both work well.  Gorilla Tape is a heavy-duty duct tape made with double thick adhesive, and a strong reinforced backing, however Duct Tape comes in bright colors which makes it easier to find your roll of tape if it falls on the forest floor, photograph by the Author.


All of you Fifty-somethings and Gen-Xers will remember how when you were a kid and you tore through the knees of your pants, your mother would glue the edges back together with an iron-on patch?  Well, that is kind of how I fixed the rip in my pants, by making my own self-sticking patch.  Now obviously, I didn’t have an electric iron, glue on patches or electricity, so I used duct tape instead!


The field repair I made on day one of my trek, photograph by the Author.


So, I taped the rip back together with Duct Tape® brand duct tape when we stopped for lunch and went about the day.  But by dinner time the duct tape that I had used to hold the rip together when we stopped for lunch, was starting to peel up at the corners, so that evening, I made a more permanent field repair while sitting around the Kelly Kettle® in our camp on an island in the middle of Rock Pond and I broke out my handy, dandy 15-pound test, braided nylon line, which I keep in my possible kit as heavy sewing thread, and stitched the patch down.  And voila, I had a patch almost as good as the iron-on patches that Mom used to use!  This patch lasted the rest of the week without any problems. 


However, if I had to do it again, I would take the advice of Philip Werner, who when writing about using Tenacious Tape™ by Gear Aid® to repair hiking pants, stated that when he cut a piece of tape as a patch, he would round the corners to prevent it from peeling off.  He also said that he puts a piece of patching tape on both side of the pants, both the inside and the outside, to create a stronger patch and that this works particularly well for large tears or holes because the inside patch will stick to the outside patch in those places where the original fabric is missing1. 


The corners of my duct tape patch began to peel up quickly after I first stuck it to my pants during our lunch break, that is why I had to break out the thread and needle to stitch it down.  Next time I will go for the rounded corner double side patch and maybe, it won’t peeled up so quickly and require stitching to reinforce it. 


I like to keep 24 inches (60 cm) of duct tape wound around my lighters.  That way it is always with me when I need it.  Some people wrap duct tape around their water bottle, for the very same reason.  Also, a couple of inches (about 5 cm) of duct tape when crumpled into a ball and lit on fire will burn for a minute or two and help your tinder catch fire on those rainy, drippy days.  Photograph by the Author.


“So, What’s In Your Possible Kit!?”


My possible kit only weighs 8 ounces (227 grams) and here is what I keep in it.


The Author’s possible kit, enumerated, photograph by the Author.

 1)     A zippered pouch to hold all the “possibles”.

2)     A LED flashlight, a spare in addition to the one in my survival kit and first aid kit.

3)     3 spare AAA batteries for my headlamp and the flashlights in my first aid kit, survival kit and possible kit.

4)     A Swiss+Tech®, multi-tool, with needle nose pliers, a saw, a Philips head screwdriver, can opener and knife.

5)     A flat head and a Philips head screwdriver for repairing eyeglasses.

6)     An eye glass repair kit: screws, spacers, nose pads and a cleaning cloth

7)     16 feet (almost 5 meters) of 15-pound test, braided nylon line, for use as heavy sewing thread.

8)     2 feet (.6 meters) of 22 gauge (.73 mm) galvanized steel wire.  I have used wire like this in the past to reattach the sole of a water shoe to its upper.  Wire can be used for repairing just about anything.

9)     2 large eyed, heavy duty sewing needles: the smaller one is a # 17 carpet needle that is 2 inches (52 mm) long and the other one is a #14 darning needle that is 3 inches long (78 mm).  Both are stuck into a piece of heavy-duty nylon patch cloth.  The large, elongated eyes on the needles make threading them, much simpler.

10)   4 large safety pins stuck into another piece of heavy-duty nylon patch cloth.

11)   A pencil.

12)   A pencil sharpener.  This is also very useful for making fine tinder to help you get your fire started.

13)   A file to sharpen my axe with, an axe without something to sharpen it, is just an oddly shaped hammer

14)   A whetstone to sharpen my knives.

15)   A 5 foot (1.5 meter) long tape measure.  I have used this to measure and diagram an old logging blaze on a stump on the shore of Lake Louisa, Algonquin Provincial Park (for pictures of the stump and my drawing, see “The Madawaska River Loop: Whitefish, to Pen, to Harry and Louisa…And Back Again! Part One ©”, HERE)

16)   A thermometer, emergency whistle, magnifying-glass, pocket compass, all in one all-purpose tool.

17)   5 mini-zip ties.  When I reattached the sole of the water shoe to its upper, I also used some small zip ties to complete the repair.

18)   3 heavy-duty rubber bands.  These originally came wrapped around celery stalks from the grocery store, they have literally 1,001 uses.


For the full article read So, What’s in Your Possible Kit!? ©, HERE.


Don’t forget to come back next week and read “Fire Burns Up! ©”, where we will talk about the number one most common error people make when trying to light a fire.


I hope that you continue to enjoy The Woodsman’s Journal Online and look for me on YouTube at Bandanaman Productions for other related videos, HERE.  Don’t forget to follow me on both The Woodsman’s Journal Online, HERE, and subscribe to BandanaMan Productions on YouTube.  If you have questions, as always, feel free to leave a comment on either site.  I announce new articles on Facebook at Eric Reynolds, on Instagram at bandanamanaproductions, and on VK at Eric Reynolds, so watch for me.


That is all for now, and as always, until next time, Happy Trails!


Notes


1 “How to Repair Hiking Pants with Tenacious Tape”, by Philip Werner


Tenacious Tape™ by Gear Aid® can be found online at REI and Amazon and also at Walmart.  This tape is backed by an ultra-aggressive adhesive will quickly fix tents, ski pants, puffy coats, or anything else made of technical fabrics including nylon and vinyl.  No sewing skills or heat is required; simply remove the backing and apply to surface with pressure; after 24 hours it’s washable and its waterproof.  More information on Tenacious Tape™ can be found HERE.


Sources


Werner, Philip; “How to Repair Hiking Pants with Tenacious Tape”, September 24, 2015, [© Copyright 2007-2021, SectionHiker.com and Fells Press LLC], https://sectionhiker.com/how-to-repair-hiking-pants-with-tenancious-tape/, July 28, 2021