Sunday, August 1, 2021

Field Repairs, or What I Learned on My Canoe Trek ©


The Author’s favorite pair of canoe pants, which tore twenty minutes into my trek through the William C. Whitney Wilderness Area in the southwestern Adirondacks, after field repairs.  Photograph by the Author.


All good things die, and you know it is going to be one of those treks, when your favorite pair of canoe pants rip twenty minutes after getting onto the water on day one of your trek.  What a bummer!


Duck Tape® or Gorilla Tape® both work well.  Gorilla Tape is a heavy-duty duct tape made with double thick adhesive, and a strong reinforced backing, however Duct Tape comes in bright colors which makes it easier to find your roll of tape if it falls on the forest floor, photograph by the Author.


All of you Fifty-somethings and Gen-Xers will remember how when you were a kid and you tore through the knees of your pants, your mother would glue the edges back together with an iron-on patch?  Well, that is kind of how I fixed the rip in my pants, by making my own self-sticking patch.  Now obviously, I didn’t have an electric iron, glue on patches or electricity, so I used duct tape instead!


The field repair I made on day one of my trek, photograph by the Author.


So, I taped the rip back together with Duct Tape® brand duct tape when we stopped for lunch and went about the day.  But by dinner time the duct tape that I had used to hold the rip together when we stopped for lunch, was starting to peel up at the corners, so that evening, I made a more permanent field repair while sitting around the Kelly Kettle® in our camp on an island in the middle of Rock Pond and I broke out my handy, dandy 15-pound test, braided nylon line, which I keep in my possible kit as heavy sewing thread, and stitched the patch down.  And voila, I had a patch almost as good as the iron-on patches that Mom used to use!  This patch lasted the rest of the week without any problems. 


However, if I had to do it again, I would take the advice of Philip Werner, who when writing about using Tenacious Tape™ by Gear Aid® to repair hiking pants, stated that when he cut a piece of tape as a patch, he would round the corners to prevent it from peeling off.  He also said that he puts a piece of patching tape on both side of the pants, both the inside and the outside, to create a stronger patch and that this works particularly well for large tears or holes because the inside patch will stick to the outside patch in those places where the original fabric is missing1. 


The corners of my duct tape patch began to peel up quickly after I first stuck it to my pants during our lunch break, that is why I had to break out the thread and needle to stitch it down.  Next time I will go for the rounded corner double side patch and maybe, it won’t peeled up so quickly and require stitching to reinforce it. 


I like to keep 24 inches (60 cm) of duct tape wound around my lighters.  That way it is always with me when I need it.  Some people wrap duct tape around their water bottle, for the very same reason.  Also, a couple of inches (about 5 cm) of duct tape when crumpled into a ball and lit on fire will burn for a minute or two and help your tinder catch fire on those rainy, drippy days.  Photograph by the Author.


“So, What’s In Your Possible Kit!?”


My possible kit only weighs 8 ounces (227 grams) and here is what I keep in it.


The Author’s possible kit, enumerated, photograph by the Author.

 1)     A zippered pouch to hold all the “possibles”.

2)     A LED flashlight, a spare in addition to the one in my survival kit and first aid kit.

3)     3 spare AAA batteries for my headlamp and the flashlights in my first aid kit, survival kit and possible kit.

4)     A Swiss+Tech®, multi-tool, with needle nose pliers, a saw, a Philips head screwdriver, can opener and knife.

5)     A flat head and a Philips head screwdriver for repairing eyeglasses.

6)     An eye glass repair kit: screws, spacers, nose pads and a cleaning cloth

7)     16 feet (almost 5 meters) of 15-pound test, braided nylon line, for use as heavy sewing thread.

8)     2 feet (.6 meters) of 22 gauge (.73 mm) galvanized steel wire.  I have used wire like this in the past to reattach the sole of a water shoe to its upper.  Wire can be used for repairing just about anything.

9)     2 large eyed, heavy duty sewing needles: the smaller one is a # 17 carpet needle that is 2 inches (52 mm) long and the other one is a #14 darning needle that is 3 inches long (78 mm).  Both are stuck into a piece of heavy-duty nylon patch cloth.  The large, elongated eyes on the needles make threading them, much simpler.

10)   4 large safety pins stuck into another piece of heavy-duty nylon patch cloth.

11)   A pencil.

12)   A pencil sharpener.  This is also very useful for making fine tinder to help you get your fire started.

13)   A file to sharpen my axe with, an axe without something to sharpen it, is just an oddly shaped hammer

14)   A whetstone to sharpen my knives.

15)   A 5 foot (1.5 meter) long tape measure.  I have used this to measure and diagram an old logging blaze on a stump on the shore of Lake Louisa, Algonquin Provincial Park (for pictures of the stump and my drawing, see “The Madawaska River Loop: Whitefish, to Pen, to Harry and Louisa…And Back Again! Part One ©”, HERE)

16)   A thermometer, emergency whistle, magnifying-glass, pocket compass, all in one all-purpose tool.

17)   5 mini-zip ties.  When I reattached the sole of the water shoe to its upper, I also used some small zip ties to complete the repair.

18)   3 heavy-duty rubber bands.  These originally came wrapped around celery stalks from the grocery store, they have literally 1,001 uses.


For the full article read So, What’s in Your Possible Kit!? ©, HERE.


Don’t forget to come back next week and read “Fire Burns Up! ©”, where we will talk about the number one most common error people make when trying to light a fire.


I hope that you continue to enjoy The Woodsman’s Journal Online and look for me on YouTube at Bandanaman Productions for other related videos, HERE.  Don’t forget to follow me on both The Woodsman’s Journal Online, HERE, and subscribe to BandanaMan Productions on YouTube.  If you have questions, as always, feel free to leave a comment on either site.  I announce new articles on Facebook at Eric Reynolds, on Instagram at bandanamanaproductions, and on VK at Eric Reynolds, so watch for me.


That is all for now, and as always, until next time, Happy Trails!


Notes


1 “How to Repair Hiking Pants with Tenacious Tape”, by Philip Werner


Tenacious Tape™ by Gear Aid® can be found online at REI and Amazon and also at Walmart.  This tape is backed by an ultra-aggressive adhesive will quickly fix tents, ski pants, puffy coats, or anything else made of technical fabrics including nylon and vinyl.  No sewing skills or heat is required; simply remove the backing and apply to surface with pressure; after 24 hours it’s washable and its waterproof.  More information on Tenacious Tape™ can be found HERE.


Sources


Werner, Philip; “How to Repair Hiking Pants with Tenacious Tape”, September 24, 2015, [© Copyright 2007-2021, SectionHiker.com and Fells Press LLC], https://sectionhiker.com/how-to-repair-hiking-pants-with-tenancious-tape/, July 28, 2021


Sunday, July 25, 2021

There and Back Again...And the Trails You Take©


Sunrise on Lake Lila, William C. Whitney Wilderness Area in the southwestern Adirondacks, photograph by the Author.


Sometimes the outcome of your wilderness trek depends on the trails you take!  This sounds obvious, I know, but sometimes the trails you take can seriously affect your plans and the conditions on the ground can be very different from what you expect when you study a map.  Also, you should always have a “Plan B” ready to go and you should always be ready to cut your losses and change your plans when conditions and situations warrant it.


As an example of this, I just got back from guiding some members of the Scouts BSA, Troop 285, on a wilderness canoe trek from Little Tupper Lake to Lake Lila, traversing through the William C. Whitney Wilderness Area in the southwestern Adirondacks, and the trails we took and the conditions on the ground changed our plans and the route we ended up taking.


The area through which we travelled, photograph by the Author.


We had originally planned to travel from Little Tupper Lake to Rock Pond and then on to Lake Lila and to Low’s Lake, via Clear Pond and Bog Lake, before portaging to Big Deer Pond and the headwaters of the Oswegatchie River, coming off the water at the Oswegatchie River inlet to Cranberry Lake.  We knew that the second day of our trek, when we planned to travel from Rock Pond to Lake Lila would be a long and hard day, but what we didn’t plan on was “unimproved” portages!


But unfortunately, the portages from Rock Pond to Hardigan Pond, from Hardigan Pond to the Salmon Lake Outlet and from Little Salmon Lake to Lilypad Pond were “unimproved” and for our nine-member trek crew almost impassable.  And it looked like the portage between Lilypad Pond and Single Shanty Brook was going to be just as bad or maybe even worse than the others!


The beginning of the “unimproved” 2.2 mile (3.5 km) long portage to Hardigan Pond, photograph by the Author.


The Trails You Take ... “Improved” versus “Unimproved”


The best way to describe these portages is as “unimproved”, but what does that mean?  Unlike the well-travelled or “improved” path between Little Tupper Lake and Rock Pond, the portages between Rock Pond and Lake Lila apparently don’t see many travelers.  At various points on these portages, the path was a stream, a bog, a washed-out ravine, was covered with fallen trees, or was an overgrown thicket.  Now, to be fair, the maps of the area were excellent and the portages themselves were marked with round yellow markers nailed to trees along the trail, orange tape tied onto branches and markers at the landings.


An example of one of the trail markers nailed to a tree, a tree which a bear had decided to use as a scratching post.  This photograph was taken on the portage between Hardigan Pond and the Salmon Lake Outlet by the Author.


It wasn’t that the portages were bad necessarily, it was that the level of wilderness experience of our group, the age of the members and the heavy weight of the equipment which we were carrying which made these portages difficult for us.  Now, we were looking for the “full wilderness experience”, and that is exactly what we got.  The problem with this “full wilderness experience” was that seven of the eight people I was leading, were new to wilderness canoeing and trekking and when these seven people reached the portage to Hardigan Pond, they were only on their second portage of their lives.  And not only were they new to the wilderness, but worse yet more than half of them were 14 years old or younger!


Crossing the Rock Pond portage, carrying the heavier 72 pounds, 33 kilograms, canoe.  This was a well-travelled, “improved” portage.  Photograph by the Author.


Compounding this problem, when you are leading people who are relatively new to canoeing and trekking in the wilderness, the canoes you use, have to be virtually indestructible, which means heavy, and in this case the lightest weighed more than 60 pounds or 27 kilograms, and the heaviest was 72 pounds or 33 kilograms.  Carrying this type of canoe over an “improved” portage with a clear path, without fallen trees, bogs and wash outs is difficult enough, depending upon the incline, roots, and rocks.  Carrying these same canoes over an “unimproved” portage, which at different points is a bog, a stream, the top of a beaver dam, pushing through thickets and over fallen trees, is much more difficult!


Sunrise over Rock Pond, at the beginning of day two of our travels, through the William C. Whitney Wilderness Area, photograph by the Author.


When we planned this trek, I originally had estimated, based on my previous experience in Algonquin Provincial Park, that the 2.2 mile (3.5 km) long portage to Hardigan Pond would take us just over two hours, -- it actually took us over four hours because of the condition of the path and the difficulty of shifting canoes and gear across the portage.  I also had originally estimated that the next two portages, which were both about half a mile or 800 meters long, should take about half an hour each -- they actually took well over an hour each, due to the conditions of the portages. 


The additional time that it took to cross these portages, put us seriously behind schedule by the time we reached the portage from Lilypad Pond to Single Shanty Brook.  Because of the lateness of the day, a developing thunderstorm and the awful beginning of the portage from Lilypad Pond to Single Shanty Brook, in which you had to cross 50 feet or 15 meters of hanging bog and three trees, which had fallen down on top of each other to make a three-foot or 1 meter high wall across the beginning of solid ground, we decided to stop there for the night and camp near the portage path and not try to make it to Lake Lila until our third day.


Camping along the portage is an example of cutting your losses and making a new plan on the fly.  Nobody really wanted to camp alongside the portage path, but we had to get off the water because of an incoming thunderstorm and because, since it was 7:30 pm and there was at best only two hours of daylight left, there just wasn’t enough time remaining in the day to make it to Lake Lila.  At that point in our travels, we had no choice but to setup camp then and there, whether we liked the location or not.  Also, it is always a good rule to stop and setup camp, while there is still at least two hours of daylight remaining (for more on this read “Estimating The Time Till Sunset ©”, HERE).  While we were setting up camp along the portage path, I reviewed our options and the chances of successfully completing our original travel plan and decided we needed to move to “Plan B”. 


With “Plan B” we would have to change our planned pickup site from the Oswegatchie River inlet into Cranberry Lake, to an exit from the Lake Lila access road instead.  Lake Lila was the last pickup point on our trek before we reached the Oswegatchie River inlet pickup site and was therefore the only “Plan B” option available.  We needed to move to “Plan B” because I knew that we wouldn’t be able to make up the time we had lost on the second day of the trek, without canoeing harder and longer than anyone would have wanted to.  At this point a forced march was the only way to get us back onto schedule and since this trip was supposed to be fun for everyone and not a forced march, we had to go for “Plan B”.


Lake Lila, a beautiful lake that everyone enjoyed exploring, photograph by the Author.


The good news is that because we switched to “Plan B” and didn’t push everyone to complete the original plan, everyone had a good time and enjoyed the remainder of their trek, which included canoeing the entire circumference of Lake Lila and exploring part of the Beaver River.


The beginning of the portage from Little Tupper Lake to Rock Pond, photograph by the Author.


If I was to follow these trails again, now that I have firsthand knowledge of the ground conditions, I would travel with a more experienced crew and with lighter canoes and gear, that way these “unimproved” portages wouldn’t get the better of us.  And again, I would make sure that we had a good “Plan B” and knew to cut our losses and change our plans when the conditions warranted it!


Sunrise on Lake Lila, photograph by the Author.


Don’t forget to come back next week and read “Field Repairs, or What I Learned on My Canoe Trek ©”, where we will talk about what’s in your repair kit and how to repair your gear.


I hope that you continue to enjoy The Woodsman’s Journal Online and look for me on YouTube at Bandanaman Productions for other related videos, HERE.  Don’t forget to follow me on both The Woodsman’s Journal Online, HERE, and subscribe to BandanaMan Productions on YouTube.  If you have questions, as always, feel free to leave a comment on either site.  I announce new articles on Facebook at Eric Reynolds, on Instagram at bandanamanaproductions, and on VK at Eric Reynolds, so watch for me.


That is all for now, and as always, until next time, Happy Trails!


Sunday, July 18, 2021

Could You Survive? What to Put Survival Equipment In ©


Metal band aid boxers from the 1980’s, photograph by the Author.


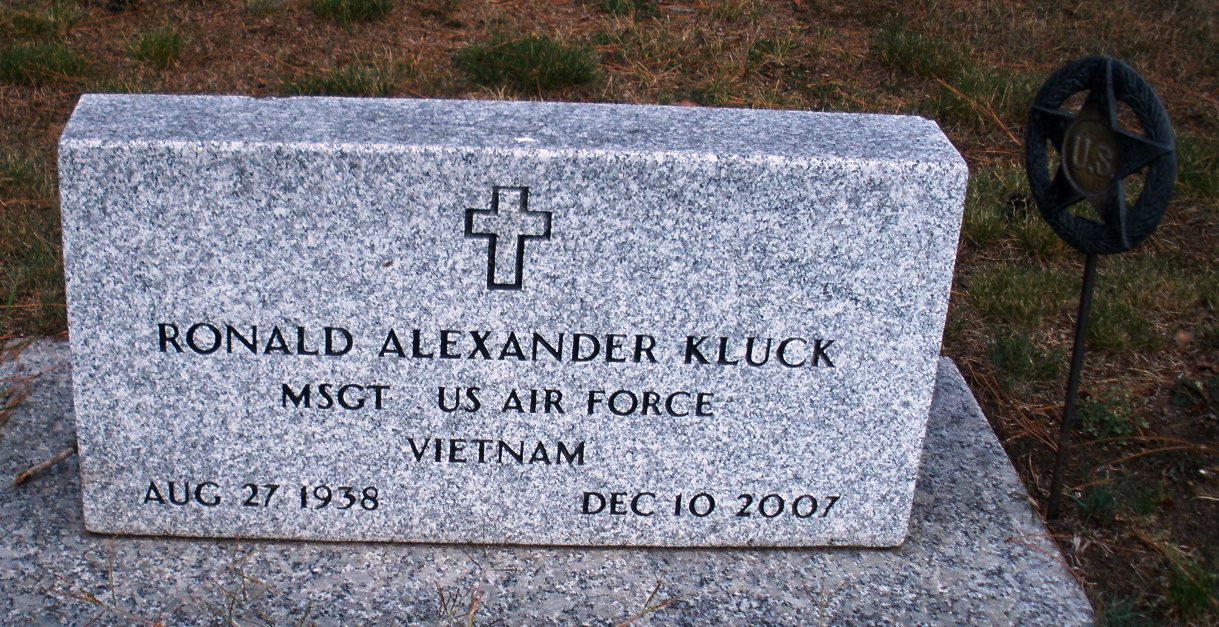
In the 1970’s and 80’s metal Band-Aid® boxes were often used to hold survival kit supplies, but what did the Master Sergeant Ronald Kluck1, an Air Force survival expert, think was the best container to hold survival items?


Could You Survive?  What would you pick?


An excerpt from the “Could You Survive” survival quiz, published in the Spokane Daily Chronicle, on February 21, 1978, by Master Sergeant Ronald Kluck, found HERE.


Various pocket-sized containers, both plastic and metal, that you could use to contain your survival gear, photograph by the Author.


So, where did you put your survival gear, did you choose A) a plastic bag, B) in different pockets, C) one or two metal containers or D) plastic boxes?  Do you think that you got the right answer?  Let’s find out what the Air Force survival experts thought.


Could You Survive?  What the survival expert picked.


An excerpt from the “Could You Survive” survival quiz, published in the Spokane Daily Chronicle, on February 21, 1978, by Master Sergeant Ronald Kluck, found HERE.


Plastic soap containers, which were Master Sgt. Ronald Kluck’s first choice to contain his survival gear.  Photograph by the Author.


Personally, I use two Altoid tins to contain my survival gear, one for wire, needles, and fishing gear and one for fire starting and first aid supplies.  I like these tins, because they fit easily in my pockets and because, since I like the way Altoids taste, I have a box full of empty tins.  Master Sgt. Kluck’s argument that the tins could become dented to the point that you can’t open them makes some sense, although I have never personally experienced this problem.  And I agree whole heartedly that plastic bags wear-out and will eventually have pin holes or rips which could allow your survival gear to become water damaged. 


In the long run, no matter what you put your survival gear in, a plastic bag, a metal or plastic tin, or even loose in your pockets; if you never leave home without, you are far, far ahead of the average person who wanders in the wilderness!


Don’t forget to come back next week and read “There and Back Again...Little Tupper Lake to Lake Lila©”, where we will talk about canoe trekking in the Adirondack Wilderness.


I hope that you continue to enjoy The Woodsman’s Journal Online and look for me on YouTube at Bandanaman Productions for other related videos, HERE.  Don’t forget to follow me on both The Woodsman’s Journal Online, HERE, and subscribe to BandanaMan Productions on YouTube.  If you have questions, as always, feel free to leave a comment on either site.  I announce new articles on Facebook at Eric Reynolds, on Instagram at bandanamanaproductions, and on VK at Eric Reynolds, so watch for me.


That is all for now, and as always, until next time, Happy Trails!


Notes


1 As far as I can tell, Richard Kluck was born August 27, 1938, in Milwaukee Wisconsin.  He entered the U.S. Air Force on October 9, 1957, retiring as a master sergeant on April 30, 1978.  He died on December 10, 2007, at the age of 69.


From https://www.findagrave.com/memorial/27512844/ronald-alexander-kluck and https://images.findagrave.com/photos/2013/357/27512844_138795058642.jpg, both accessed December 26, 2020.


Sources


Kluck, Ronald; “Could You Survive?”, Spokane Daily Chronicle, February 21, 1978, https://books.google.com/books?id=7_pLAAAAIBAJ&pg=PA11&dq=%22spokane+daily+chronicle%22+%22could+you+survive%22&article_id=6772,1159515&hl=en&sa=X&ved=2ahUKEwiu38XJ9oHxAhXGZc0KHZd-DswQ6AEwBHoECAgQAg#v=onepage&q=%22spokane%20daily%20chronicle%22%20%22could%20you%20survive%22&f=false, accessed June 5, 2021


Sunday, July 11, 2021

Could You Survive? Hiking in the Desert, Sun blindness or Dehydration? ©


Photograph by the Author.


Could You Survive?  Survival quiz questions...


An excerpt from the “Could You Survive” survival quiz, published in the Spokane Daily Chronicle, on August 9, 1977, found HERE.


So, what answer did you choose?  Was it A, B, C or D?  Do you think that you got the right answer?  Let’s find out what the Air Force survival experts thought.


Could You Survive?  Survival quiz answers...


The Author’s UV rated wraparound sunglasses, with retaining strap, photograph by the Author.


An excerpt from the “Could You Survive” survival quiz, published in the Spokane Daily Chronicle, on August 9, 1977, found HERE.


Photokeratitis, or sun blindness, is caused by the Sun’s UV rays burning the corneas of your eyes.  It can be very painful, and it doesn’t just happen in the desert!  It is most commonly experienced when crossing snowfields, particularly when at high altitudes, and less commonly when on the water or surrounded by sand.  So, be prepared and always have a pair of UV rated, wrap-around sunglasses, with retaining straps.  In the case of an emergency, remember you can blacken your cheekbones and your face below your eyes with Chapstick© or Vaseline® mixed with charcoal to reduce glare and the UV rays reflecting into your eyes.  You could also tie a bandanna or piece of cloth, with eye slits cut into it, over your eyes, when possible, choose a dark colored bandana or piece of cloth.  You could even fold a piece of duct tape back over itself and cut eye slits into to make an Inuit style snow goggles.


An Inuit wearing snow goggles, from Wikimedia, by Julian Idrobo from Winnipeg, Canada, HERE.


Don’t forget to come back next week and read “Could You Survive?  What to Put Survival Equipment In ©”, where we will find out what type of container the Air Force recommends using to build a survival kit.


I hope that you continue to enjoy The Woodsman’s Journal Online and look for me on YouTube at Bandanaman Productions for other related videos, HERE.  Don’t forget to follow me on both The Woodsman’s Journal Online, HERE, and subscribe to BandanaMan Productions on YouTube.  If you have questions, as always, feel free to leave a comment on either site.  I announce new articles on Facebook at Eric Reynolds, on Instagram at bandanamanaproductions, and on VK at Eric Reynolds, so watch for me.


That is all for now, and as always, until next time, Happy Trails!


Sources


Air Force Survival School, at Fairchild Air Force Base; “Could You Survive”, Spokane Daily Chronicle Aug 9, 1977, https://books.google.com/books?id=OftLAAAAIBAJ&pg=PA12&dq=%22spokane+daily+chronicle%22+%22could+you+survive%22&article_id=6755,2068006&hl=en&sa=X&ved=2ahUKEwiu38XJ9oHxAhXGZc0KHZd-DswQ6AEwBXoECAkQAg#v=onepage&q=%22spokane%20daily%20chronicle%22%20%22could%20you%20survive%22&f=false, accessed June 20, 2021


Wikimedia, “An Inuit wearing snow goggles”, by Julian Idrobo, https://commons.wikimedia.org/wiki/File:Inuit_snow_goggles.jpg, accessed July 6, 2021